Wednesday, 12 October 2011

RASBERRY SHORTBREAD BARS

Everyone loves these raspberry bars, they have an ultra-buttery shortbread crust topped with cooked raspberries and a streusel topping.They are very sweet, buttery, tender AND they cut nicely...perfect for gift giving (these will definitely be in my cookie gift boxes this Christmas). Yes, you heard me correctly...it is never too early to start planning your holiday baking!!.

Raspberries grow well in Alaska, so if you are lucky enough to have some in the freezer, this is a wonderful recipe for them; I'm not so lucky, so I used a 12 ounce bag of frozen raspberries.

Put the berries (no need to thaw) in a heavy saucepan with ¼ cup of water and one cup of white sugar. Bring to a boil over high heat, then reduce the heat to medium high and simmer the berries until they thick (I turned mine down to a medium low heat and simmered them for about 15 minutes). Set aside to cool (they will thicken even more as they cool).
SHORTBREAD CRUST
21 tablespoons of butter, melted and cooled to room temp.
This seems like a lot of butter, but it makes an upper and lower crust
¾ cup of white sugar
2 large egg yolks
3 cups + 3 tablespoons all purpose flour
No need to use an electric mixer, I did it all with a wooden spoon. Mix the sugar into the melted butter and whisk in the egg yolks. Stir in the flour to make a very stiff dough. Remove two cups of this dough and pat evenly into a foil lined 9 x 13 pan. Prick the dough all over with a fork and refrigerate for 30 minutes (or put in freezer for 7 minutes). Set the rest of the dough aside.

Bake the 9 x 13 chilled pan of dough, on the middle rack of your oven, for 20 minutes at 325.
After 20 minutes, the dough will still be very pale in color and will not have any golden color on the edges. Remove it from the oven and spread the cooled raspberry filling evenly over it.

To the reserved shortbread dough that you set aside, add ¼ cup of granulated sugar and use a fork to break up the dough into crumbs (I use my pastry cutter).
Sprinkle the crumbs evenly over the raspberry layer. Bake on the TOP rack of a 350 oven for 25 minutes (mine took 32 minutes). Watch the crumbles towards the end of the baking time so they don't get dark. 

Cool baked bars on a wire rack for at least an hour or until completely firm. You can speed set them in the fridge. When the bottom of the pan is completely cool, lift the bars out of the pan by pulling on the flap ends of the foil. Cut into 2" bars. These will keep at room temperature for a week.

 NOTE: The butter measurement of 21 tablespoons is not a typing error
NOTE: Line  your 9" x 13" baking pan with foil and leave the ends of the foil a little long, so you can use them as handles to lift the cooled bars out of the pan. You don't have to grease the bottom of the pan because there's so much butter in the shortbread, but DO spray the sides of the pan/foil with cooking spray so the jam doesn't stick to the sides.

NOTE:
Pay attention to baking temperatures. The first crust pre-bake is on the middle rack at 325. The final bake is on the TOP rack at 350. The recipe says it is baked on the top rack so that the bottom of the crust doesn't get too dark.


NOTE: If you want to take a shortcut, I am fairly certain you can just use raspberry jam instead of cooking the berries. I have not tried it this way, but I don't know why it wouldn't work (although I'm fairly certain that the cooked berries taste "brighter".

Thursday, 6 October 2011

MAPLE PEANUT BUTTER FUDGE (MICROWAVE)

I found this recipe on one of my favorite recipe pages: The Domestic Mama and; The Village Cook. I have found some great recipes over there, and I highly recommend their recipe blog.

This quick and easy microwave fudge is totally addicting. I made it the other day and our company went nuts for it (I have to admit that Picky-Picky Hubby and I ate our share as well). The unlikely maple-peanut butter combo is fantastic; not quite peanut butter, not quite maple, hint of butterscotch maybe?


8 ounces salted butter
1 cup creamy peanut butter
1 pound of powdered sugar
1/4 teaspoon salt
1 1/2 teaspoons maple extract
1 teaspoon vanilla extract

Line an 8" x 8" buttered pan with parchment paper so that the parchment overhangs enough to fold over, once the pan is filled (I didn't butter the pan).

Place the butter and peanut butter in a large (microwave safe) bowl; cover with plastic wrap. Microwave on high for 2 minutes (cut the butter into cubes and mix it into the peanut butter so that it all melts evenly).

Remove the bowl from the microwave (carefully, it is hot), and stir. Re-cover and microwave for (an additional) 2 minutes. Remove from microwave (careful, it is really hot) (watch for hot steam when you remove plastic).

Add the extracts and powdered sugar and stir with wooden spoon (I used my stand mixer). Press into prepared pan and press down until flat and compact. Cover the top of the fudge with extra parchment paper. Place in fridge for 2 to 4 hours.  Bring to room temperature before you try to slice this fudge. I didn't butter the pan, so I had to run a thin knife around the edges before I lifted the fudge out of the pan by using the parchment paper "handles".

Store in air tight container at room temperature. I didn't put mine in an air tight container, I just left it in a bowl with loose fitting lid.

NOTE: If the fudge seems "crumbly" while it is still hot, don't worry about it. Just press it tightly into the prepared pan and when it chills, it will look just like the photo. Eight ounces of butter seems like a lot, but I can guarantee you the fudge does NOT taste greasy at all, it is excellent.

Saturday, 1 October 2011

APPLE CAKE with CARAMEL SAUCE

My Facebook friends are "torturing" me with tales of inexpensive produce this time of year...bushels of tomatoes equaling 14 quarts of fresh salsa...bushels of apples and peaches (I am so envious). The other day (here in Alaska) I paid $2.29 a pound for apples!! Whew!!!

I found this recipe for apple cake on Recipe Shoebox, it is the ultimate as far as flavor and moistness. It is one of those gem-recipes that is even more moist on the second day. Served alone it is sensational, but served slightly warm with ice cream, it is ridiculously delicious.


5 large Granny Smith apples
½ cup butter (room temperature)
2 cups granulated sugar
2 eggs
1 teaspoon vanilla extract
2 cups all purpose flour
1½ teaspoons ground cinnamon
½ teaspoon ground nutmeg
½ teaspoon salt
1 teaspoon baking soda

Peel, core and dice the apples (about pea size...I use the food processor), set aside. With an electric mixer, cream the butter and sugar until light and fluffy.  Add eggs, one at a time, beating well after each egg; beat in vanilla.

Add flour, spices, salt and baking soda to the butter mixture. The batter will be very thick (almost like a cookie batter). Stir in the apples (the moisture from the apples will loosen up the batter).

Spread the batter into a greased 9" x 13" baking dish (I like to use glass) and bake at 350 for 40 to 45 minutes or until the top is golden brown and springs back when lightly touched (my electric oven takes 45 minutes).

Lara's original recipe just said to serve the sauce (recipe below) with the cake, however, I decided to do it a little differently: I removed the cake from oven and let it cool for 15 minutes, then I poked small holes, about every 2", over the entire cake  (make sure the holes go deep enough to touch the bottom of the cake pan). NOTE: I used my skinniest meat thermometer to make the small holes.  Pour the hot caramel topping over the surface of the cake (it will disappear down into the holes).

EASY CARAMEL TOPPING (Lara called it butterscotch, but it is more of a caramel taste).
In a sauce pan with a heavy bottom, mix ¼ cup butter and ½ cup brown sugar. Cook over medium heat until the butter is melted completely. Slowly add ½ cup heavy cream (careful it will splatter at first) whisking while you add it.  Bring this mixture to a LOW boil.  Boil and stir for 3 minutes. Pour hot topping over warm cake. Let cake cool before serving.

Tuesday, 27 September 2011

BEST APPLE PIE EVER !!!

I've made a zillion apple pies in my life that I thought were pretty good. However, the following recipe is new to me, and I have to tell you it is the absolute BEST apple pie I've EVER tasted.
Sorry about this photo, I cut the pie when it was still too hot

When I served this pie to Picky-Picky husband and guests, no one spoke. All I heard were forks clicking on the plates, and the muffled sounds of "oooohhhh man!!"  and "Mmmmmmm"  (a good sign). The first servings of pie were followed quickly by second servings and comments like "wow, that's good".  I totally agree!!!
Double 9" pie crust
6 large Granny Smith apples
½ cup butter
3 tablespoons flour
1 tablespoon corn starch
¾ cup brown sugar
¾ cup granulated sugar
1 teaspoon ground cinnamon
¼ teaspoon ground nutmeg
1 tablespoon vanilla extract + enough water to = ¼ cup

Peel and thinly slice the apples. Place them in the bottom half of the pie crust. NOTE: It is important that you use a DEEP dish pie plate or you will get spill over.

In a heavy bottomed sauce pan, melt the butter. Add the flour and corn starch and stir until smooth.  Measure 1 tablespoon of vanilla extract into a quarter cup measure, and then fill the rest up with water (total liquid ¼ cup). Add the liquid, brown sugar, granulated sugar, cinnamon and nutmeg to the melted butter. Bring to a low boil (actually not a boil...just let it start to boil around the edges of the pan for about 30 seconds.

Take off the heat and pour over the apples.  Put on the top crust. Pinch the edges shut and cut some vent holes in the top crust.  Brush the top pie crust with beaten egg whites and sprinkle with granulated sugar.

Place pie on a baking sheet (in case it spills over), and bake in PREHEATED 400 degree oven for 1 hour or until apples are tender. Let cool until you can hold your hand (comfortably) on the bottom of the pie plate before cutting.

The pie tastes almost like a mellow caramel apple, it is beyond good!!

Friday, 23 September 2011

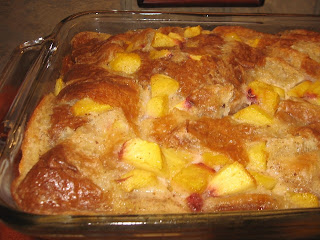
CROISSANT PEACH BREAD PUDDING and BUTTER RUM SAUCE

OK, this dessert is SERIOUSLY delicious and definitely not for the calorie shy. It makes a nice big bread pudding and yet it lasted only one evening (thank goodness we had company). It is a creamy, custard-y (but not heavy) bread pudding made with croissants and fresh peaches.  As if that weren't good enough, it is topped with the most delicious butter rum sauce you can imagine.
4  large (day old) croissants
3 large (ripe) peaches, peeled and diced
(1) 14 ounce can sweetened condensed milk (not evaporated)
3 large whole eggs + 3 egg yolks (well beaten)
1¼ cups hot milk
¼ cup butter melted
1 teaspoon ground cinnamon
1 teaspoon vanilla extract

Whisk everything together except the croissants and peaches. Once mixed well, stir in the peaches. Tear the croissants into 1" pieces and add them to the mixture (stir ever so gently, just to moisten...be careful you don't turn the croissants into "mush").

Pour the mixture into a greased 8" x 11" baking dish. Bake in a preheated 325 oven for 50 to 60 minutes (my oven took 55 minutes). A knife inserted in the center of the bread pudding will come out clean when the bread pudding is done. Let bead pudding cool for about half hour before serving (or serve it chilled). Top with warm butter rum sauce. Refrigerate any leftovers.


BUTTER RUM SAUCE

½ cup brown sugar
½ cup butter
2 tablespoons light corn syrup
1 tablespoon rum (I use 1 teaspoon rum extract)

While bread pudding is baking, Mix the brown sugar, butter and corn syrup in a heavy bottomed sauce pan and bring to a boil. Immediately turn heat down so that the sauce just simmers around the edges and simmer for 1 or 2 minutes (mine was done in 1 minute) or until it is just slightly thickened. Remove from heat and mix in the rum (or rum extract). Let the sauce cool a little before you use it.
 
NOTE: As the butter rum sauce cools to room temperature (which takes quite a while), the butter may separate from the sauce. If it does, just heat it up a little and whisk it again (it will go back together).

Monday, 19 September 2011

CRUSTLESS CRANBERRY-WALNUT PIE


This is a very old (and wonderful) recipe. It is called a pie, although I would say it is a cross between a pie and a cake...(a little more like pie than cake, if that makes sense). It goes together in just a couple of minutes with a bowl and spoon. I serve it while still warm with a scoop of vanilla ice cream and company gobbles it up....it is the perfect balance of flavors, not too sweet and not too tart. Our son is NOT a cranberry fan, but he loves this dessert.

1 cup all purpose flour
1 cup granulated sugar
¼ teaspoon table salt
2 cups fresh cranberries (I use frozen)
½ cup chopped walnuts
½ cup butter, melted
2 large eggs
1 teaspoon almond extract (don't leave out)
1 teaspoon vanilla extract
½ teaspoon ground cinnamon

 
Preheat your oven to 350 and spray a 9" pie plate with vegetable spray, set aside.

In a large bowl, mix the flour, sugar and salt. Add the walnuts and gently toss to coat the fruit and nuts (this will keep them from sinking in the batter as it bakes).

Whisk the eggs, melted butter, cinnamon, almond extract and vanilla extract together until smooth. Pour over the dry ingredients and mix with a spoon. NOTE: The batter is almost as thick as cookie dough, so I use my hands to mix gently.

Spread into prepared pie plate and bake at 350 for 40 to 50 minutes, or until a toothpick inserted in the center comes out clean. NOTE: I used frozen cranberries (no need to thaw), so it took about 48 minutes to bake in my oven. It slices beautifully like a pie.


Monday, 12 September 2011

CLASSIC APPLESAUCE CUPCAKES

I have been making these cupcakes for my kids since they were little. They all have teenagers of their own now, so, lets just say the recipe has been in our family a while. It is a simple, one bowl recipe, that produces a moist and flavorful cupcake in short order.

NOTE: Baking times for using this recipe in a 9" x 13" pan, a 9" square pan, or (2) 8" or 9" layers and cupcakes are at the bottom of this post.

2½ cups all purpose flour
2 cups sugar
1½ teaspoons baking soda
¼ teaspoon baking powder
1½ teaspoons salt
¾ teaspoon ground cinnamon
½ teaspoon ground cloves
½ teaspoon allspice
1½ cups applesauce
½ cup water (I use apple juice)
½ cup shortening (I use butter flavored)
2 eggs
1 cup raisins (I use golden)
½ cup chopped walnuts

Beat all ingredients (except raisins and nuts) in a large bowl with an electric mixer (on low) for 30 seconds, scraping sides of bowl. Then beat on high for 3 minutes. Stir in raisins and nuts and pour into greased and floured pans. It is just that quick and easy!!

NOTE: If you want to make half of this recipe (my mother used to call them "snack cakes"), just cut the recipe in half and bake it in a 9" square pan.

BAKING TIMES
9" x 13" pan = bake for 60 to 65 minutes
(2) 8" or 9" layers  = bake for 50 to 55 minutes
9" x 9" snack cake = 50 to 55 minutes
cupcakes = 20 minutes  (makes 3 dozen)

A toothpick, inserted in baked cake should come out clean when the cakes are done.