Monday 28 February 2011

SWEET & SOUR PORK RECIPE

There are three reasons to try this great recipe. First, this recipe is made in the slow cooker, so it's super easy. Secondly, this recipe is very cheap to make and thirdly, it gets rave reviews whenever I make it. What more can you ask for?

 
.
You should know that I am not a big sweet and sour fan, but I love this recipe. It is extremely moist and just the right amount of sweet to sour ratio.

 Walmart sells a small vacuum packed 2 pound pork roast that is perfect for this recipe. The package says "pork loin rib eye pork roast" and even here in Alaska, it's only $4.50!!
.
2-3 pound lean pork roast
1 cup granulated sugar (seems like a lot, but it mellows out)
½ cup white vinegar
4 tablespoons soy sauce
4 tablespoons ketchup
20 ounce can crushed pineapple (drained)
.
Brown the pork roast on all sides and put it in your slow cooker. Mix everything else and bring it to a boil, then pour it over the meat.
.
Cook on low for 4-6 hours or until very tender (spoon the sauce over the meat every once in a while).
.
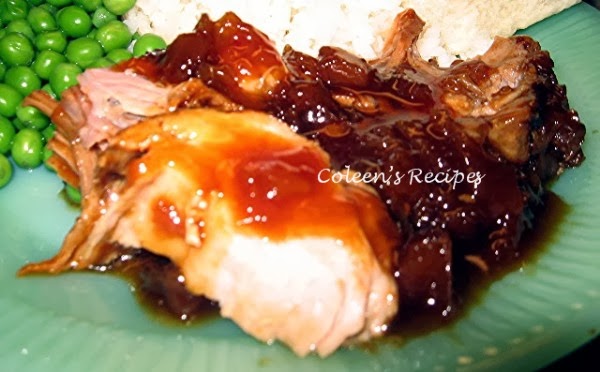
That's it...super easy!! At the very end of the cooking time, I thickened the sauce a little with a slurry of cornstarch and water (right in the crockpot). To serve, slice the meat and spoon a little of the sauce over it; it's great with rice.

Now this last suggestion is not for everyone, but my picky-picky hubby absolutely loves it. On day two, I pull this pork apart and mix it with a little of the sauce (make sure you include some pineapple out of the sauce). While its still cold, I roll it into a large burrito size tortilla (folding in all the ends) and then I brown the whole sandwich in a little butter until its piping hot. Hubby is extremely UNdemostrative when it comes to food, but he ooohhh'd and ahhhhhh'd about this sandwich until the last bite.


NOTE: Sorry about these photographs. This is one of those recipes that, no matter how hard to try to get a good photo, it just doesn't work. You'll just have to trust me that it is delicious.

Saturday 12 February 2011

MICROWAVE BROWNIE FOR ONE !!

 They say that you are not supposed to reward yourself with food...OK, I get that. But every once in a while, I crave something deeply chocolate, deeply warm, gooey and rewarding. This recipe fills that bill perfectly and since it is only a single serving, there isn't a whole pan of calories calling your name the rest of the day.
 
.
I've been looking for a single serving brownie recipe like this for a long time because Hubby doesn't like brownies. I've tested lots of contenders with little satisfaction until now. The best part of this recipe, is that it is ready to eat in less than 5 minutes. The most "dangerous" part of this recipe is that it is ready to eat in less than 5 minutes...hahaha!!
.
MICROWAVE BROWNIE FOR ONE
.
¼ cup all purpose flour
¼ cup brown sugar
1/8 teaspoon baking powder
2 tablespoons cocoa powder
3 tablespoons milk
1 tablespoon butter (room temperature)
1 tablespoons pecans (optional)
2 tablespoon chocolate chips
.
In a small microwave safe bowl, mix everything together until smooth (mixture will be very thick). Cook in the microwave.
.
Now here comes the only tricky part of the recipe. Total cooking time in the microwave is one to two minutes depending on how powerful your microwave is. My microwave is a 1000 watt machine and it takes one minute 20 seconds. You will have to watch yours carefully the first time you cook this treat, so you don't over bake it (use the toothpick test for doneness the first time). LET THE BAKED BROWNIE SIT FOR ABOUT A MINUTE.
.
NOTE: I am embarrassed to say I know this recipe by heart now. Any flavored chocolate, peanut butter, white (etc.) chips will work well.
.
NOTE: The recipe doesn't say you have to, but I bake mine in a little ramekin that I spray with cooking spray.

Wednesday 9 February 2011

GLAZED DONUTS...Live a Little!!

This is my "go to" recipe when Hubby asks for homemade donuts. I have tried many, many donut recipes over the years and this is his favorite; it is simple, delicious and it has never failed me.

 2 envelopes of dry active yeast (I use 2 scant tablespoons)
¼ cup warm water
1½ cups warm milk
½ cup white sugar
1 teaspoon salt
2 eggs (room temperature)
1/3 cup butter flavored Crisco
5 cups all purpose flour
Sprinkle the yeast over the warm water and let it stand for 5 minutes or until foamy. In a stand mixer, mix 2 cups of the flour, milk, sugar, salt, eggs, shortening, and yeast mixture until well mixed (takes just a minute on low speed).
Beat in the rest of the flour, ½ cup at a time, until the dough doesn't stick to the sides of the bowl anymore. Once it is at that stage, knead for about 5 minutes.
Place the dough in a greased (I use cooking spray) bowl, cover it with plastic wrap and sit it in a very warm part of your kitchen for an hour, or until the dough doubles in size.
Turn the dough out onto a floured surface and gently roll it out to ½" thickness. Cut with a floured donut cutter (see note below). Set cut out donuts on a square of parchment paper that you lightly sprayed with cooking spray. This will help you tremendously when it comes time to lift the donuts into the cooking oil.
Spray the tops of the donuts with a little cooking spray and cover loosely with plastic wrap for a second rising (takes about 45 minutes to an hour). Heat vegetable oil in a deep fryer (see note below) to 350 (I cooked mine at 375) and gently lower donuts into oil. Fry until they turn nice and golden then flip them.

Drained cooked donuts on a baking rack and before they cool all the way down, dip them in a simple sugar glaze (or cinnamon sugar).

SIMPLE SUGAR GLAZE
1/3 cup melted butter
2 cups powdered sugar
1 teaspoon vanilla extract
¼ teaspoon almond extract
4 tablespoons hot water


Mix everything together (starting with 3 tablespoons hot water, then adding the last tablespoon if you need it).

NOTE: My donut cutter is a small pineapple can that I've removed the top & bottom from. For the center hole, I use a small circle cookie cutter.

NOTE: I heat my oil in an electric frying pan so I can regulate the temperature (and it doesn't take as much oil as a deep fryer).

Monday 7 February 2011

EASY ENCHILADA CASSEROLE

This is a great comfort food classic that I turned into an easy, quick fix casserole. You can easily double or triple the ingredients for a big crowd. The flavors are great and it reheats extremely well.

MEAT FILLING
1 pound lean ground beef
1 teaspoon salt
1 tablespoon dry onion flakes
3 teaspoons chili powder
1 teaspoon ground cumin
½ cup water

4 oz. mild green chilies (I use Ortega brand)

Brown the ground beef and drain. Return to pan and add everything else, stir well and let this simmer for about 10 minutes, remove from heat and set aside.
 
ENCHILADA SAUCE (1) 6 ounce can tomato paste
1 teaspoon salt
1 teaspoon chili powder
1 teaspoon ground cumin
2 cups water

Mix well and simmer for about 15 minutes...set aside

ASSEMBLY

In a greased 9 x 13 pan, place TWO layers of soft corn tortillas; cover with a little of the enchilada sauce. Space large spoons of the meat filling 2" apart on top of the sauce, and sprinkle with a little cheese like this:


Top with TWO more thickness' of soft corn tortillas that have been cut into diamonds, like this:

Ladle some more sauce over the soft tortilla diamonds, then repeat with the meat and cheese. Bake in a preheated 350 oven for about 35 minutes. You can make this early in the day and then just pop it into the oven at dinner time. If you do that, add about 10 minutes to the total baking time.


Wednesday 2 February 2011

THE ULTIMATE POPOVER

I have been playing around with popover recipes for a while now, so I thought I would "get serious" and buy a popover pan. The pan makes a huge difference, not so much in the taste, but in appearance and how big the air bubbles are inside of the popover. These popovers could not be easier or cheaper to make, and they are such a treat, hot out of the oven with honey butter or strawberry jam!! If you do not have a popover pan, see note at the end of this post.

This recipe is fool proof as long as you follow it closely. Preheat your oven to 425 degrees. I put my popover pan in the oven while it preheats (do not grease before you preheat).

While your oven/pan is preheating, whisk together:
3 eggs
¼ teaspoon salt
1 teaspoon vanilla
1 cup of milk (see note)1 tablespoon melted butter

NOTE: If I have whipping cream, I put about ¼ cup of whipping cream in a measuring cup and then fill the rest of the way with 2% milk...if I have no cream on hand, I just use 1 cup of 2% milk).

After the above ingredients are whisked together well, add one cup of all purpose flour (spoon flour into measuring measuring cup and level off with straight edge). Whisk
everything together for about 30 seconds or until it looks very smooth & creamy.
Take the popover pan out of the hot oven and spray each cup with vegetable spray. Put a small chunk of chilled butter (roughly ½ teaspoon but the exact size is not crucial) into the bottom of each hot cup. Fill each cup half way full (makes six big popovers).

Bake popovers at 425 for 20 minutes. After 20 minutes, turn the oven down to 325 and bake for another 15 minutes. Remove popovers from pan and poke a tiny hole (I use a toothpick) in the bottom of each popover to relieve a little steam (not totally necessary if you are going to eat them right away).


 NOTE: If you do not have a popover pan, you can use 6 ounce (oven safe) custard cups (I used the clear Pyrex ones, for a long time, with great success). I placed them all on a cookie sheet for easier handling. The popovers will not get quite as tall (as they do with a popover pan) but they taste every bit as good.

Someone from outside the USA wrote and asked me what a popover pan was, so here is a photo. As you can see, it is almost like a cupcake pan, but the cups are a lot deeper and spaced far apart so the hot air can circulate around each cup.

Sunday 30 January 2011

HOMEMADE FRESH NOODLES

The title of this post is my "gentle protest" in the noodle vs. pasta debate. I grew up calling them noodles, but all of the cooking shows call it pasta. Is there a difference? Perhaps the word pasta makes it sound fancier? Oh well, call me old fashioned I guess.

I've been playing around with homemade noodle recipes since I got a little hand crank noodle roller for Christmas. This latest recipe uses all semolina flour and it was SO much easier to work than recipes that use all purpose flour. The back of the semolina flour bag suggested using the full sheets of this dough (uncut) for lasagna (without boiling) which I am looking forward to trying.


 Homemade noodles in cheesy
fettuccine Alfredo sauce

1½ cups semolina flour
½ teaspoon salt (optional)
2 eggs
2 tablespoons water
2 tablespoons olive oil (I used canola oil)


Combine the semolina flour and salt; add the beaten eggs, water and oil. Mix to make a very stiff dough. Knead for 10 minutes or until dough is elastic (I did this with my stand mixer). Cover with plastic and let the dough rest for 30 minutes (important)..
After 30 minutes of resting, turn the dough out onto a very lightly floured counter. Don't use too much flour on the dough before you put it through the machine, just enough to make it not sticky.


Start with pieces of dough about the size of a golf ball, maybe slightly larger. Flatten it out with your hand and taper one end of the dough so the machine will be able to "catch" the dough easily. Roll the dough through your machine on the lowest number two or three times (it will get longer each time).
.
Set your dial to the next lower number and run the dough through again. Do this a couple times. My final machine setting was #3 and it was just right for fettuccine noodles.
.You can air dry these noodles at this point or you can boil it like any other noodle; it takes a lot less time to cook if you don't dry it. Drain and use like you would any other noodle.


NOTE: You certainly do not HAVE to have a machine to roll out this dough. I have made many noodles by rolling out small balls of dough on a floured counter with my rolling pin. Just make sure you roll them out nice and thin then cut with a pizza cutter.

Wednesday 26 January 2011

PUMPKIN CHEESECAKE WITH GINGERSNAP CRUST

Each little cheesecake (or two) is the perfect portion size and the gingersnap crumb crust goes perfectly with the pumpkin filling. This recipe makes 12 little scrumptious cheesecakes, but you could easily double it for a crowd.


 2/3 cup of crushed gingersnaps (about 15)
2 tablespoons of melted butter

Mix the crumbs and melted butter and put a scant tablespoon of the mixture into the bottom of 12 paper lined cupcake compartments; press down the crumbs into an even layer and bake in a 325 degree oven for 5 minutes. Remove and set aside.

8 ounce cream cheese (room temperature)
1 cup of canned pumpkin (not pumpkin pie filling)
½ cup of granulated sugar
1 teaspoon pumpkin pie spice
1 teaspoon vanilla

Cream everything together until very well mixed.
Beat in 2 eggs, one at a time, until well mixed.

Fill the paper cupcake liners ¾ full. Bake for 25-30 minutes at 325. My oven took 30 minutes. Chill in the pan for several hours. Remove the cupcake paper before serving and top with whipped cream.