Wednesday 28 December 2011

MINI OREO CHEESECAKES

I've made these little gems many, many times, and I've never had a single crack in any of them and they go together in a snap. They are absolutely delicious and totally addicting. 

The only "extra" step, is that they really need to sit in the fridge overnight after baking (to soften the cookie crust), but this step is WELL WORTH IT. You can eat them as soon as they are chilled, but the cookie will still be crunchy.  If you let them sit in the fridge overnight, the cookie almost becomes part of the cheesecake...scrumptious.


24 Oreo cookies (divided)
1 pound of cream cheese (room temperature)
1/2  cup granulated sugar
1/2  cup sour cream
2  large eggs (lightly beaten)
1 teaspoon vanilla extract

Place 6 (original) Oreo cookies in the food processor and process into fine crumbs (set aside). Preheat your oven to 275 F and put 18 cupcake papers in your cupcake pan. Place a whole Oreo cookie in the base of each cupcake paper and set aside.

With your electric mixer (I used my stand mixer with a paddle attachment), mix the cream cheese on medium speed for three minutes.  Add the sugar and vanilla and mix for another 2 minutes on medium speed, or until very smooth. Add the lightly beaten eggs and mix on LOW until well combined. Fold in the sour cream and cookie crumbs with a spatula.

Fill the cupcake papers almost to the top (I used an ice cream scoop and it seemed to be the perfect measurement). Bake in preheated 275° oven for 30 minutes.

Once they are baked, leave them in the cupcake pan and immediately put them in the fridge. Chill overnight.  Delicious !!!


Tuesday 20 December 2011

SPICED OATMEAL-CRAISIN COOKIES

We have all tried a LOT of oatmeal cookie recipes, some thick and heavy, some thin and crunchy, some bland and doughy. This cookie, however, is everything those "other" cookies weren't; it is tender, chewy, buttery, mildly spiced and they make your kitchen smell heavenly while baking; it is the perfect holiday cookie!!   


1/2 cup butter (room temperature)
1/2 cup butter flavored Crisco (important)
1 cup brown sugar (I like to use dark, but light works well also)
1/2 cup granulated sugar
2 eggs
1 teaspoon vanilla
1½ cups flour
1 teaspoon baking soda
1 teaspoon cinnamon
1/2 teaspoon ground cloves
1/2 teaspoon salt
3 cups quick cooking oats
1½ cups craisins (or raisins)

Cream together the butter, brown sugar, white sugar, vanilla, eggs and butter flavored Crisco (the combo is MUCH better in texture and taste than if you use all butter).

Combine the flour, baking soda, cinnamon, cloves and salt, then mix into the creamed mixture. Stir in the oats and craisins (I do all of this in my big stand mixer).

Roll into balls about the size of a small walnut and bake on ungreased cookie sheet (do not flatten) for 10 to 12 minutes (my oven takes 11 minutes) don't over cook. Let them cool for about 30 seconds before removing them from the cookie sheet.

Store in airtight container. Makes about 5 dozen.

Saturday 17 December 2011

DOG REWARD TREATS

I've been making this reward treat for our dog Chloe for 8 years and she loves them. As a matter of fact, when they are baking, she positions herself in front of the oven and waits "patiently".....well, there's only a LITTLE bit of drooling!!

If you want to make your dog very happy, bake up a batch of these "puppy treats". They are super easy to make and bake up hard and crunchy(they will "keep" forever, much like a commercial milk bone, but tastier).


Since Chloe isn't a BIG dog, I bake little treats, just the right size for her; if you have a big dog, you can cut them bigger.

Another reason WE love giving our dog these treats is that they don't cause the "gas" that many commercial treats cause.

2 1/2 cups whole wheat flour (white flour will work too)
1/3 cup bacon grease (see note below)
1 egg
1/2 to 3/4 cup milk (see update note)
1 teaspoon garlic powder (not salt) (see note)
1 teaspoon onion powder (not salt)
3 heaping teaspoons beef bullion granules

Mix everything ( using the ½ cup of milk) into a STIFF dough (stand mixer works best). Beat until it comes together in a smooth ball. All flour is different, so if the dough seems dry and won‘t hold together in a  smooth ball, just start adding the other ¼ cup of milk (one tablespoon at a time) until it holds together in a nice moist (but not sticky) ball (the dough texture should feel like freshly kneaded Play Doh).

Roll the dough into ropes about ½” in diameter. Cut the ropes into small pieces and put on an UNgreased cookie sheet (try to spread the pieces out; it's ok if they get sort of close to each other, but just make sure they are in a single layer. 


Bake at 350° for 40 minutes; remove the pan from oven  and shake the pan a little (the pieces should slide around easily).  Cool the treats right on the pan. When the treats cool, they will be as dense and hard as a commercial milk bone treat; your dog will thank you!!!


NOTE: This recipe calls for 1/3 cup of bacon fat, sounds like a lot, but the recipe makes a LOT of treats. If you don't have bacon fat, peanut butter works well too.
 
 
UPDATE:  People have written to me saying that garlic is poisonous to dogs. We've fed this recipe to our dog for almost 10 years and she's never had a problem. If you are worried about feeding garlic to your dog, just substitute another spice for the garlic or leave it out all together.

Wednesday 30 November 2011

PEANUT BUTTER BROWNIES (and a question)

These quick, easy, moist, fudgy, addictive peanut butter brownies are the perfect accompaniment to a big glass of cold milk.
1/2 cup creamy peanut butter
1/3 cup butter, room temperature
2/3 cup granulated sugar
1/2 cup brown sugar (packed)
2 eggs
1 teaspoon vanilla extract
1 cup all purpose flour
1 teaspoon baking powder
1/4 teaspoon salt
1/2 cup miniature chocolate chips

Cream the peanut butter and butter together; beat in the sugars, eggs and vanilla until well combined. Mix in the flour, baking powder and salt until well mixed, then fold in the miniature chocolate chips. Spread into a 9" x 9" greased baking dish.

Bake in preheated 350 oven for about 30 minutes, but start checking for doneness (toothpick test) at 25 minutes. They will be done when the top springs back a little, don't over bake.

I can't believe that  it is time to start thinking about Christmas baking!! It is my favorite time of year, when I can bake with wild abandon and it all goes into the freezer for holiday cookie boxes.  Do YOU give cookie boxes as gifts? How do you present the cookies? I usually just put my baked goods in a decorated large foil pan, but I'm looking for something a little different this year...maybe more festive? Any ideas?

Monday 28 November 2011

STOVE-TOP TO OVEN BABY BACK RIBS

Shelby, over at The Life & Loves of Grumpy's Honeybunch, posted this "recipe" recently. It is more of a cooking technique than a recipe, but never-the-less, it is fantastic and so much fun to bring the tastes of summer indoors during the winter!!! Shelby has such good recipes over there, I hope you will visit her page.

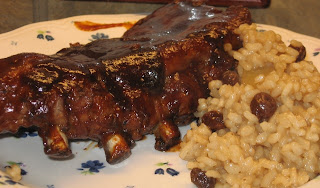
This isn't the best photograph, but the ribs QUICKLY disappeared before I realized I needed a better photo, so this will have to do for now.  Let's just say that the ribs went from the above condition, to the condition in the next picture in record time.

Start with a 2 to 3 pound section of baby back pork ribs and cut them into three sections. I buy the more meaty baby back ribs, so I think next time I'll cut them into even smaller sections.

Put the sections in a large deep pot and cover with water. Shelby said to salt and pepper the ribs, but I added a full tablespoon of salt and a ½ teaspoon of black pepper directly to the water.
Bring everything to a boil and then reduce to a "high simmer" (not a full boil) for an hour, then drain.

While the ribs are simmering, cover a baking sheet (that has a lip) with foil and spray it with vegetable spray. This will be a huge help in cleanup.

Place the boiled ribs bone side up first and cover with a thick layer of your favorite barbecue sauce. Shelby recommends Sweet Baby Rays and I totally agree.  Broil in a PREHEATED broiler, on high, for 5  minutes.

Remove from oven and flip the ribs over so the meaty side is up. Apply another thick layer of barbecue sauce and put back under the broiler for another five minutes or until the sauce is bubbly and just starting to crisp up (watch it because it will burn quickly if left under the broiler too long).

Remove and serve immediately....with LOTS of napkins!!!   Delicious, thanks Shelby.

Wednesday 23 November 2011

COCONUT CREAM PUDDING

This is a wonderful "last minute dessert" that uses every day pantry items and holds up very well in the fridge for a couple of days, if need be. The wonderfully sweet, rich (but mellow) coconut flavor comes from adding the coconut during the first stages of cooking this pudding.  Even Picky-picky hubby loves this dessert !!

4 tablespoons granulated sugar
2 tablespoons corn starch
1/4 teaspoon salt
2 cups milk ( 2% is ok)
1/2 cup sweetened shredded coconut
2 egg YOLKS (just the yolks)
1 tablespoon butter
1 teaspoon vanilla extract

In a heavy saucepan, mix the sugar, cornstarch, salt , coconut and milk. Cook and stir over medium heat until the mixture gets THICK and bubbly. Turn heat down a little (to medium simmer) and cook (and stir) for 2 minutes. In the meantime, put the 2 egg yolks (yolks only) in a small bowl and set aside.

Remove pan from heat  (but leave the burner on) and temper the egg yolks.  To do this, slowly dribble about a cup of the hot mixture (while you whisk like crazy) into 2 beaten egg yolks.  Once you've whisked in about a cup of the hot mixture, put it all back into the saucepan, stir well and put back on the heat and cook for one more minute.

Remove from heat, add 1 tablespoon of butter and 1 teaspoon of vanilla and stir well.

Pour into dessert dishes (or serve family style in a larger dessert bowl). Chill for a couple of hours, (I like to eat it warm).  Either way, top it with sweetened whipped cream and toasted coconut.

NOTE: Toast the coconut in a dry saute pan, over medium heat until it is golden brown (when it cools it will  be a little crunchy and almost taste like coconut candy). Watch it very carefully, the coconut burns easily!!

NOTE:  This recipe doubles well.

Friday 18 November 2011

BROWN AND SERVE DINNER ROLLS

This recipe is just in time for the holidays and could not be easier. The dough goes together in the stand mixer (or bread machine) and only has to raise once. PARTIALLY bake the rolls (for about 10 minutes) then freeze them for later use.

When it's time for dinner, pop them into the oven and finish baking them (no need to defrost). You'll know they are done when they turn golden.

This technique insures great FRESH yeast rolls at ALL dinners. It is also a HUGE TIME SAVING RECIPE during busy holidays; it makes a dozen rolls. As "Empty Nesters" it is nice to be able to bake just two or three rolls.


2 cups all purpose flour (divided) (see note)
1 envelope dry active yeast (I use 1 tablespoon)
2 tablespoons sugar
1/2 teaspoon salt
1/2 cup milk
1/4 cup water
2 tablespoons butter

Mix 3/4 cup flour, yeast, sugar and salt in the bowl of your stand mixer.  Heat the milk, water and butter in the microwave for about 30 seconds, or just until it is "baby bottle warm". Add it to the flour mixture and beat with mixer for 2 minutes.

Add another 1/4 cup of flour and beat on high for another 2 minutes. Stir in enough of the remaining flour to make a soft dough.

NOTE: This recipe calls for 2 cups flour (total), but it takes me 2+ 1/2 cups. Since the moisture content of flour is always different (brand to brand and climate to climate), I suggest that you put in the 2 original cups of flour and then see how the dough looks. If it's still very sticky, add a little more flour.

Knead the dough (with dough hook or by hand) for about 8 minutes; at the end of 8 minutes, the dough should come away from the sides of the bowl cleanly.

Cover with plastic and let it rest for 10 minutes.  Divide dough into 12 pieces and shape into balls.  Place in greased cupcake pans. Mist the top of the rolls with vegetable spray and cover loosely with plastic. Let rise until double (this dough rises very quickly and it only takes mine 30 minutes to rise).

Bake at 375 for 16 to 20 minutes (if you are going to eat them right away)or until golden brown. If you are going to freeze them as Brown and Serve Rolls, only bake them half way; cool then freeze.

Just before you serve these rolls, and while they are still hot, brush with butter.