Friday 30 March 2012

"HARD BOILED" EGGS FROM THE OVEN !!

There is nothing tricky about boiling eggs for Easter, but there are ALWAYS those eggs that crack as they boil, or the phone rings and you forget the eggs on the stove (and they overcook and  get those green "rings" around the yolks, etc.)  Not a big deal, but it can be a hassle when you are preparing for a crowd.

This oven method, of cooking eggs in the shell, is not only fool proof, but the eggs come out absolutely perfect and you can make a ba-jillion at once!!

Preheat your oven to 350 and place large size eggs in a mini-muffin pan (large end down). If you don't have a mini-muffin pan, you can use a regular cupcake pan  (they they will just roll around a little more).

How long you bake the eggs depends on the size of eggs you use and how hot your oven runs. I used large grade A eggs and cooked them for 25 minutes.  If you are concerned about it, just run a "test egg" to gauge how long to cook them.

When the eggs are done, use tongs to put the eggs into a bowl of ICE water (for 10 minutes) to stop further cooking.

NOTE: After the eggs are cooked, you MIGHT find SOME eggs that have brown speckles on them, but don't freak out; these little specks will dissolve when you put the eggs into the ice water. The next photo is before and after the ice water bath.

Not only is this a great way to cook Easter eggs in bulk, but the eggs are delicious!! The yolks are bright yellow and the whites are very tender (not rubbery like boiled eggs can produce).

Where has this cooking method been all my life!?!?

Wednesday 28 March 2012

BACON RISOTTO

There are huge "blind spots" in my cooking repertoire, like various herbs that I've never been introduced to, or spices that picky-picky husband refuses to eat and then there is always the financial restrictions that keep me from trying certain foods.

I'm not sure which of these categories risotto falls into (I've never even tasted it before today)  but I'm guessing that the $10 price tag for a 36 ounce jar of Arborio rice was part of the "hold up". I know I will be on a search for a more reasonable source, in the near future, for this specialty rice since we liked it so much.

This recipe came from allrecipes.com and it is absolutely delicious. I am really looking forward to reheating it for tomorrows lunch!!
1/2 pound bacon (fried, drained and crumbled)
5 cups chicken stock
2 tablespoons butter
1/2 onion, diced
4 cloves garlic, minced (see note)
1½ cups Arborio rice (do not use regular rice)
2 tablespoons butter
1/4 cup grated Parmesan cheese (not the powdered kind)
salt and pepper to taste

Bring the chicken stock to a boil in a sauce pan, over high heat; reduce the heat to low and keep the chicken stock hot.

Heat 2 tablespoons butter in a large, heavy bottomed saucepan over medium high heat.  Add the onion and garlic; cook and stir until the onion begins to turn golden brown at the edges, about 2 minutes. Add the rice and stir until it is coated in butter and has started to toast, about 2 or 3 minutes.

Reduce the heat to medium and stir in one third of the hot chicken stock; continue stirring until the rice has absorbed the liquid and turned creamy.

Repeat this process two more times, stirring constantly, which should take about 15-20 minutes total time. The rice should be tender but slightly firm when fully cooked.

Remove the risotto from the heat and stir in the remaining 2 tablespoons butter, the cheese and the crisp bacon. Season to taste with salt and pepper.

NOTE: As a first time risotto maker, I was nervous about making rice without using a lid on the pan, but it works great...just don't rush it.

NOTE: I wanted the bacon flavor to cook into the rice, so I put about half of the crisp bacon into the rice as it cooked, then mixed in the other half of the crisp bacon before serving. I will definitely do that again because it gave the rice a wonderful flavor.

NOTE: The recipe calls for four cloves of garlic, but that seems like a LOT. I didn't use any garlic because picky-picky is allergic to it.
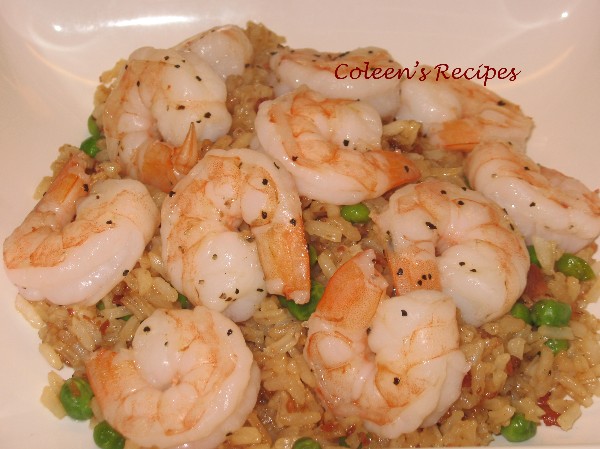
These photos do not do this tasty side dish justice.

Saturday 24 March 2012

CHICKEN SOUP FOR A SICK HOUSE

I haven't posted much lately because picky-picky husband and I have had the flu. Not just your every day "better in a week flu", but the old fashioned "don't even get out of your jammies)"flu that has plagued us with lethargy and coughs for almost a month.

Our meals have been simple and mostly from the crock pot (or frozen food entree aisle) but then we haven't had much of an appetite either. Now that we are feeling a little better, I am venturing back into the kitchen.

This chicken soup has been a life saver for us during this time. I just keep it going in the slow cooker, adding a little more broth and veggies when necessary. It is a super simple recipe and if your family is coping with this ugly flu, like we are, I hope you will give this magic "elixer" a try.


6 large boneless-skinless chicken thighs (dark meat has the best flavor)
1 cup chopped onion (I like to use sweet onions)
1 cup chopped celery
1 cup chopped carrot
2 quarts of good chicken stock (I use the boxed kind)
1 tablespoon chicken bullion granules
1/2 teaspoon black pepper
1 teaspoon salt
pinch of dried thyme
pinch of poultry seasoning
2 cups favorite veggies (I use frozen mixed veggies)
spaghetti or fettuccine noodles (they hold up better than other noodles)

Cube and brown the chicken thighs in a tablespoon of oil until you get brown crusty spots on the chicken. Remove from pan and put it into the crock pot. In the same pan, saute the onion, celery and carrot until they get a little soft. Use a spatula and use the moisture in the veggies to de-glaze any crusty bits left in the bottom of the pan. Add this mixture into the crock pot ; those crusty brown bits in the pan are PACKED with chicken flavor.

Add the broth, 2 cups favorite veggies, bullion granules and salt and pepper. Stir and cook on high for about 6 hours, stirring once in a while. Half an hour before you serve this soup, break the noodles into 4" pieces and put into hot broth and stir. The noodles should be ready to eat in about 30 minutes.

NOTE: I have tried many different kinds of noodles in this soup. Spaghetti seems to hold up the best without turning to mush if you are cooking the soup for a long time or overnight. I also use rice instead of noodles, however, DO NOT put the rice into the soup because after a short while, it will deteriorate and make your soup a mushy mess. Instead, make the rice SEPARATELY and put a big spoon of it in your soup bowl and ladle the soup OVER the rice. It only took me about 10 years to figure this trick out.

NOTE: Any cut of chicken will work in the soup, however, the dark meat gives the most flavor and after 6 hours, it will still be very moist and "fall apart" tender.


NOTE: Any kind of veggies can be used for the "favorite veggies" part. Just make sure you use veggies that will stand up to long cooking. I usually use a frozen veggie mixture that has peas, corn, green beans and carrots, but anything will work (just don't used canned veggies).

NOTE: Homemade chicken broth is best, but I never seem to have any when I want to make this soup, so I use a good quality BOXED chicken broth (just don't use bullion and water to make broth because it will be too salty).

Friday 16 March 2012

TENDER SHRIMP

I don't know about you, but I've ruined a LOT of expensive shrimp over the years by not cooking it properly. In mere minutes, I have been known to turn $15 dollars worth of beautiful raw shrimp into a bowl of curly shrimp that have the mouth feel of an eraser...very frustrating!!

Not any more!! I have found the easiest, quickest, most fool proof and certainly most delicious way to cook RAW shrimp. Where has this recipe been all these years!?!?!? Am I the only one who didn't know this trick?


A QUICK 30 MINUTE BRINE
1 cup cold water
2 cups ice (I just used an ice cube tray full)
1/4 cup kosher salt
1/4 cup white sugar

Mix the brine ingredients well, then add 1 to 1½ pounds of large size shrimp (roughly 25 shrimp to the pound) that have had the head and shells taken off and the vein removed (leave the tails on if you want).

Stir gently to make sure the brine reaches all of the shrimp evenly, then chill in the fridge for 30 minutes.

After 30 minutes, drain the shrimp and rinse well under cold running water.  Drain well for a few seconds and then completely blot dry with paper towels (put back in the fridge while you heat your oven).

Pre-heat a baking sheet under your BROILER (with nothing on the pan) for a full five minutes. While the pan is pre-heating, put the shrimp in a bowl and gently toss with a tablespoon of olive oil, making sure each shrimp is coated.

After the empty pan has pre-heated for five minutes, put the shrimp on the pan (they will sizzle) and separate them so they don't touch each other and  sprinkle lightly with Old Bay seasoning (we don't like that flavor, so I just used some black pepper) but don't add salt (there is enough salt from the brine) and quickly put it back under the broiler.

Broil (about 6" away from the flame) for 2 minutes, then flip the shrimp over, and broil for one more minute. Remove the shrimp, immediately, from the baking pan (or they will continue to cook and get rubbery).
Shrimp cooked with this method are extremely tender and flavorful. This is a great technique for ANY recipe that calls for pre-cooked shrimp and it will make cooking shrimp for a big family crowd a snap!!

Wednesday 29 February 2012

PEANUT BUTTER PUDDING

Last week I got a weird idea for peanut butter pudding; the process was a lot more complicated than I thought it was going to be. I tried several Internet recipes and none of them were exactly what I was looking for. Picky-picky husband was my Guinea pig taste tester and the first spoon full of each new recipe elicited those serious "brow furrows" that make all cooks cringe.

I didn't let that slow me down in my quest for a great "kid pudding". My next move was to start combining and tweaking recipes... the richness from this one ...the consistency from that one ... the sweet-factor from another one. The final result brought a "pudding face smile" to old Picky-picky AND the grand kids. This one IS a keeper!!!

I layered this recipe with sliced bananas and Hershey chocolate syrup, but next time I think I'll try layering it with crushed chocolate wafers ... Yummm!!!


This pudding is rich, creamy, peanut butter-y and oh so easy to make!!

2/3 cup dark brown sugar (light brown is OK, but dark brown is better)
2 level tablespoons of corn starch
1/8 teaspoon salt
1¾ cups whole milk (I've used 2% in a pinch)
1/2 cup heavy whipping cream
1/2 cup creamy peanut butter
1 teaspoon vanilla extract

In a saucepan that has a heavy bottom, whisk together the brown sugar, corn starch and salt. This step helps the cornstarch from clumping-lumping when you add the liquid.

After the sugar, cornstarch and salt are whisked together, slowly add the milk and cream. Stir to make sure everything is mixed well.

Bring to a boil, over medium high heat, stirring constantly. When this mixture gets nice and thick, add the peanut butter and whisk until it is totally melted and pudding just starts to boil again, (takes about 30 more seconds). Remove from heat and add vanilla extract, mix well.


Pour into a pretty serving dish (or individual dishes) and lay plastic wrap directly on top of the hot pudding (make sure the plastic is actually touching the pudding) so a "skin" doesn't form on the pudding as it cools.  Chill for 2-3 hours or overnight.
What a great recipe for ANY kids birthday party!!

Tuesday 28 February 2012

GREAT PIE CRUST

A We have all made (and eaten) pie crusts that are flavorless, flat tasting, sort of soggy and, little more than something "necessary" to hold the fruit filling, ha ha!! Well, that does NOT describe today's classic pie crust.

This pie crust is absolutely delicious. It makes three single crust pie shells and bakes up very flaky, very flavorful and very tender. Picky-picky husband RAVED about this pie crust (and he is NOT a rave kind of guy, if you know what I mean).

This dough is extremely easy to work with and because there is a little sugar in it, it bakes to a beautiful deep golden color. You will NOT be disappointed with this pie crust recipe!!

Click on this photo to get a better look at the pie crust.
4 cups all purpose flour
1¾ cups butter flavored Crisco
3 tablespoons sugar
1 teaspoon salt
1 large egg
½ cup cold water

Mix the flour, sugar and salt, then cut the butter flavored Crisco into it with a pastry cutter (or two forks) until the mixture is crumbly.

Whisk the egg into the cold water, then pour it into the dry mixture. Mix till everything is moistened but do not overwork it.  Let the dough sit for about 10 minutes before you roll it out.

The recipe calls for chilling the dough for 30 minutes, but I don't find that is necessary.  Roll out the dough and use it in your favorite pie recipe.

NOTE: I always brush my top crust with a mixture of 1 egg white whisked with a tablespoon of cold water. Whisk it thoroughly, then brush your top crust with just a little bit of it, then sprinkle with granulated sugar before you bake it.

Thursday 23 February 2012

SWEET LEMON CURD

There are a ton of lemon curd recipes out there and they are all basically made from fresh lemons, sugar, butter and eggs cooked together. The main difference between the recipes is the degree of sweetness.  We like our lemon curd a little on the sweeter side, so I use 1½ cups of sugar in my recipe.  I've seen other recipes that use only ½ cup of sugar for every three lemons...talk about tart!!
There are a million uses for this sweet lemon curd. You can use it between cake layers, or as a cupcake filling. You can use it on hot scones or even toast. You can fold it into sweetened whipped cream for a delicious mousse, anything your imagination can come up with. Slightly sweet, silky smooth and inexpensive to make, you will love this recipe.

1/2 cup fresh squeezed lemon juice (3 or 4 lemons)
1½ cups granulated sugar
¼ pound of unsalted butter (room temperature)
4 extra large eggs
1/8 teaspoon kosher salt

Don't waste your time, effort and money making lemon curd with anything but good fresh lemons. I use lemon juice in a bottle for some things, but not for this recipe. 

Wash, rinse and dry your lemons before you zest them. Be very careful that you only use the bright yellow part of the peeling. Stay away from the white layer underneath because it is BITTER.  Zest three lemons.
Put the granulated sugar and the zest of 3 lemons into a food processor fitted with a steel blade. Pulse until the zest is very finely minced into the sugar.

In a different bowl, cream the room temperature butter until smooth, then beat in the lemon sugar. Beat in the eggs, one at a time, and then the lemon juice and salt. Beat until smooth.

Pour the mixture into a saucepan that has a heavy bottom (this will keep the mixture from scorching easily). Cook over low heat until thickened (about 10 minutes) stirring constantly.

The lemon curd will thicken at about 170 degrees or just below a simmer.  Keep a careful eye on it and keep stirring.

Press the cooked curd through a strainer to filter out any cooked zest pieces and/or tiny lumps.
Straining it is not absolutely necessary, but it insures a silky smooth curd.


Lay some plastic wrap directly onto the surface of the hot curd, and chill in the fridge.

NOTE: Zest the lemons before you cut and squeeze them.