Friday, 30 April 2010

FLOURLESS CHOCOLATE & VANILLA MARBLE CAKE

Flourless baked goods are a curiosity to me. It just doesn't seem "right" but the process intrigues me. This specific recipe has been beckoning me since I bought the Christmas issue of Fine Cooking's magazine called Sweet Cakes.

It is a flourless chocolate and vanilla marble "cake" and it was absolutely delicious, although I don't know if I would really classify it as a cake. It tasted very much like a fudgy cheesecake. I will definitely be making this again.


VANILLA BATTER
8 ounce cream cheese (room temperature)
2/3 cup granulated sugar
1 large egg
1 teaspoon vanilla extract
.
CHOCOLATE BATTER
10 ounces bittersweet chocolate finely chopped
10 tablespoons unsalted butter cut into pieces
3 large eggs
1/3 cup granulated sugar
1 tablespoon espresso
1 teaspoon vanilla extract
pinch of table salt
.
Preheat oven to 300F and position rack in the middle of your oven. Lightly grease a 9"x2" round cake pan and line bottom with parchment paper (I used a springform pan).
.
In a medium bowl, beat the cream cheese with electric mixer until smooth, add sugar and beat until well blended and no lumps remain. Add eggs and vanilla and beat just until blended, set aside.
.
In another medium bowl, melt the chocolate and butter over a pan of simmering water (or in the microwave), whisk until smooth and let cool slightly.
.
Using a stand mixer fitted with whisk, beat the eggs, sugar, espresso, vanilla and salt on medium high until pale and thick (3 or 4 minutes). Turn mixer to low and gradually pour in the melted chocolate mixture and continue beating until well blended.
.
Spread half of the chocolate mixture into the prepared 9" pan. Alternately add large scoops of the vanilla batter and the rest of the chocolate batter to the cake pan. Use a knife to gently swirl the two batters together so they are mixed, but not completely blended. Rap the pan against the counter top a few times to settle the batters.
.
Bake 40 to 42 minutes (mine took 48 minutes) or until a pick inserted 2" from outer edge of cake comes out gooey but not liquid. The top of the cake will be puffed and slightly cracked around the edges (it will settle as it cools).


 This is a close up, showing the
texture of this cake

NOTE: Cover and refrigerate until very cold, at least 4 hours or overnight.

NOTE: This cake is extremely rich, much like cheesecake, so cut small slices.

NOTE: I didn't have bittersweet chocolate, so I used semi-sweet.

Monday, 26 April 2010

PEANUT BUTTER AND CHOCOLATE (and the cooking blah's)

This is not my favorite time of year. We still have a little snow in the yard and everything is a sad shade of “dead vegetation brown” except for the bits of grass sprouting near the warm house foundation. Most days are still too cold to barbecue outdoors and yet that is what I want to do. We are tired of heavy winter stews, casseroles and roasts, yet summer vegetable crops and fresh seafood will not be in our markets for a while yet. This scenario results in the “cooking blahs” for me, how about you? How do you combat your cooking blahs? .

.
Personally, I find myself trying new dessert and cookie recipes. That is how I found this yummy treat. It has a chocolate cookie base (conveniently made with a cake mix) and a super creamy peanut butter center, topped with milk chocolate ganache. Served chilled, what's not to love here?

(1) 2 layer chocolate cake mix
1/3 cup butter, melted
1 egg
¾ cup butter, softened
¾ cup peanut butter
2 teaspoons vanilla extract
3 cups powdered sugar
2 tablespoons whipping cream
¾ cup honey roasted peanuts chopped
½ cup whipping cream
2 cups milk chocolate chips
Line a 10" x 15" baking pan with parchment paper (or foil) leaving the ends long so you can use them as handles (to lift the bars out of the pan) after they've cooled. Spray the parchment paper (or foil) with vegetable spray. Set aside.


 Mix the dry cake mix with 1/3 cup melted butter and 1 egg. Beat with electric mixer for 2 minutes or until well combined. This "dough" will be super thick. My Kitchen Aid mixer fitted with a paddle worked well. Press this into the bottom of your prepared 10x15 cake pan, trying to get it as even as possible. Bake at 350F for 12 minutes, remove from oven and cool completely in the pan.
In a large mixing bowl, beat the peanut butter, butter and vanilla until very well combined and light in color. Beat in powdered sugar and 2 tablespoons of whipping cream. Mix well, then stir in the chopped peanuts.

Spread this mixture over the cooled cookie crust. Place this in the fridge (or freezer) while you make the ganache topping.

For the topping, heat ½ cup whipping cream, in a saucepan, just to the boiling point (don't let it boil). Remove from heat and add the milk chocolate chips. Do not stir, just let it sit for five minutes, then stir until smooth. Cool for 20 minutes.

Gently spread (evenly) over the peanut butter bars. Chill for at least a couple hours. To serve, loosen the edges of the bars and lift them out of the pan, using the ends of the parchment paper. Cut them into bars.

NOTE: These freeze well.
NOTE: Store covered in refrigerator. Let these sit at room temperature about 15 minutes before you serve them.

Friday, 23 April 2010

Strawberry Mousse by Paula Deen

If it is a real Paula Deen recipe, you know it is going to be rich, delicious and decadent. This little recipe certainly fits all three categories. It is quick to fix and it has many possibilities. This time, I served it in little dessert glasses. Next time, I plan on using a 9" x 13" pan (yes, it makes a lot) and stirring in a few chopped strawberries and putting it all on a graham cracker crust. This would be a huge hit at any family gathering or pot luck.

1 envelope unflavored gelatin
¼ cup hot water
3 cups heavy whipping cream
1/3 cup powdered sugar
¾ cup Smuckers strawberry-flavored syrup
.
In a small bowl, dissolve the gelatin in very hot water; let stand for 10 minutes or until room temperature.
.
In a large bowl, beat cream at medium-high speed with an electric mixer, until soft peaks form. Gradually add the powdered sugar, beating until stiff peaks form. Whisk in the gelatin and strawberry syrup. Cover and chill for at least 4 hours.
.
NOTE: This makes a lot (at least 8 pretty good sized dessert dishes.
NOTE: I think this would be very good frozen as well.
NOTE: Because this has gelatin in it, it keeps very well in the fridge for several days.
NOTE: I'm sure other flavored syrups would work well in this recipe as well, blueberry sounds pretty good.
NOTE: If you lick the beaters right after you stir in the syrup, this dessert is going to taste like it is lacking something...no fear. After the 4 hours, the strawberry syrup mellows and the dessert is very tasty.

Saturday, 17 April 2010

MR. MOOSE

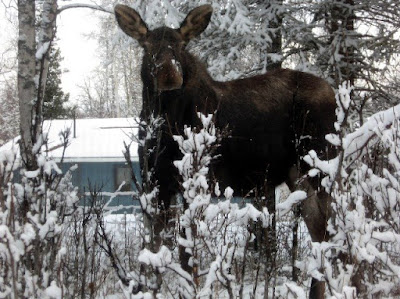
This beauty has been hanging around my back door for a while. Actually, it's my young apple tree's that he is eyeing (moose love to eat apple trees). He's a whopper of a moose, not fully grown yet, but still weighing in at about 1,000 pounds; a perfect specimen. He is not camera shy, but you can see it in his eyes that he is NOT a friendly guest.
All of these photos were taken from inside
the house (through a window) for safety sake
We had a late spring dump of snow this week, as you can see, and it made a nice contrast for Mr. Moose's beautiful brown fur (usually they blend into the scenery and you really have to watch for them).

Moose are nothing to be toyed with. They are totally passive unless they feel threatened, then they will come after you! Everyone who lives in Alaska KNOWS that you don't get between a mother moose and her babies...that is serious danger.

I hope this guy moves on and leaves my little apple trees alone. Hubby wrapped them in burlap for the winter because the moose have eaten them to near-death the last several winters. Hopefully, this burlap trick will work.
The moose aren't around so much in the summer because, as the snow melts, they recede up into the higher (people-less) elevations. In the winter, the deep snow forces them down to populated areas, so we get a LOT of them in our yard over the winter. Moose are a big threat to pets, especially dogs, because dogs love to chase and harrass moose, which ends up with the moose kicking and stomping the dog (often fatally).

So...Mr. Moose...go on your merry way and please don't eat my little trees!

Friday, 9 April 2010

Breakfast Brûlée For This Weekend

Pre-Recipe Editorial: I have noticed that many Food Network cooking shows revel in the French language. For example, Alton Brown continually calls the common green bean by its French name haricot vert. Come on now, does that make them taste better? I don’t think so. Recipe titles like Crème Brûlée literally translates to burnt cream; that sounds more like a kitchen accident to me. I guess I have issues, ha! ha!

The reason I bring this up today, is that I found today’s recipe in the latest issue of Pillsbury Bake-Off magazine. It is called Breakfast Brûlée (yes, you guessed it = burnt breakfast)…go figure. This little recipe deserves a much better title; it is a quick and delicious weekend breakfast treat.

2 eggs
¼ cup whipping cream
1/8 teaspoon ground nutmeg
(2) 6 ounce 99% fat free vanilla yogurt
(1) 16 oz. tube Pillsbury Grand biscuits (Flaky style)

Heat oven to 375F and spray eight 6 ounce ramekins or custard cups with cooking spray; place them on a cookie sheet that has edges.

In a medium bowl, whisk together the eggs, cream, nutmeg and yogurt until smooth; set aside.

Separate each refrigerator biscuit (horizontally) into two even layers with your fingers (making 16 rounds). Brush both sides of each round with melted butter and roll them in white sugar (on all sides). Place one dough round in the bottom of each ramekin. Top with ¼ cup of the egg-yogurt mixture. Top with remaining dough rounds.
Bake at 375F for 20 to 26 minutes or until tops are deep golden color (my oven took 20 minutes). Cool 15 minutes before serving.

These are 350 calories, which isn't too bad for such a treat.

NOTE: When I ran spell check, it highlighted all of the French words as errors... hahaha, my case is closed.