Monday, 13 April 2009

CHEESY FOCACCIA

This is the easiest bread I have ever made. It is FULL of flavor and is soft and chewy with a delicious cheesy surface. Whether you use it to sop up a great sauce…or slice it for a sandwich, this recipe is a winner. The smell of it baking will bring your family running to the table.
2 ¾ cups all purpose flour
1 teaspoon salt
1 teaspoon sugar
1 tablespoon dry active yeast
1 clove garlic minced
1 teaspoon dried oregano
1 teaspoon dried thyme
1 teaspoon dried basil
¼ teaspoon black pepper
2 tablespoon olive oil (divided)
1 cup warm milk
1 tablespoon parmesan cheese
1 cup mozzarella shredded
1 teaspoon dried rosemary

Mix first 9 ingredients in the bowl of an electric mixer. Mix in warm milk and 1 tablespoon of olive oil. Mix well and knead until the dough is smooth and elastic (it will take just a couple minutes). Cover with plastic wrap and let this sit in a warm place for about 45 minutes. Punch down and place on a greased baking sheet. Pat dough out into a rectangle about ½” thick. Brush top with remaining 1 tablespoon olive oil and sprinkle with rosemary, mozzarella and parmesan cheeses. Cover loosely with plastic wrap and let this sit for about 30 minutes. With 2 fingers, make dents every few inches over surface of focaccia. Bake at 450° for 15 minutes or until golden. Remove to a rack.


This hearty bread also makes an excellent sandwich.

Make sure you pop over to Tried and True Cooking With Heidi
She is giving away a prize to celebrate her 100th post.

Friday, 10 April 2009

BACON WRAPPED SHRIMP


Your guests will never guess how simple these shrimp are to make and YOU will be amazed how quickly they disappear; they are an absolutely delicious hors d’oeuvre.

(1) 16 ounce bag of frozen 16-20 count RAW shrimp (see note)
1 pound of smoked bacon (not the thick kind)
1 cup of your favorite barbeque sauce

In our Fred Meyer store, these shrimp are sold frozen (near the meat case). The one pound package says they are 16-20 count “Wild Caught” with shell on and heads off. Let them thaw in your fridge overnight. The next day, remove the shell (leave tails on). With a small sharp knife, make a shallow cut down the back of the shrimp and rinse out any “vein” you see there. Drain the shrimp on a paper towel and sit in fridge for a few minutes while you prepare the bacon.
If you use the 16-20 count shrimp (16 to 20 shrimp per pound), it will take a whole slice of bacon per shrimp. Make sure you use regular cut bacon (not thick sliced). Partially cook it, to remove some of the fat, but don’t let it get crispy (drain on paper towels). It should look like this:
Wrap the partially cooked bacon around the raw shrimp. Starting at the wide end of the shrimp, attach the bacon to the shrimp with a toothpick. Wind the bacon around (in a single thickness) and all the way down to the tail and secure it with another toothpick like this:
Baste the shrimp on both sides with your favorite barbeque sauce (I recommend Sweet Baby Ray’s barbeque sauce). Cover with plastic wrap and refrigerate for two hours.

Line a large baking sheet with foil (to help with cleanup) and put a baking rack on the foil (spray the rack with cooking spray). Place the shrimp on the rack and bake in a PREHEATED 450° oven for 10 minutes. After 10 minutes, TURN OFF THE OVEN (do not open the door) and let the shrimp sit in the hot oven for another five minutes. Remove the toothpicks and enjoy!

Tuesday, 31 March 2009

PEANUT BUTTER COOKIES

This glass cookie jar has been on my kitchen counter for the last 20 years. At least 75% of that time, it had peanut butter cookies in it. Our standard comment (“the kids like peanut butter cookies”) was obviously just an excuse, because the kids are all grown (with families of their own) and the jar is STILL full of peanut butter cookies. Needless to say, I don’t even look the recipe up anymore…I think I could make these cookies in my sleep.

Preheat oven to 375° Bake on un-greased cookie sheet
In large mixing bowl with electric mixer, beat until smooth:
1 cup butter flavored Crisco
1 cup peanut butter
2 eggs
2 teaspoon vanilla
1 cup white sugar
1 cup brown sugar
Once the above mixture is smooth, add 2 ½ cups flour, 1½ teaspoons baking soda and ½ teaspoon salt. Mix well. Cookie dough should be moist and hold together easily when you squeeze a hand full. If it seems a little dry or crumbly, add a couple tablespoons of water.
Roll the dough into balls about the size of walnuts, and then roll the balls in granulated sugar. Place on UN-greased baking sheet and flatten with fork tines in criss-cross pattern. Bake for 10-12 minutes at 375°; cool on parchment paper.
NOTE: Cooking time depends on how large you make these cookies. Dough balls about the size of a walnut, bake for 11 minutes in my oven.
NOTE: The original recipe called for butter (instead of the Butter Flavored Crisco). The Butter Flavored Crisco makes a much lighter & crispier cookie than butter (and still provides the buttery taste).

Friday, 27 March 2009

HUNGARIAN GOULASH + HOMEMADE PASTA


This is MY kind of comfort food…slow simmered beef until it is fork tender, in a rich, full-bodied gravy and served over homemade noodles; it does not get much better than that. If you make this on the stovetop, it is done in about 2½ hours, at most. If you cook it in the crockpot, it takes about 8 hours on low.

2 pounds of chuck roast
1 medium onion diced
1 clove garlic minced
2 tablespoons olive oil
2 ½ cups beef broth (not bullion)
¾ cup ketchup
2 tablespoons Worcestershire sauce
1 tablespoon packed brown sugar
2 teaspoons salt
2 teaspoons paprika (not the hot kind)
½ teaspoon dry mustard
healthy pinch of crushed red pepper flakes
½ teaspoon coarse ground black pepper

Trim all of the white fat parts from a 2 pound chuck roast and cut it into one inch cubes. Brown the meat, onion and garlic in the olive oil. Drain any excess fat.

Add the rest of the ingredients and heat to boiling. Stir well and reduce heat to a very gentle simmer. Cover and simmer until fork tender (about 1 ½ to 2 hours depending on how tough the meat is). While this is simmering, make the noodles.


PASTA FOR FOUR

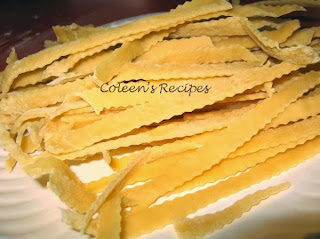
I made the dough for this in my kitchen aid (with paddle attachment). I made this before I got my new pasta roller, so it is a little irregular, but it still tasted great.

2 eggs
2 cups all purpose flour
1 teaspoon salt
6 tablespoons water
2 tablespoons olive oil

I just put the wet ingredients in first, mixed for a couple seconds, then put in the dry ingredients and mixed until it turned into a nice soft dough. Depending on the moisture content of your flour, you might have to add or subtract a tablespoon of water to get the right consistency (so don’t add all of the water at once). Knead the dough by hand for five minutes (or by machine for 3 minutes).The dough should be smooth, elastic and a just a little tacky to the touch.

Wrap the dough in plastic and let it sit (at room temperature) for 20 minutes…this is the most important step. If you skip this step, the dough will not roll out right and will try to spring back on you. If you let it sit for 20 minutes, it will roll out much easier.

Flour your counter and roll the dough out as thin as you can get it (it is a very forgiving dough and will not crack or tear like piecrust). Keep in mind that when you cook the noodles, they expand, so whatever thickness you roll them out to…your final product will be almost twice as thick! Cut the noodles in thin strips and air dry for an hour or so (I dried my noodles on a baking rack).To cook, bring a big pot of salted water to a boil (I added a tablespoon olive oil to the water) and cook the pasta for about 4 minutes, stirring occasionally. When it starts to float, it is very close to being done; remove a piece and taste it for doneness.
BACK TO GOULASH

When the noodles are almost done, and the meat is ultra-tender, turn up the heat under the meat and thicken the sauce with a flour-water slurry (¼ cup water + 2 tablespoons flour shaken in a jar). Stir vigorously while adding the slurry to the sauce and cook until thick, remove from heat. Serve goulash over cooked noodles.
NOTE: The first hour that the goulash cooks, the aroma will be strong, but never fear…the second hour, something magical happens and it all mellows out and becomes delicious.

Thursday, 26 March 2009

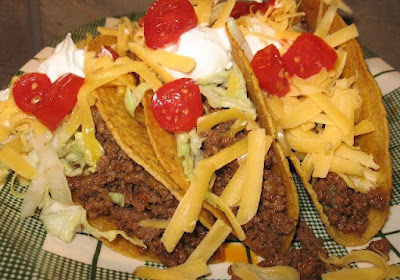
TACO FILLING

I often look at the packets of dry seasoning and gravy mixes, at the grocery store, and wonder what is in them besides the main ingredient which seems to be salt. I see young cooks buying packets of taco seasoning mix and I have to resist the urge to tell them “save your money…you probably have the necessary ingredients at home already!”

This is a good, basic, kid friendly recipe for beef taco filling because it is more flavorful than spicy; I’ve used this recipe for many years. If you like more “heat”, just add some (seeded and diced) jalapeƱo peppers. Personally, I like more heat than my husband (who thinks black pepper is too spicy LOL), so instead of bumping up the seasoning in the whole recipe, I just add some pepperjack cheese to MY taco.

1 pound lean ground beef
2/3 cup chopped sweet onion
3 teaspoons chili powder
1 teaspoon ground cumin
1/2 teaspoon oregano
1 teaspoon salt
½ teaspoon regular paprika (not the hot kind)
pinch garlic powder
pinch of dried red pepper flakes (or to taste)
½ cup water
(1) 4 ounce can of Ortega chopped mild green chiles

Brown the ground beef and onions, then drain well. Return meat to pan and add everything else. Simmer for about 15 minutes, using your spatula to chop the burger into fine pieces as it cooks. The water will help disperse the seasonings and then it will cook away. Turn heat down and keep warm until ready to use.

NOTE: If have an unexpected guest or two, just add some refried beans to the meat and mix well.

Sunday, 22 March 2009

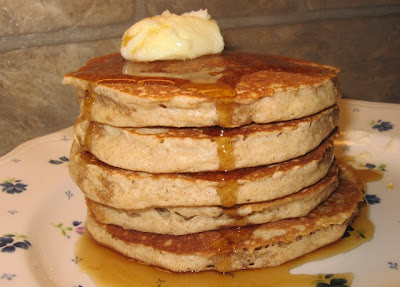
HONEY-WHOLE WHEAT-OATMEAL PANCAKES

JUST IN TIME FOR SUNDAY BREAKFAST!
These pancakes have a wonderful honey-whole wheat flavor that you are not going to get out of an instant "white bread" pancake mix. This batter mixes up in just a couple of minutes, using every day ingredients. I hope you try them.

1 egg
½ cup whole wheat flour
½ cup quick cooking oats
¼ cup white flour
¾ cup milk
2 tablespoons vegetable oil
1 tablespoon honey
3 teaspoons baking powder
½ teaspoon salt
In medium size bowl, whisk the egg until it is lemon colored & a little foamy; whisk in the milk, oil and honey (*see note). Add the flour, oats, baking powder and salt; whisk just until everything is well mixed (don‘t over whisk). Let batter sit for about 5 minutes before cooking.
NOTE: Use a scant 1/3 cup of batter for each pancake.
NOTE: The honey will want to “stay together” and sit on the bottom of your bowl, so make sure you completely mix it into the milk BEFORE you add the flour and oats (that way you won’t over mix the batter).
NOTE: I find that pancakes cook best on a pan that has been sprayed liberally with vegetable spray and then wiped out with a paper towel.
NOTE: You can add ½ cup raisins to this batter if you like raisins. Plump raisins by pouring a little boiling water over them in a small dish and let them sit for 15 minutes then drain well and add to batter.

Thursday, 12 March 2009

MAPLE-WALNUT MINI MUFFINS


The combination of maple and walnut just seem to go together in this sweet, moist mini-muffin. They are perfect with a hot cup of tea or if you are on the go. The muffins have a sweet maple syrup glaze on the top.
1 cup light brown sugar
½ cup flour
2 eggs
2/3 cup soft butter
½ teaspoon vanilla
½ teaspoon maple extract
1 cup chopped walnuts
Preheat oven to 350°. Grease and flour a mini muffin pan (or spray with a cooking spray that has flour, like Bakers Joy). Mix the wet ingredients in a medium size bowl and then stir in the dry ingredients, its just that simple. Mix long enough to just get the batter smooth. Make sure you use the MINI muffin pans (not cupcake size). Fill cups with one tablespoon batter each (makes 24). Top each one with a piece of walnut. Bake for 17 minutes.
NOTE: Dusting pan with flour is important.
NOTE: My oven cooked these little gems in 16 minutes
NOTE: Let these muffins cool for five minutes, then use a thin bladed knife to help you gently lift the muffins out onto a cooling rack. Don’t let these cool in the pan because they won’t come out.
NOTE: If you keep these muffins covered, they will stay soft. If you like a more chewy cookie type muffin, don’t cover them.
NOTE: Glaze the tops of the cooled muffins with the following mixture: ¼ cup real maple syrup + 1 tablespoon corn syrup boiled together for about 30 seconds.