Showing posts with label MINI RECIPES. Show all posts

Monday, 11 November 2013

THANKSGIVING MINI DESSERT

We just love mini desserts, don't you? No extra plates and forks (we use napkins), no "commitment" to a big slice of something; instead two or three different mini-desserts is more to our liking.

Todays recipe is a combination of two of my favorite holiday treats. It has a bottom layer of moist, spicy pumpkin CAKE and a top layer of rich and creamy CHEESECAKE; what could be better for your holiday buffet table?

 
CAKE LAYER
 
1/2  cup Libby pumpkin puree (NOT the pre-spiced kind)
3/4  cup all purpose flour
1 1/2  teaspoons pumpkin pie spice
1/4 teaspoon salt
1/4 teaspoon baking soda
1 large egg
1/2 cup sugar
1/4 cup + 1 tablespoon vegetable oil
1 teaspoon vanilla extract
 
Mix the flour, spice, salt and baking soda and set aside.  In another bowl, whisk together the pumpkin, egg, sugar, oil and vanilla until smooth, then add the dry ingredients from the first bowl. Whisk just until well mixed and set aside.
 
CHEESECAKE LAYER
 
(2) 8 ounces cream cheese (room temperature)
2   large egg
4 teaspoons all purpose flour
2 cups powdered sugar
2 teaspoons vanilla
 

Beat the cream cheese with electric mixer until smooth, then add the egg, flour, sugar and vanilla and beat until smooth, but don't over beat.

ASSEMBLY

Super simple: place cupcake papers in cupcake pan and very lightly mist them with cooking spray.

Put a small amount of cake batter into each paper and make sure it covers the bottom. Top with cheesecake filling(dividing evenly between the 24 desserts).

Bake in pre-heated 350° oven for 25 minutes or until set (my electric oven takes exactly 25 minutes).

Cool to room temperature then chill for at least a couple hours.

NOTE:  These little gems can be made two or three days ahead of time which is a huge help during the holidays. As a matter of fact, they taste even more moist after a couple days in the fridge.  Just make sure that you store them chilled in an airtight container.

NOTE: This cake batter raises nicely, so don't put too much in the bottom of each one...sort of spread it around but not too terribly thick or you will get all cake and less cheesecake.

Friday, 16 August 2013

POT LUCK MINI CHERRY PIES

These "Grab-and-Go" mini cherry pies are perfect for large gatherings and family or church potluck dinners. The dough can be made days ahead and baked off when you have some "extra" time, which is a big help.

Guests (at least mine) seem to appreciate PIE at a potluck, but traditional pie can be messy to serve, especially for children. These little "two bite" beauties are perfect. This recipe makes 24 pies, but the recipe doubles easily.


CRUST

1/2 cup butter  (room temperature)
3 ounces cream cheese (room temperature)
1 cup flour

Mix with electric mixer (I use my stand mixer with paddle attachment) until you get a smooth dough. Wrap it in plastic and chill for about an hour (will also keep well in fridge for several days).

FILLING

(1)  14½ ounce can tart pie cherries packed in water
3/4 cup granulated sugar (divided)
2 tablespoons + 1 teaspoon corn starch
pinch of table salt
1/4 teaspoon almond extract (do not leave out)
1 teaspoon butter

Drain the cherries, reserving the liquid. Pulse the cherries in the food processor until fairly well chopped then drain again (I even press on the cherries a little to remove excess liquid): set aside.

 In a saucepan, combine 1/2 cup of the reserved cherry juice, HALF of the sugar, the cornstarch and a pinch of salt. Whisk till smooth and bring to a boil. When this mixture gets super thick (it will happen FAST once it starts to thicken), remove from heat and stir in the rest of the sugar, the chopped cherries, the almond extract and butter. Stir until well mixed; let cool while you form the crusts.

 Preheat oven to 375°. Cut the chilled dough into 24 pieces and roll each piece into a ball. Place one ball in each mini-muffin cup (no need to grease the pan).

Now, you have to use your fingers and push the dough across the bottom and up the sides of each mini-muffin space.  Better yet, if you have tart tamper or something similar, this step will go MUCH faster (just dip it in a little flour between each use).  I use the rounded end of the wooden tool that came with my Kitchen Aid meat grinder, it works absolutely perfectly. Try and get the crust edges just a little taller than the edges of each muffin cup (see 2nd photo).

Fill each mini-crust 2/3 full of the cherry filling. Bake at 375° for 20 minutes on the TOP RACK of your oven.   When the edges of the crust are light golden brown, they are done. 

IMPORTANT:
Don't try to remove the cooked pies from the pan right away. The filling stays hot for a while, so let them cool for a good 25 minutes or so. You can use a butter knife to help "lift" the pies out of the pan. 

BETTER YET: line the mini-muffin pan with mini-cupcake papers and that should solve any/all problems.

 
Delicious and FUN to Serve!!

Wednesday, 7 August 2013

MAPLE PECAN TASSIES

When our kids were little, I made these Tassie's ONLY on special occasions, or during the Christmas holiday. I'm not sure why that was "the rule", but it was.

These days, at our house, Tassie's have evolved into a barbecue "staple" for several reasons: not only are they super easy (and mess-less) to serve a crowd (especially the little ones), but you can make them a day (or even two) ahead of time, which is always handy.

I just set a tray of these beauties out on the buffet table, and guests "re-visit" it again and again; I guess their mini-size isn't as intimidating as a big old piece of pecan pie.

Tassie's Aren't Just For Christmas Anymore!!


PASTRY CRUST
1 cup unsalted butter at room temperature (see note)
6 ounces cream cheese at room temperature
2 cups all purpose flour

Cream the butter and cream cheese (with electric mixer) until it is light and fluffy. Add the flour and beat until the dough comes cleanly away from the inside walls of your mixing bowl.

Roll pastry into 1 inch balls and place them into an un-greased mini-muffin pan. Using your fingers, press the balls of dough into the bottom of each cup and up the sides. (I use the floured round end of my rolling pin to press the dough into place). Place the pan of shaped shells into the freezer for a few minutes while you make the filling.

FILLING
3 large eggs
3 tablespoons melted butter
1 3/4 cups light brown sugar
1 teaspoon vanilla
1/2 teaspoon maple extract
3/4 cup coarsely chopped pecans (see note)

Beat the eggs until very well mixed and lemon colored. Stir in everything else (except nuts) and whisk until smooth; set aside.

Put a few chopped pecans in the bottom of each pastry shell and add enough filling to fill the shell about 2/3 full. (see note)

Bake in pre-heated 375F oven for 20 minutes or until the pastry is golden and the filling is set, yet still a little soft in the center. Remove from oven and sit the pan on a wire rack for about 10 minutes before you try to lift them out. Lift Tassie's out of pan and cool on a wire rack.


NOTE: Keep in mind that the filling puffs as it bakes, so don't overfill the unbaked shells. If you overfill them, they will be hard to get out of the pans. If your Tassie's resist coming out easily, use the tip of a knife to help you "lift them" out of the pan.

UPDATE: The recipe that I've used for 35+ years, used butter in the crust. However, recently, I decided to try butter flavored Crisco and I was thrilled with the crust difference. The butter produces a very white and non-flaky crust, but the butter flavored Crisco produces a super-flaky golden crust that picky-picky husband loved. If you click on the following photo, you can see how nice and flaky this ingredient substitution turned out.

NOTE: If you do not have maple extract, just leave it out.

NOTE: Picky-picky husband is not a big nut eater, so I put minimal nuts in these when I make them. Even with the extra filling, they bake in 20 minutes.
 

Monday, 15 July 2013

MINI MAPLE CHEESECAKES

We love the world of mini desserts these days; with an "empty nest", mini desserts are an easy better way to battle the mega-calories that a big ole' cheesecake in the fridge tempts us with.

Picky-picky husband LOVES all things maple, so I've been on a search for a maple cheesecake for a long time. This recipe is a combination of several other recipes combined with my own personal tweaks. WE
are very pleased with the results; they are sweet, smooth to the tongue, maple-y and super easy to make.

CRUMB CRUST
3/4 cup graham cracker crumbs
2 tablespoons sugar
2 tablespoons melted butter

Mix until well combined; I do this in a plastic food bag (saves on clean up). 

Preheat your oven to 275° and put paper cupcake liners in a cupcake pan.

Put a slightly rounded tablespoon of crumb mixture into each paper liner and press down.

CHEESECAKE FILLING
8 ounces cream cheese (room temperature)
1/3 cup REAL maple syrup (I've never tried pancake syrup)
1 tablespoon sugar
1 teaspoon vanilla extract
1/4 teaspoon maple extract
1 egg
2 tablespoons flour

Beat the cream cheese until it is fluffy and well mixed. While the mixer is running, drizzle in the maple syrup (scrape the sides of the bowl down if necessary).

Beat in the egg, extracts and flour until smooth.

Pour over the crumb crusts, filling almost to the top.

Bake at 275° for 30 to 35 minutes or until set. 

NOTE: My electric oven took 35 minutes to bake these because my maple syrup and egg were cold (right out of the fridge). If you bring the syrup and egg to room temperature before making these, it would probably only take 30 minutes to bake.

NOTE: I've never used artificial pancake syrup in these little cheesecakes, so I can't tell you if that will work or not, although I'm guessing it would (it just wouldn't taste as good).

NOTE: This recipe made 10 little cheesecakes.

Thursday, 4 July 2013

S'MORE CUPS

This has to be the cutest idea that I've seen in a while. It (and the photo) is from  At Home With Amy.   They are delicious and so much fun.


7 whole graham crackers finely crushed
1/4 cup powdered sugar
6 tablespoons melted butter
4 milk chocolate candy bars (see note)
12 large marshmallows

Mix the graham cracker crumbs, powdered sugar and melted butter together until crumbly and evenly mixed. Put a small scoop of these crumbs in each cup of a mini-muffin tin and press down and up the sides to form a little "cup".  Bake at 350° for 4 or 5 minutes or until the edges are bubbling.

WhiLe the cups are baking, break apart the candy bar into sections (Hershey's are already scored into sections) and cut the marshmallows in half (scissors dipped in cold water works well for this).

Remove the cups from the oven and put a square of chocolate in each crumb cup, then top with a marshmallow half. Return to the oven for 1 or 2 minutes or until the marshmallow is just slightly puffed.

Cool in the pan for 15 minutes before removing them, then cool them completely. 

Melt the remaining chocolate (microwave works well) and dip the top of the completely cooled S'more Cups into the melted chocolate. Let them sit for about an hour to "set" the chocolate.

Store in an airtight container for up to a week. "Reheating" these in the microwave for a FEW seconds, is beyond delicious.

NOTE: Any (ALL chocolate) candy bar will work, whatever is your favorite....dark? white? milk chocolate?

Wednesday, 15 May 2013

EASY MINI CHEESECAKES

Picky-picky husband has decided he loves cheesecake. Not just any cheesecake (that's part of his picky-picky-ness), but he loves miniature cheesecakes. I think it is because he can just snag one out of the fridge without plate or utensils.

This recipe for mini-cheesecakes is extremely quick and easy and since you can use any flavor of jam, it is quite versatile. If you don't want to add the jam, just leave it out!!

CRUST
1 cup graham cracker crumbs
2 tablespoons sugar
3 tablespoons butter, melted

Mix these three items until everything is moist and crumbly.
Place paper cupcake liners in cupcake pan (recipe makes 24 miniature cheesecakes).  Place a scant tablespoon of the crumbs in the bottom of each paper liner and tamp down a little.

CHEESECAKE FILLING

(3) 8 ounce packages of cream cheese (room temperature)
3/4 cup sugar
2 teaspoons vanilla extract
3 eggs

Beat the softened cream cheese for 2 minutes; it should be very creamy. Add the sugar and vanilla and beat for about 30 seconds.

Add the eggs, one at a time, beating well (on low) in between each egg.

If you are going to use jam in these cheesecakes (it is completely optional), put a rounded tablespoon of cheesecake batter on top of each graham cracker crust. Swirl a little of your favorite jam over the batter, like this:

Top this with another heaping tablespoon of cheesecake filling and then put another swirl of jam on the top surface.

Bake at 325°F for 25-30 minutes (my electric oven takes 25 minutes).
Leave the baked cheesecakes in the pan and cool to room temperature. After they are at room temperature, put them in the fridge to chill for at least a couple hours before serving.

Monday, 6 May 2013

MINI BUTTERSCOTCH CHEESECAKES

Whether you are a small family or "empty nesters" like us, this scaled down recipe for mini-butterscotch cheesecakes is a handy one.

I started scaling down full sized dessert recipes because we got tired of eating the same dessert several nights in a row. This recipe (depending on how big you make them) will give you 5 or 6 cupcake sized cheesecakes.


Preheat oven to 325°F and line a cupcake pan with paper liners.

GRAHAM CRACKER CRUST:
3/4 cup graham cracker crumbs
2 tablespoons sugar
3 tablespoons melted butter
Mix crust ingredients and divide evenly between 5-6 paper liners (press crumbs down to make flat crust inside paper liners).

CHEESECAKE BATTER:
1/2 cup butterscotch baking chips
4 ounces regular cream cheese (room temperature)
2 tablespoons sugar
1 eggs slightly beaten (room temperature)
1 teaspoons all purpose flour
1/2 teaspoon vanilla extract
1/2 teaspoon rum extract (see note)

Melt butterscotch baking chips (I use my microwave) just until they are melted and smooth, don't overheat. Set aside to cool down a little.

Beat the cream cheese until it is very smooth (1 minute or so?). Beat in the melted (and cooled) butterscotch chips and sugar until well mixed. Add the egg, flour and extracts and beat until smooth, but don't over beat.

Pour the batter over the crust and fill paper liners about 80% full, or almost to the top. When these cheesecakes are done baking, they will look domed, but as they cool, they will lose that "dome".

Bake for 25-30 minutes (my electric oven takes 30 minutes). Of course it will depend on how much you fill up the paper liners and how hot your oven runs. Just bake them until they are set.

Cool in the pan for half hour or so, then put them (still in the pan) in the fridge to chill for a few hours. Remove paper liners before serving.

NOTE: If you don't have rum extract, just double the vanilla.


Friday, 22 March 2013

MINI PEANUT BUTTER CHEESECAKES

Chocolate glazed, mini peanut butter cheesecakes, what could be better? My family loves cheesecake and I've made a bagillion of them over the years, but I've never quite mastered cutting them cleanly, especially when serving a crowd. These mini cheesecakes are the perfect solution for Easter this year.

CRUST
1½ cups graham cracker crumbs
4 tablespoons sugar
¼ cup melted butter
pinch of cinnamon

Mix crust ingredients well, set aside

FILLING
(2) 8 ounce pkg. cream cheese room temperature
1 cup granulated sugar
1 teaspoon vanilla extract
1/2 cup creamy style peanut butter
3 tablespoons flour
2 eggs

Line cupcake pan with paper liners (this recipe makes 18 cheesecakes). Spoon a little of the crust crumbs into each paper liner and press down. Set aside and preheat your oven to 350°F

In a large bowl, beat the room temperature cream cheese and granulated sugar until very smooth, scraping down the sides of the bowl if necessary. Add the peanut butter and vanilla and beat until smooth.

While beating, sprinkle in the flour and then add the eggs, one at a time, mixing until smooth.

Fill the paper liners almost full (I use an ice cream scoop for this).  Bake in 350°F oven for 20-23 minutes. My electric oven took 23 minutes.

Cool to room temperature, then top with chocolate glaze.

CHOCOLATE GLAZE
6 tablespoons melted butter
6 tablespoons unsweetened baking cocoa
6 tablespoons boiling water
2 cups powdered sugar
1 teaspoon vanilla extract

Mix the cocoa into the butter until smooth. Add the boiling water and mix well. Add the powdered sugar and vanilla and whisk till smooth.  Pour over the cooled cheesecakes and put in the fridge to help the glaze "set".

Store cheesecakes, covered, in the refrigerator until time to serve.

Friday, 15 June 2012

MINI CHICKEN POT PIES

Picky-picky husband loves chicken pot pies, but they definitely  have not been on my "quick fix" list until now. This "recipe" is almost a cheater recipe, because you can skip the filling recipe below and just use your favorite leftover chicken and gravy to make
these. 

They were so tasty that picky-picky husband went back for seconds!! With this quick and easy technique, I can see we will be having mini chicken pot pies a lot more often.


2 potatoes  cubed fairly small
1 cup favorite veggies(I use a frozen pea-corn-green bean mix)
1/2 stalk celery chopped fine
1 tablespoon onion chopped fine
1 carrot sliced thin
1 COOKED chicken breast small cubed
1 tube of refrigerator rolls (see note about brand)
3 tablespoons butter
3 tablespoons flour
2 1/2 cups chicken broth (see note)
2 teaspoons chicken bullion
pepper to taste

In a large sauce pan, saute the onion and celery in a little butter until soft. Add the chicken broth, potatoes, veggies, bullion and pepper (DO NOT ADD THE CHICKEN MEAT AT THIS STAGE). Boil about 5-8 minutes or until potatoes and carrots are fork tender.

Drain but SAVE THE BROTH!! In a medium size sauce pan, melt 3 tablespoons of butter then add 3 tablespoons flour and stir, (cook for about a minute to cook out the raw flour taste).  Add the saved chicken broth (whisk like crazy when you add the broth). Cook until the mixture thickens, then put the cooked veggies back in. Remove from heat and set aside. Note: If the "gravy' seems a little thick, just add a couple tablespoons more chicken broth.

Spray a Texas size muffin pan lightly with vegetable spray (even if it is a non-stick pan). Roll out each refrigerator biscuit very thin and place one in each muffin cup.


Then use your fingers to press the thinned out biscuit up the sides and to the top of each cup.

NOTE: If you don't have a Texas size muffin pan, see note below.

NOTE: I've tried all brands of refrigerator biscuits for this recipe and the very best one (for mini pot pies) is a Kroger brand biscuit called JUMBO butter biscuits  (our Fred Meyer sells them).

 
Place pieces of cooked chicken in the bottom of each little pot pie and then spoon the veggies and gravy over it (almost to the top).

Place the muffin pan on a cookie tray (in case you've filled them too much) and bake in preheated 375 oven for 20 minutes or until golden brown and bubbly.

 
Remove from oven and let sit for 3 or 4 minutes before taking them out of the pan; this will really help.

Don't worry, they stay hot forever!! Use a butter knife to assist you in lifting these out of the pan.


NOTE:  If you don't use chicken bullion, you'll have to add a little salt to the sauce.

NOTE: On occasion, I buy Pillsbury Grands refrigerator biscuits, but they don't work well for this recipe (too bready). The Kroger brand of Jumbo Butter Biscuits roll out nice and thin and they bake into a thin crusty-buttery shell.

NOTE: I don't think this recipe will work very well in a standard cupcake pan unless you chop everything VERY small and use only half of a refrigerator biscuit (but I've never tried it).


Thursday, 9 February 2012

MINI BLUEBERRY CRUMB TARTS

I found this recipe, a while back, on The Life and Loves of Grumpy's Honeybunch and decided to give it a try. I have used the pastry shell many times in other recipes like Pecan Tassies, but I never thought of using it with a fruit filling until Shelby's post....what a great idea!!
CRUST

3 ounces cream cheese (Shelby uses fat free)
1/2 cup butter at room temperature
1 cup all purpose flour

Mix until smooth, wrap in plastic and chill for an hour.  This dough is lovely and very easy to work with. While the dough is chilling, make the blueberry filling.

BLUEBERRY FILLING

4 cups of blueberries (if frozen - thaw and drain well)
Juice of one lemon
3/4 cup sugar (Shelby uses Splenda)
1 tablespoon cornstarch mixed with 1/8 cup cold water

Mix the blueberries, lemon juice and sugar in a heavy bottomed saucepan. Bring to a slow boil and then whisk in the cornstarch slurry (cornstarch and water mixed together). Keep stiring so that lumps do not form. Continue to cook and stir for 1-2 minutes or until very thick.  Remove from heat and let cool.

CRUMB TOPPING

1 cup all purpose flour
3 tablespoons brown sugar (Shelby uses Splenda brown sugar)
3 tablespoons butter at room temperature

Work these ingredients together, with your fingers, until you get a soft crumbly texture.

NOTE: This makes a TON of crumb topping. I cut the ingredients in half and I STILL had too much topping, so I put the rest in the freezer for my next baking project.

ASSEMBLY

Roll the chilled dough into 1" balls (this recipe makes about 20-24 tarts). Place each ball of dough into ungreased mini-cupcake pan.

Use a tart tamper (or anything in your kitchen that has a large rounded end that you can use) to tamp down the dough, making sure the dough comes up on the sides of each tart. You can also use your fingers to make a depression in the dough ball and work the pastry crust up the sides of the tart well.

Fill each tart with the cooled blueberry filling and a generous teaspoon of the crumb topping.

Bake in a pre-heated 375 oven for 15-20 minutes (my oven took 25 minutes) or until the crust gets a nice golden color. Let the tarts COOL IN THE PAN for 10-15 minutes before lifting them out.

NOTE: I love versatile recipes like this one. I think ANY fruit filling would work well here; I'm trying apple next!!

Thursday, 2 February 2012

EASY BAKED MINI-OMELETS

I see great possibilities with this little recipe. Not only is this the perfect way to use those bits and pieces of veggies, meat and cheese in your fridge, but each mini-omelet can be made to order. Another reason I like this recipe is that it can easily be doubled for a crowd and there is no standing over an omelet pan while your company is waiting for you!!
 
Picky-picky husband loves these little omelets with just diced ham and cheese in them, but I like them with chopped mushrooms,broccoli and bacon. Either way, two mini-omelets make a very filling breakfast. 

EASY BAKED MINI-OMELETS        (makes 12)

1 pound of breakfast meat cooked and drained (ham, bacon or sausage)
1 cup favorite veggies, sauteed (optional)
8 large eggs
1/4 cup milk (or cream if you're feeling self-indulgent)
1/2 teaspoon vegetable oil
1/2 teaspoon baking powder
1/4 teaspoon salt (depending on how salty your meat is)
1/2 teaspoon black pepper
1/2 cup grated Parmesan cheese (I used swiss)

Preheat oven to 375 and spray cupcake pan with vegetable spray.

Whisk the eggs, milk or cream, oil, baking powder and salt and pepper together until smooth.

Divide meat and vegetables evenly between the 12 greased cupcake wells; top with a little cheese.  Pour enough egg mixture in each well to come to the top.

Bake in preheated 375 oven for 15-20 minutes (my oven took 22 minutes). During this time, they will REALLY dome up like a real cupcake, but they will flatten back down as they cool.

Remove from oven and garnish with a pinch of cheese (I topped them with cheddar). Let the mini-omelets rest in the pan for 5 minutes before you take them out (they will easily lift out after 5 minutes).

 
NOTE:  Use your imagination regarding what veggies you want to include in this recipe, just remember they have to be pre-cooked.

NOTE: These little muffins stay warm for quite a while, and they reheat VERY well in the microwave. They would be a fantastic addition to any brunch table because they are tasty at room temperature as well !!

NOTE:  When I make these for just the two of us, I cut the recipe in half, which gives us 2 mini-omelets each and a couple to snack on later.

Wednesday, 28 December 2011

MINI OREO CHEESECAKES

I've made these little gems many, many times, and I've never had a single crack in any of them and they go together in a snap. They are absolutely delicious and totally addicting. 

The only "extra" step, is that they really need to sit in the fridge overnight after baking (to soften the cookie crust), but this step is WELL WORTH IT. You can eat them as soon as they are chilled, but the cookie will still be crunchy.  If you let them sit in the fridge overnight, the cookie almost becomes part of the cheesecake...scrumptious.


24 Oreo cookies (divided)
1 pound of cream cheese (room temperature)
1/2  cup granulated sugar
1/2  cup sour cream
2  large eggs (lightly beaten)
1 teaspoon vanilla extract

Place 6 (original) Oreo cookies in the food processor and process into fine crumbs (set aside). Preheat your oven to 275 F and put 18 cupcake papers in your cupcake pan. Place a whole Oreo cookie in the base of each cupcake paper and set aside.

With your electric mixer (I used my stand mixer with a paddle attachment), mix the cream cheese on medium speed for three minutes.  Add the sugar and vanilla and mix for another 2 minutes on medium speed, or until very smooth. Add the lightly beaten eggs and mix on LOW until well combined. Fold in the sour cream and cookie crumbs with a spatula.

Fill the cupcake papers almost to the top (I used an ice cream scoop and it seemed to be the perfect measurement). Bake in preheated 275° oven for 30 minutes.

Once they are baked, leave them in the cupcake pan and immediately put them in the fridge. Chill overnight.  Delicious !!!


Thursday, 19 May 2011

PECAN PIE MINI-MUFFINS

These little gems taste just like a Pecan Tassie. They are made out of 6 every day ingredients and are great with a morning cup of tea, or the lunch box or a long car ride (not at all messy). These are Hubby's "new" favorite snack. Store covered.
1 cup light brown sugar
½ cup flour
2 eggs
2/3 cup soft butter
½ teaspoon vanilla
1 cup chopped pecans

Preheat oven to 350°. Grease and flour a mini muffin pan (or spray with a cooking spray that has flour in it, like Bakers Joy). Mix the wet ingredients in a medium size bowl and then stir in the dry ingredients, its just that simple!!

Mix long enough to just get the batter smooth. Make sure you use the MINI muffin pans (not cupcake size). Fill cups with one tablespoon batter each (makes 24). Bake for 17 minutes.

NOTE: Dusting pan with flour is important.

NOTE: My oven cooked these in 16 minutes.

NOTE: Taking these out of the pan is the only (mildly) tricky part of this recipe. Letting the muffins cool for 2 or 3 minutes before you try to remove them from the pan will help a lot, but don't leave them in the pan longer than than that, since they will get harder to remove from the pan as they cool.

NOTE: Slide a  thin knife gently around the sides of the muffins, then gently lift them out using the knife.

NOTE: If you keep these muffins covered well, they will stay soft for a long time (they tend to get a little crispy around the edges if left out in the air).

Thursday, 18 November 2010

FUDGE FILLED PEANUT BUTTER COOKIES

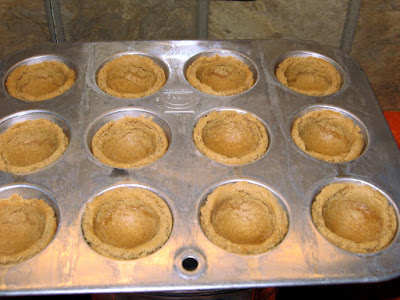
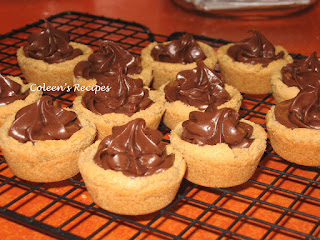
This impressive (but very simple) cookie will be great for the holidays. It consists of a sweet peanut butter cookie shell, filled with a rich fudge filling. When you first make the cookies, the filling is soft enough to pipe (or you can spoon it into the shell). However, after it completely cools, the filling is the consistency of a soft fudge. They are delicious, and look so pretty!!!

 
1/2 cup butter (room temperature)
1/2 cup creamy peanut butter
1/2 cup white sugar
1/2 cup brown sugar
1 egg
1 teaspoon vanilla
.
Cream the above ingredients together until smooth, then add:
.
1  1/4 cups all purpose flour
3/4 teaspoon baking soda
1/2 teaspoon salt
.
Beat everything until very smooth. Shape dough into 1" balls (makes about 4 dozen) and place each ball into the bottom of a mini muffin tin (ungreased) like this:

Bake in a preheated 375 oven for about 10-11 minutes or until they look like this:

After they are baked, find something in your kitchen that has a round end that you can use to press down on the center of these HOT cookies (to make the shell shape). I used the large rounded end of my mortar and pestle, but anything will work. Just be careful not to press so hard that you break through to the bottom. They should look like this:
Let these cookies cool (in the pan) for 10 minutes, then use a thin (but pointed) paring knife to assist you in lifting the cookie shells out of the pan (they come out pretty easy). Cool shells on a baking rack.
.
FILLING
 
1 cup milk chocolate chips
1 cup semi-sweet chocolate chips
1 (14 ounce) can sweetened condensed milk (not evaporated)
1 teaspoon vanilla extract
 
.
Melt the chocolate in a double boiler over simmering water (I just used the microwave). With an electric mixer, beat in the sweetened condensed milk and vanilla until smooth. Fill the cookies.
 
The fudge dries to the touch
after it is completely cooled.

Monday, 10 May 2010

BROWNIE BITES

So what does a baker do to celebrate her 60th birthday? She bakes something
SHE really likes!!!


 I found this little recipe gem on My Tasty Treasures last winter; she calls them Fudge Brownie Cups; I call them addictive!!! Donna frosts hers with melted Hershey's chocolate, but since I made these for my birthday, I frosted them with my all-time favorite chocolate cream cheese frosting. These little beauties are moist and chocolate-y and so easy to pop in your mouth. My son calls them "wicked good". Fortunately for me...as all bakers know, calories consumed on your birthday do not count!!!


 2 sticks butter, room temperature
12 ounces semisweet chocolate chips
1 + 1/3 cups firmly packed light brown sugar
2 teaspoons vanilla extract
4 eggs
20 tablespoons flour

Lightly butter mini-muffin pans (I used Bakers Joy spray). Melt together, butter, semisweet chocolate and brown sugar in a pan over low heat, stirring constantly until mixture is smooth (*keep it as cool as possible).
.
Remove from heat and beat in vanilla, then eggs, one at a time, stirring until well mixed. Fold in flour and blend well. (*let this batter sit for about 10 minutes before you bake it and it will be easier to work).
.
Spoon one (*rounded) measuring teaspoonful into each spot. Bake in preheated 350F oven for 10 to 12 minutes (*my oven took exactly 11 minutes). Remove and cool completely.

NOTE: grease or spray pans between each batches of brownie cups. This recipe makes 60.
.
CHOCOLATE CREAM CHEESE FROSTING
1/4 cup soft butter
1/2 cup baking cocoa
8 ounce cream cheese (room temperature)
1 teaspoon vanilla extract
4 cups powdered sugar
.
The butter needs to be really warm, but not melted. Stir the cocoa into the butter and mix well; whip in the cream cheese and add vanilla, scraping the sides of the bowl frequently so that you get a nice smooth butter-cocoa-vanilla-cream cheese mixture. Beat in the powdered sugar, one cup at a time, beating until really smooth in between each cup of powdered sugar.

Thursday, 19 November 2009

CLASSIC PECAN TASSIE

Almost everyone has their own favorite version of a pecan tassie, the classic Christmas treat. However, for those who don't, this is a great one. Pecan tassies are a bite size pecan pie in a cream cheese pastry crust. I used to make them only at Christmas, but they have become one of Hubby's favorites, so I make them throughout the year. This recipe makes 4 dozen and freezes well.


PASTRY CRUST
1 cup unsalted butter at room temperature
6 ounces cream cheese at room temperature
2 cups all purpose flour

Cream the butter and cream cheese (with electric mixer) until it is light and fluffy. Add the flour and beat until the dough comes cleanly away from the inside walls of your mixing bowl. Flatten dough into a disk, wrap in plastic and chill for one hour (I NEVER chill this dough, it is a dream to work with).

FILLING
3 large eggs
3 tablespoons melted unsalted butter
1¾ cups light brown sugar
1 teaspoon vanilla
¼ teaspoon salt
1 cup coarsely chopped pecans

Beat the eggs until very well mixed and lemon colored. Stir in everything else.

ASSEMBLY
Roll pastry into 1 inch balls and place them into an ungreased mini-muffin pan. Using your fingers, press the balls of dough into the bottom of each cup and up the sides. (I use the floured end of my rolling pin to press the dough into place). Put a few chopped pecans in the bottom of each pastry shell and top with about a tablespoon of filling. (see note)


 Bake in pre-heated 375F oven for 15-20 minutes or until the pastry is golden and the filling is set, yet still a little soft in the center. Remove from oven and sit the pan on a wire rack for about 10 minutes before you try to lift them out. Lift tassies out of pan and cool on a wire rack.

NOTE: Keep in mind that the filling puffs as it bakes, so don't overfill the unbaked shells. If you overfill them, they will be hard to get out of the pans. For those stubborn tassies, use the tip of a knife to help you lift them out of the pan.