Showing posts with label BAKE SALE RECIPES. Show all posts

Thursday 19 January 2012

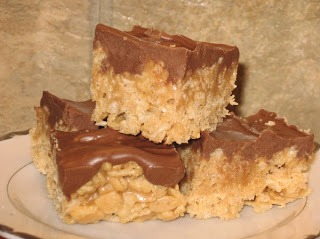
PEANUT BUTTER KRISPIE TREATS

This recipe has been around forever; it is one of those classic sweet treats from our childhood.  Picky-picky husband is a big fan of the old fashioned Rice Krispie treats made with melted marshmallows, so he initially resisted this peanut butter version (he resists change).  However, this evening, I noticed that the pan of treats, on the kitchen counter, had been seriously noshed upon.

This recipe is SUPER easy and uses all pantry ingredients, which is a good thing.  It goes together in just minutes (the longest part of this recipe is the cool down time). They cut beautifully if you let them cool all the way down and they travel well.

1 cup light Karo syrup
1 cup granulated sugar
1 cup peanut butter
6 cups Rice Krispie cereal
1 cup semi-sweet chocolate chips
1 cup peanut butter chips (see note)

Mix the syrup and granulated sugar in a heavy saucepan, over medium heat (stirring). Bring to a boil and immediately remove from heat; stir in peanut butter until smooth and well mixed.

Pour over Rice Krispie cereal and stir to coat evenly.  Press into a lightly greased 11" x 7" pan (see note) and press down evenly with slightly damp hands.

Melt the chocolate chips and stir until smooth (I melted mine in my microwave at 60% power for about 1½ minutes).  Spread evenly over bars.  Cool about an hour before cutting.

NOTE: This recipe calls for half semi-sweet chocolate chips and half peanut butter chips, but any combo would work well.  I found a similar recipe that used half semi-sweet chocolate chips and half butterscotch chips for the frosting (they called them Scotcheroo's).
NOTE: The size of the pan is not really important. Just remember that the smaller the pan is, the thicker the treats will be and the bigger the pan is the thinner they will be.
Thursday 3 November 2011

PECAN PIE BARS

Picky-picky Hubby says these pecan pie bars are totally addictive. They have a buttery shortbread crust and a nutty (and slightly gooey) baked topping with a great pecan pie taste.

I have to admit that my budget doesn't allow pecans right now (they are almost $10 for a 2 cup bag!!), so I use walnuts, but they are ever so tasty just the same!! I am planning on adding these to my Christmas cookie trays (I'll splurge on pecans for Christmas though).

CRUST
2 cups all purpose flour
1/3 cup sugar
¼ teaspoon salt
2/3 cup butter (room temperature)

Mix the above crust ingredients and press into a 9" x 13" baking dish (see note below about greasing pan). This mixture will seem crumbly, but don't worry about that. Just pat it evenly into the pan.  Bake in preheated 350 oven for 20 minutes. While the crust is baking, mix up the topping:

TOPPING
3 eggs well beaten
1 cup light corn syrup (like Karo syrup)
½ cup granulated sugar
½ cup brown sugar
2 tablespoons melted butter
1 teaspoon vanilla
1 + 2/3 cup chopped pecans (toasted a little)

Mix well and pour over partially baked crust, making sure the nuts are evenly spread. Return to the 350 degree oven and bake for 25 more minutes.
Cool completely in pan before cutting.

NOTE:  The pecan pie bar crust does not stick to the pan, but around the edges of the topping, it does tend to stick. To combat that, I lined my 9" x 13" glass dish with foil. I didn't grease the bottom, but I greased the sides of the foil a little (the new Reynolds Easy Release foil would be good for this). 

Also, let the foil ends hand over the edges of the baking dish a little bit so you can grab the foil "tails" and lift the baked (and cooled) bars out of the pan for easier cutting.

When the bars are completely cool, just lift the whole thing out of the pan and onto a cutting board.They are rich, so cut the bars small.

Thursday 19 May 2011

PECAN PIE MINI-MUFFINS

These little gems taste just like a Pecan Tassie. They are made out of 6 every day ingredients and are great with a morning cup of tea, or the lunch box or a long car ride (not at all messy). These are Hubby's "new" favorite snack. Store covered.
1 cup light brown sugar
½ cup flour
2 eggs
2/3 cup soft butter
½ teaspoon vanilla
1 cup chopped pecans

Preheat oven to 350°. Grease and flour a mini muffin pan (or spray with a cooking spray that has flour in it, like Bakers Joy). Mix the wet ingredients in a medium size bowl and then stir in the dry ingredients, its just that simple!!

Mix long enough to just get the batter smooth. Make sure you use the MINI muffin pans (not cupcake size). Fill cups with one tablespoon batter each (makes 24). Bake for 17 minutes.

NOTE: Dusting pan with flour is important.

NOTE: My oven cooked these in 16 minutes.

NOTE: Taking these out of the pan is the only (mildly) tricky part of this recipe. Letting the muffins cool for 2 or 3 minutes before you try to remove them from the pan will help a lot, but don't leave them in the pan longer than than that, since they will get harder to remove from the pan as they cool.

NOTE: Slide a  thin knife gently around the sides of the muffins, then gently lift them out using the knife.

NOTE: If you keep these muffins covered well, they will stay soft for a long time (they tend to get a little crispy around the edges if left out in the air).

Thursday 18 November 2010

FUDGE FILLED PEANUT BUTTER COOKIES

This impressive (but very simple) cookie will be great for the holidays. It consists of a sweet peanut butter cookie shell, filled with a rich fudge filling. When you first make the cookies, the filling is soft enough to pipe (or you can spoon it into the shell). However, after it completely cools, the filling is the consistency of a soft fudge. They are delicious, and look so pretty!!!

 
1/2 cup butter (room temperature)
1/2 cup creamy peanut butter
1/2 cup white sugar
1/2 cup brown sugar
1 egg
1 teaspoon vanilla
.
Cream the above ingredients together until smooth, then add:
.
1  1/4 cups all purpose flour
3/4 teaspoon baking soda
1/2 teaspoon salt
.
Beat everything until very smooth. Shape dough into 1" balls (makes about 4 dozen) and place each ball into the bottom of a mini muffin tin (ungreased) like this:

Bake in a preheated 375 oven for about 10-11 minutes or until they look like this:

After they are baked, find something in your kitchen that has a round end that you can use to press down on the center of these HOT cookies (to make the shell shape). I used the large rounded end of my mortar and pestle, but anything will work. Just be careful not to press so hard that you break through to the bottom. They should look like this:
Let these cookies cool (in the pan) for 10 minutes, then use a thin (but pointed) paring knife to assist you in lifting the cookie shells out of the pan (they come out pretty easy). Cool shells on a baking rack.
.
FILLING
 
1 cup milk chocolate chips
1 cup semi-sweet chocolate chips
1 (14 ounce) can sweetened condensed milk (not evaporated)
1 teaspoon vanilla extract
 
.
Melt the chocolate in a double boiler over simmering water (I just used the microwave). With an electric mixer, beat in the sweetened condensed milk and vanilla until smooth. Fill the cookies.
 
The fudge dries to the touch
after it is completely cooled.

Monday 25 October 2010

PUMPKIN - CRANBERRY BREAD (the best)

If the rating system for this recipe was 1 to 5 stars; I would rate this a 10. It is absolutely delicious and will be perfect for your holiday table!! It is very easy to make (doesn't even take an electric mixer) and yet it is unique enough for gift giving. I hope you try it, it is SO GOOD... extremely moist, total comfort food!!!


 Preheat your oven to 350, and grease and flour two 9" x 5" loaf pans. Set out two large bowls. In the first one mix:

3 cups flour
3 1/4 teaspoons cinnamon
3/4 teaspoon nutmeg
3/4 teaspoon ground ginger
1/4 teaspoon ground cloves
2 teaspoons baking soda
1 1/2 teaspoons salt

In the 2nd bowl, mix:
3 cups sugar
(1) 15 ounce can pumpkin (without spice)
4 eggs
1 cup vegetable oil
1/2 cup orange juice
2 cups fresh or frozen cranberries
.
Whisk the first bowl (with the flour in it)until the dry ingredients are well mixed. Whisk the 2nd bowl (with the pumpkin in it) until WELL mixed and oil is completely incorporated. Pour the wet into the dry and mix with spoon just until moistened. Stir in cranberries gently.
.
Pour batter into prepared loaf pans. Bake 60 to 65 minutes (my oven took 70 minutes). Cool (in the pans) for about 10 minutes, then turn them out. Wrap the hot bread IMMEDIATELY in plastic wrap, covering tightly. Let the breads cool completely in the wrap.


NOTE: Make sure you use a 15 ounce can of plain packed pumpkin and NOT pumpkin pie filling (big difference).

NOTE: Recipe calls for ½ cup of orange juice, which I didn't have, so I used pineapple juice instead.

NOTE: Wash and sort your cranberries. Try to use the darkest berries. Make sure they are thawed out before mixing into batter.

NOTE: It is OK to put the plastic wrap on the hot bread as soon as it comes out of the pan. This forces the moisture back into the bread as it cools.

NOTE: My oven took 70 minutes to cook these loaves. Use the toothpick test to determine doneness.

Wednesday 12 May 2010

PEANUT BUTTER BLONDIES (and a thank you)

These peanut butter blondies are dense, moist and packed full of peanut butter flavor; they are the consistency of a good brownie and would make an excellent addition to any lunch box, bake sale or weekend treat served with a big glass of cold milk.

½ cup peanut butter
1/3 cup butter (room temperature)
2/3 cup white sugar
½ cup packed brown sugar
2 eggs
2 teaspoons vanilla extract
1 cup all purpose flour
1 teaspoon baking powder
¼ teaspoon salt
.
In a medium mixing bowl, cream the peanut butter and butter together; beat in the sugars, eggs and vanilla just until well mixed. Add the flour, baking powder and salt and mix just until everything is well mixed.
,
Bake in a greased 9" x 9" baking pan at 350F for 30 to 35 minutes or until top springs back when lightly touched (my oven took 34 minutes). Frost and sprinkle with chopped peanuts. Cool before cutting.
.
PEANUT BUTTER FROSTING
½ cup peanut butter
1 teaspoon vanilla extract
2 cups powdered sugar
4 to 5 tablespoons milk
Warm the peanut butter in the microwave just until it gets very soft, then whip everything together, starting with the lesser amount of milk and adding more if necessary.
Thank you very much for all of the warm birthday sentiments. Your kind and generous words made my (potentially traumatic) 60th birthday a lot easier for me. Thank you friends!!

Monday 22 March 2010

SHORTBREAD MELTAWAY COOKIES

My Hubby has started a new hobby...wood turning and I couldn't be happier. I am quickly accumulating beauties like the piece below which is made out of birch (he harvests wind-fallen birch and spruce trees from the forest behind the house). He used to teach college level hand thrown pottery, so I'm guessing some of those skills have carried over to his new wood turning attempts. In any case, I am very happy with the results.

Today's Shortbread Meltaway Cookies are quick, easy and they literally do, melt in your mouth.
.
1 cup all purpose flour
½ cup cornstarch
½ cup powdered sugar
¾ cup butter (room temperature)
1 teaspoons vanilla
.
Cream the butter, in a stand mixer, until smooth. Add the rest of the ingredients and beat until the dough is well mixed and comes away from the sides of the bowl.
.
Roll dough into one inch balls and roll them in sugar. Place on ungreased cookie sheet and lightly press down with a fork. Bake at 350F for 10 to 12 minutes or until the outside edges of the cookie start to turn golden. Makes about 3 dozen cookies.


Sunday 14 March 2010

(TWIX COPYCAT) CHOCOLATE-CARAMEL-SHORTBREAD COOKIES

A few days ago, I spotted an intriguing recipe on someones web page, however, in my haste I didn't take note of who's page it was (thank you to everyone who helped with page suggestions). Instead I found a similar recipe and gave it a try (with a couple minor changes). My first "taste testers" were a group of old grizzled snowmachine groupies in Hubby's shop and the treats disappeared instantly.


Next, I made some to take to our granddaughters 14th birthday party; they were a hit there as well. It is unfortunate that these cookies are called Twix cookies, because they are vastly better than ANY Twix candy bar I've ever eaten. There is a sweet crispy shortbread cookie base, topped with a nice thick layer of caramel made from sweetened condensed milk, and then they are topped with your favorite flavor of melted chocolate. These cookies are totally addicting and the recipe is going straight into my FIVE STAR recipe folder.

COOKIE BASE
1 cup cold butter
2 generous cups all purpose flour
heaping ½ cup brown sugar (I used dark)


Put all the of cookie ingredients into the food processor and pulse until it just starts to bind together. It won't go completely together, but if you watch it while you pulse, you will see the consistency change and small "clumps" appear.


Press this mixture into a parchment paper lined 9x13 baking dish (I left the ends of the parchment paper long, so I could grab them and lift the final product out of the pan for easier cutting). Bake in preheated 350F oven for 20-25 minutes or until edges are light golden. (see note below)

While the crust is baking, make the caramel filling:
.
¾ cup butter
generous ½ cup brown sugar (I used dark)
3 tablespoons Karo corn syrup
14 ounce can sweetened condensed milk (not evaporated)
.
In a heavy bottomed saucepan, mix all of the caramel ingredients. Heat (and stir constantly) on medium high heat until it comes to a boil. At first, the melted butter will sort of float on top, but as it cooks (and you stir) it will incorporate. See note below for burner temperature suggestions. Reduce heat and simmer for 6-8 minutes, stirring constantly. Pour over pre-baked cookie base. Refrigerate until caramel layer is cold and firm to the touch.
.
Melt 12 ounces of your favorite flavor chocolate (I used milk chocolate) + a teaspoon of butter. Stir until smooth and pourable (I just melted mine in the microwave for 60 seconds). Spread over cooled caramel and return to the fridge to let the chocolate set (I actually speed set mine in the freezer).
.
Cut into small squares and serve. These are really rich, so I cut them into squares just a little bigger than 1" x 1".
.
NOTE: The recipe calls for "2 generous cups of flour"...whats up with that? I measured my flour and sugar in the standard way then added a tablespoon extra per cup. I'm not sure if that is what the original recipe meant, but it worked well for me.
.
NOTE: The ingredient amounts for the cookie crust are way off track in the original recipe. I only used about 2/3 of the crumbs for the cookie base and it was perfect. If you like a thick cookie base, use all of the crumbs.
.
NOTE: My burner settings go from 1 to 10. I brought the caramel ingredients up to a boil at setting 8 (medium high), then quickly turned it down to setting 5 (medium) for a couple of minutes, and finally ended up on setting 3 (low); cooking for a total of 6 minutes. The caramel will be pretty thick, so keep reducing the heat until the caramel. The caramel traps and holds the heat for a long time, so start turning down your burner before it gets to that wild-boil stage.
.
NOTE: I found this recipe (dated 2008) on a web page called The Domestic Side of Life.

Wednesday 21 October 2009

CRANBERRY SHORTBREAD BARS

This week, I have been trying out some new "goodie" recipes with the holidays in mind; I like to add a few new items to my standard cookie boxes every year. Today I made some cranberry shortbread bars that I found in a holiday issue of Fine Cooking and they are definitely going to make the "big list". The bars have an ultra-buttery shortbread crust topped with cooked cranberries and then a shortbread-type streusel topping. They are baked in a 9 x 13 pan that is lined with foil for easy removal. The bars are very sweet, buttery, tender and cut nicely...perfect for gift giving.

Wash and sort a 12 ounce bag of fresh cranberries. Put them in a heavy saucepan with ¼ cup of water and one cup of white sugar. Bring to a boil over high heat. After it comes to a boil, reduce the heat to medium high and boil until the sauce is like a thick syrup - 5 to 8 minutes (mine took 6 minutes). Set aside to cool (it will thicken even more as it cools).
SHORTBREAD CRUST
21 tablespoons of butter, melted and cooled to room temp.
This seems like a lot of butter, but it makes an upper and lower crust
¾ cup of white sugar
2 large egg yolks
3 cups + 3 tablespoons all purpose flour
No need to use an electric mixer, I did it all with a wooden spoon. Mix the sugar into the melted butter and whisk in the egg yolks. Stir in the flour to make a very stiff dough. Remove two cups of this dough and pat evenly into a foil lined 9 x 13 pan. Prick the dough all over with a fork and refrigerate for 30 minutes (or put in freezer for 7 minutes). Set the rest of the dough aside.
With the remaining dough, run a fork back and forth in the dough to loosen it up into crumbles Add ¼ cup of white sugar to these crumbles and work the fork back and for a little more to break up any large clumps. Do not chill these crumbles.
Bake the 9 x 13 chilled pan of dough, on the middle rack of your oven, for 20 minutes at 325. After 20 minutes, the dough will still be very pale in color and will not have any golden color on the edges. Remove it from the oven and spread the cooled cranberry filling evenly over it.
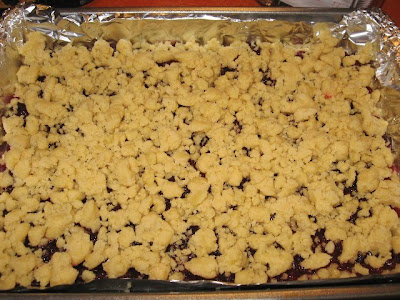
Spread the loose crumbles over the cranberry filling

Bake on the TOP rack of a 350 oven for 25 minutes (mine took 32 minutes). Watch the crumbles towards the end of the baking time. You want to see a little golden color on the top of the crumbles, like this:
Cool baked bars on a wire rack for at least an hour or until completely firm. You can speed set them in the fridge. When the bottom of the pan is completely cool, lift the bars out of the pan by pulling on the flap ends of the foil. Cut into 2" bars. These will keep at room temperature for a week.

NOTE: The butter measurement of 21 tablespoons is not a typing error
NOTE: Bake the bars in a metal 9 x 13 pan so they don't over bake. Line it with foil and leave the ends of the foil a little long, so you can use them as handles to lift the cooled bars out of the pan.
NOTE: Pay attention to baking temperatures. The first crust pre-bake is on the middle rack at 325. The final bake is on the TOP rack at 350. The recipe says it is baked on the top rack so that the bottom of the crust doesn't get too dark.

Friday 7 August 2009

THE ULTIMATE (FILLED) PEANUT BUTTER COOKIE

These (crispy on the outside - creamy on the inside) cookies are a hit every time I make them. They are quick to make and delicious to eat, with a sweet peanut butter cookie exterior and a Reese's cup interior...need I say more? These cookies are also a great bake sale item.


1 BAG OF MINIATURE REESE CUPS FROZEN

1 & 1/4 CUPS ALL PURPOSE FLOUR
3/4 TEASPOON BAKING SODA
1/4 TEASPOON SALT
1/2 CUP BUTTER FLAVORED CRISCO (don't substitute)
1/2 CUP PEANUT BUTTER
1/2 CUP WHITE SUGAR
1/2 CUP BROWN SUGAR
1 EGG
1 TEASPOON VANILLA EXTRACT


In a large mixing bowl, cream together the Crisco, peanut butter, sugars, egg and vanilla until it is smooth and creamy. Next add the dry ingredients and beat until smooth. Roll this dough into 1" balls and place them in an UNgreased mini-muffin pan:

Bake them at 375 for 10 minutes and they will look like this:


Immediately press a FROZEN miniature Reese's cups into the center of each cookie (pressing down until the top of the candy is at the same level as the top of the cookie).


Let these cool IN THE PAN for about 2 minutes before you try to remove them. To remove the cookies, insert just the tip of a thin knife between the cookie and the pan (the knife will help you lift the cookie out). The chocolate will melt from the heat of the cookie, so it will be messy until the chocolate re-sets. You can speed set them in the fridge.

BE CAREFUL, THEY ARE ADDICTING!!


Tuesday 21 July 2009

HOT SOFT PRETZELS

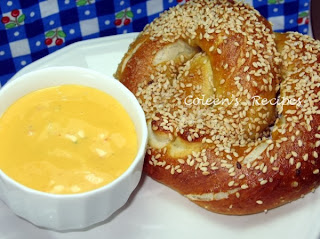
I love hot pretzels, especially nice big puffy ones. This recipe is not hard at all, but it does have a few pesky steps. The pretzels are deliciously chewy on the outside and soft and fluffy on the inside and you can top them with just about any seed or seasoning you prefer. I made these with toasted sesame seeds and a light sprinkle of coarse ground salt. This recipe makes 8 large pretzels.


1  and 1/2 cups warm water
1 tablespoon white sugar
2 teaspoons kosher salt
1 generous tablespoon of dry yeast
4 cups all purpose flour (divided)
2 tablespoons canola oil


In your stand mixer, mix two cups of the flour, sugar, yeast and kosher salt. Pour the warm water and oil over the top and mix with wooden spoon until all ingredients are wet. Let this stand for about 10 minutes.

Attach the dough hook to your mixer and gradually beat in the additional 2 cups of flour (1/2 cup at a time). If dough is still sticky after you get the 4 cups of flour mixed in, had a little more flour (tablespoon at a time) until the dough pulls cleanly away from the inside walls of your mixing bowl. Once it does that, knead on low for about five minutes (see note).

Remove the dough from your mixing bowl and spray the inside of the bowl with vegetable spray; return the dough to the bowl and spritz the top of the dough with vegetable spray; cover the bowl with plastic wrap and let dough sit for an hour or until it doubles in size.

Preheat your oven to 450. Line two large baking sheets with parchment paper and spritz the paper with vegetable spray then rub a paper towel over the parchment paper to remove excess spray. Set aside.

Punch down the dough and cut it into 8 pieces. Roll out each piece into a 24" rope and twist it into a pretzel shape (pinching ends together tightly). Place pretzels on the prepared parchment paper.

In a large (wide bottomed sauce pan), bring 10 cups of water + 2/3 cup baking soda to a rolling boil (it will really bubble). Gently place one of your pretzels onto a slotted FLAT spatula and gently lower the spatula (with pretzel) into the boiling water. Shake the spatula very gently and the pretzel will float off into the water. COOK ONLY ONE PRETZEL AT A TIME.

Boil each pretzel for 30 seconds then gently lift it back out of the water and (before you put it BACK on the parchment paper) rest the slotted spatula/pretzel gently on a kitchen towel (for a couple of seconds) so that it will absorb any water drips......THEN put it back on the parchment paper. Repeat this process for each pretzel.

When all pretzels have been through the water bath, gently brush the tops of them with egg wash (1 egg yolk beaten with 1 tablespoon water) and sprinkle with salt and/or seeds.

Bake in 450 oven for 12 minutes or until they are dark golden brown. Cool on a wire rack for five minutes before serving.

 Not the best for you, I'm sure, but the cheese dip recipe that is on the back of the Velveeta box is still my favorite: 1 pound of Velveeta (cubed) + 8 ounce jar of your favorite salsa. Mix and microwave on high until cheese is really melted (about 4 or 5 minutes...stir once in a while). When it's completely melted, add 2 tablespoons chopped cilantro. Yum!

This evening, hubby had sweet chicken wings for dinner (not my favorite) so I sliced one of the big pretzels and made an egg salad sandwich with it. Oh man, what a sandwich!

 NOTE: I have not tried it, but I do not see why the initial dough mixing and kneading couldn't be done with a bread machine.

NOTE: Be very gentle with the pretzels when you transfer them from the boiling water back to the parchment paper lined baking sheet.

Friday 17 July 2009

BAKE SALE BUTTERSCOTCH COOKIES

I call this recipe "Bake Sale Butterscotch Cookies" because they are quick and inexpensive to make, they are something a little different and the recipe makes a whopping six dozen cookies! A great recipe for a bake sale, pot luck or family gathering.


5 and 1/4 cups all purpose flour
3 cups of brown sugar (packed)
3 eggs

2 cups butterscotch chips
1 and 1/2 cups butter flavored Crisco
1 tablespoon vanilla extract
1 tablespoon baking powder
1 and 1/2 teaspoons baking soda
1/2 teaspoon cream of tartar

In a large mixing bowl (stand mixer works best because its such a big batch), cream the Crisco and brown sugar together. Add the eggs, one at a time, and beat well after each egg. Beat in the vanilla.

Combine the dry ingredients and butterscotch chips and add gradually to the Crisco mixture and beat well. Roll this dough into balls (about the size of a small walnut) and bake on an ungreased cookie sheet, at 350, for 12 to 13 minutes. Cool on parchment paper.

NOTE: This recipe can be made with butter instead of the Crisco, but it will act very different while it is baking. With the Crisco, the cookie will retain its nice shape that you see in these photos. If you use butter, you will get a much flatter cookie.


NOTE: Personally, I prefer the butter flavored Crisco because it gives you a much more professional looking cookie. My hubby is the cookie connoisseur in hour house and he prefers cookies made with butter flavored Crisco.


 This recipe makes a lot of cookies!

Friday 12 June 2009

CANDIED APPLES

What says summer fun, more than candied apples? They are very easy to make (if you follow a few tips at the end of this post) and would be a nice addition to any summer birthday party, barbeque or even for a 4th of July picnic!


 The ingredients are very basic:

10 small (snack size) apples
10 popsicle sticks
2 cups white sugar
1 cup light Karo syrup
1 & 1/2 cups water
1/2 teaspoon cherry UNsweetened Kool Aid powder

Wash any wax or soil from the apples and thoroughly dry them (remove stems). Insert wooden stick into the stem end of the apple (push about half way into the apple).

Line a baking sheet with waxed paper and spray it with cooking spray (keep this close to your work station).

In a medium size, heavy-bottomed sauce pan, attach your candy thermometer and make sure that the glass tip is not setting on the bottom of the pan (it will give you a false reading). Put all of the candy ingredients in the pan and cook on medium high, stirring constantly, until it comes to a boil. DO NOT STIR THIS AFTER IT COMES TO A BOIL. Turn the heat down just a little, so that you have a nice gentle boil and then keep an eye on the thermometer. Cook until it hits 300 or hard crack stage; this can take up to 30 minutes, but on my stove it takes about 25. Keep a close eye on the candy after it reaches 285 because those last 15 degrees go faster than you think. DO NOT STIR!!

Remove the pan from the heat and work fast. Holding the apple by the stick, dip it into the pan (hold the pan at a tilt, so the candy will "pool". Twirl the apple and then let the candy drip off of the apple for a few seconds and then place on the prepared waxed paper. DON'T GET THIS STUFF ON YOUR SKIN!!!!! Apples will be hard and ready to use five to ten minutes after they are dipped. If you are going to add sprinkles or any decorations, you will have to add them with lightening speed because these cool off and become hard FAST (an extra person would be a big help if you are going to add sprinkles).
NOTE: Keep a bowl of ice water near your work station just in case you get some of this on your fingers (definitely not safe for younger kids).

NOTE: In the first stage of making the candy, try not to splash any liquid onto the sides of your pan (it can make crystals in the candy).

NOTE: I keep an electric frying pan, preheated to 200, at my work station. When the pan of candy comes off of the stove, I set it on the DRY, warm frying pan so that it doesn't cool down too fast and lengthens the amount of time you have to dip the apples.

NOTE: The best tip I can give you is to have EVERYTHING at your fingertips BEFORE you start dipping the apples. Once you are at that stage, you have zero time to run to the pantry and find something.
NOTE: Any candy left over can be poured out onto a pan that has been sprayed with cooking spray. When it's cooled, you can break it up and eat it (tastes like cherry life savers.

NOTE: There is a teaspoon of UNsweetened Kool Aid powder in each small envelope, so you can get two batches of candied apples per Kool Aid envelope (any flavor will work).

NOTE: Clean up can be a pain if you don't have a dishwasher. If you have a dishwasher, just put all of the stuff in the hot cycle.

NOTE: These are best eaten the day they are made. If you HAVE to make them a day ahead of time, do NOT cover them because the moisture from the apples will degrade the candy coating.

NOTE: Someone told me (I haven't tried it) that you can candy grapes, cherries and other small fruit (use their stems to hold onto instead of using a stick).

Wednesday 27 May 2009

PEANUT BUTTER CANDY (sort of like a Pay Day candy bar)

If you like Pay Day candy bars, you will love this recipe. It tastes very similar, but SO much fresher and better. This recipe makes a 9 x 13 pan of candy, which would be an excellent addition to your children's birthday party menu! They take just a few minutes to put together and then an hour or so in the fridge, to "set".


 4 cups honey roasted peanuts
(1) 10½ ounce bag miniature marshmallows
1/2 cup butter (melted)
(1) 14 ounce can sweetened condensed milk (not evaporated)
(1) 10 ounce bag peanut butter chips
1/2 cup peanut butter

Line a 9 x 13 dish with foil and spray it with cooking spray (I spray my foil with cooking spray then blot it with a paper towel so it doesn't make the candy greasy). Set aside.

In a large (heavy bottomed) saucepan, mix the marshmallows and melted butter. Heat over medium-low heat until completely melted (you do not want the marshmallows to boil, but you want to see a little bubble now and then). Keep it at this temperature for about a minute.

Stir in the sweetened condensed milk, peanut butter chips and peanut butter. Stir until everything is melted and smooth.

Pour this mixture over the peanuts in the pan and spread out evenly. Sprinkle the other half of the peanuts over the hot mixture and press the nuts into the surface of the hot mixture (with your hand). Chill in the fridge for 1-2 hours or until firm. Cut into pieces and serve. Store covered in fridge. Makes 60 pieces of candy.

Tuesday 31 March 2009

PEANUT BUTTER COOKIES

This glass cookie jar has been on my kitchen counter for the last 20 years. At least 75% of that time, it had peanut butter cookies in it. Our standard comment (“the kids like peanut butter cookies”) was obviously just an excuse, because the kids are all grown (with families of their own) and the jar is STILL full of peanut butter cookies. Needless to say, I don’t even look the recipe up anymore…I think I could make these cookies in my sleep.

Preheat oven to 375° Bake on un-greased cookie sheet
In large mixing bowl with electric mixer, beat until smooth:
1 cup butter flavored Crisco
1 cup peanut butter
2 eggs
2 teaspoon vanilla
1 cup white sugar
1 cup brown sugar
Once the above mixture is smooth, add 2 ½ cups flour, 1½ teaspoons baking soda and ½ teaspoon salt. Mix well. Cookie dough should be moist and hold together easily when you squeeze a hand full. If it seems a little dry or crumbly, add a couple tablespoons of water.
Roll the dough into balls about the size of walnuts, and then roll the balls in granulated sugar. Place on UN-greased baking sheet and flatten with fork tines in criss-cross pattern. Bake for 10-12 minutes at 375°; cool on parchment paper.
NOTE: Cooking time depends on how large you make these cookies. Dough balls about the size of a walnut, bake for 11 minutes in my oven.
NOTE: The original recipe called for butter (instead of the Butter Flavored Crisco). The Butter Flavored Crisco makes a much lighter & crispier cookie than butter (and still provides the buttery taste).