Thursday 10 September 2009

CHOCOLATE-VANILLA CHEESECAKE

I served this delicious new recipe last weekend. Hubby and I couldn't stop nibbling on it. It has a bottom chocolate layer and a top vanilla layer, then I topped it with my newly discovered cream cheese-whipped cream. Talk about a one-two punch!! It is super quick to make and baked up without a single "crack".


CHEESECAKE
4 squares semi-sweet baking chocolate

(2) 8 ounce cream cheese (divided)
1/2 cup sugar (divided)
2 eggs (divided)
(1) 6 ounce Oreo pie crust
1 teaspoon vanilla extract

Microwave the chocolate (on high) for 1½ minutes (stirring every 30 seconds) or until completely melted. My microwave only took about 50 seconds.

To the melted chocolate, add one 8 ounce package of cream cheese, 1/4 cup of white sugar and one egg. Beat until well mixed and pour into Oreo crust. In a different bowl, mix one 8 ounce package of cream cheese, 1/4 cup of white sugar, one egg and 1 teaspoon vanilla extract. Beat until smooth and pour over the chocolate filling. Bake in preheated 350 oven for 40 minutes or until center is almost set. Chill for at least 3 hours then frost with whipped topping and sprinkle with toasted sliced almonds.

CREAM CHEESE-WHIPPED CREAM TOPPING
(1) 8 ounce package of cream cheese
1/2 cup white sugar
1 teaspoon vanilla extract
1/2 teaspoon almond extract
2 cups heavy whipping cream
toasted sliced almonds

Combine room temperature cream cheese, sugar and extracts in a large mixing bowl. Beat until very smooth. With the mixer still running, slowly pour in the whipping cream (stop once in a while to scrape down the interior walls of the bowl). Continue to beat until cream forms stiff peaks.

This is a very sturdy whipped cream and will not deflate (there is still one piece of this cheesecake in the fridge (calling my name) and the whipped cream still looks as good as it did on Sunday).

NOTE: I did not have an Oreo crust, so I made a graham cracker crust and used a 10" pie plate. I didn't find out, until the cheesecake was in the oven, that an Oreo crust is only 8½" across, so my cheesecake came out a little on the thin side.

NOTE: Next time I make this recipe, I plan on making individual size cheesecakes by baking them in (cupcake paper lined) muffin tins. I am also going to alternate spoonfuls of chocolate and vanilla batter and run a knife through the batter to "marble" it.

NOTE: If you ever forget to bring the cream cheese up to room temperature, use this trick: unwrap cream cheese completely and microwave it on high for 10-15 seconds. (my microwave takes 13 seconds).

Wednesday 9 September 2009

ULTRA TENDER PORK RIBS

This is more of a cooking technique than a recipe. I've made country style boneless pork ribs using this technique for as long as I can remember and they are fork tender every time. I am guessing that most of the experienced cooks out there already know this method, but there might be a few younger ones who would like to try this.

Look for boneless country style pork ribs (the leaner the better) in the meat market. An hour before you want to grill, cut them in to sections about 4" long and put in a large sauce pan and enough water to cover them. Add a tablespoon of salt and a teaspoon of black pepper.
Bring this to a boil on high. After a few minutes, you will see some "crud" float to the surface. Don't get grossed out, but it will look like this:

Skim it off and throw it away (you may have to do this a couple of times). Reduce the heat to a gentle boil and boil for 45 minutes. Pull one of the pieces of pork out of the pan and see if it is fork tender. If not, boil for another 15 minutes (but no longer). Some pork tends to be tougher than others.
Drain pork and put it into a bowl. Drizzle with enough melted butter to coat each piece. Put the pork onto the barbecue grill and coat with your favorite barbecue sauce. Keep turning and basting until the barbecue sauce starts to crisp up on the edges (usually only takes about 10-15 minutes tops.
These ribs are So flavorful and you don't even need a knife to cut them. I hope you will try this technique.

NOTE: Country style pork ribs are usually cut about 2" wide and 10" or so long. Ask your butcher if you can't find them. Make sure you get the boneless ones (better value).

Monday 7 September 2009

PITA BREAD

Pita bread made with a bread machine, what could be easier? The only trick is to roll them thin enough (I didn't roll my first batch thin enough and they were lofty little pillows, but bad minimal pockets). The thinner batch made perfect pocket pitas.

This was a quick fun project and the final results were delicious, you will never be happy with grocery store pita's again.


1 and 1/8 cups warm water
3 cups all purpose flour
1 teaspoon salt
1 tablespoon vegetable oil
2 teaspoons white sugar
2 teaspoons active dry yeast

Put everything into the bread pan of your bread machine, select dough setting and start. Let dough going through first rise.

Turn dough out onto your floured counter. Knead dough a few times then divide into 8 equal pieces and roll each piece into a ball. With a floured rolling pin, roll each ball out into a 6" circle (dough will be very thin). Lay circles on lightly floured surface and cover with a dry light-weight dish towel. Let it rest for 30 minutes or until slightly puffy.

In the meantime, heat your oven to 500 (yep! 500) and place a wire cake rack into your oven (set it right on the oven rack...no pan please). Gently lift a circle of dough and gently place it on the hot cake rack (bake 2 at a time). Bake for five minutes until they are super-puffed and lightly brown. Remove with spatula and place in a brown paper bag (I just used some lunch bags) and make sure you seal up the bag well (I used a chip clip to seal bags) and let the pita's cool in there. I don't know why this step is necessary, but that is what the recipe calls for. They will look like this:


 When they are cooled, you can split them open or cut off one end. We really enjoyed these and I will definitely make these again.


NOTE: I don't have a bread machine, so I just made the dough in my stand mixer and let it rise for about an hour.


Friday 4 September 2009

PEANUT BUTTER RICE KRISPIE TREATS

A few weeks ago, Heidi at Tried-and-True Cooking with Heidi posted a recipe that she called Old-School Peanut Butter Squares. The recipe caught my eye because it does not call for marshmallows (we like marshmallows, but they aren't always in the pantry). The only tweak I made was to substitute some of the sugar for a little honey (I love the taste of peanut butter with honey). I must say the treats were a big hit around here. With mom's packing school lunches these days, I thought it would be a good time to repeat Heidi's super simple and super tasty recipe.

1 cup light corn syrup
1 cup white sugar (see note)
1 cup peanut butter
5 cups crisp rice cereal

Combine corn syrup and sugar in medium saucepan. Stir until well blended and cook on medium heat until boiling (stirring occasionally). Let boil for 30 seconds and remove from heat. Stir in peanut butter and mix until well blended. Stir in cereal and mix well. Pour into greased 9x13 pan. Lightly spray hands with cooking spray and press mixture into pan. Cool and cut into squares.

NOTE: I removed 2 tablespoons of sugar and replaced it with 2 tablespoons of honey.
NOTE: I let my syrup mixture gently boil for a full minute.
NOTE: I found that you don't have to spray your hands with cooking spray when you press down the mixture. If you dampen your hands and just shake them dry for about 5 seconds, it does the same thing without making the treats greasy.

Thursday 3 September 2009

GREEN ENCHILADA SAUCE

I have always cooked with canned Ortega mild fire-roasted chilies (if hubby doesn't know they are in a recipe, he magically does not get heartburn lol). However, I have put off the urge to cook with fresh Anaheim chilies because I think he would seriously panic if he saw them. Well, recently, the opportunity to cook with fresh Anaheim's presented itself (hubby wouldn't he home for dinner) so I went for it. They were delicious!!
 
 GREEN ENCHILADA SAUCE


3 fresh Anaheim chilies
1 to 2 cloves of garlic
1/2 cup of chopped onion
2 tablespoons olive oil
1 teaspoon cumin
1 to 3 teaspoons mild chili powder
1 teaspoon salt
2 cups chicken broth
2 tablespoons flour

Wash and dry the chilies and put them under the broiler for 5-10 minutes (my broiler took about 8 minutes) turning the chilies about once a minute. You want the skins of the chilies to blacken on at least 60% of their surface. Remove them from the broiler and place them in a Tupperware container with a tight lid (this will help steam the chilies) for about 15 minutes. Next step is to peel off their skins, cut open and remove seeds and dice flesh; you should have about one cup of diced chilies (set aside).

In a frying pan, heat the olive oil and saute the onions and garlic until they are tender and mellow, then put them in a food processor along with 1 cup of prepared chilies, and 1/2 cup of the chicken broth and 2 tablespoons of flour; process until smooth. Transfer to a sauce pan and add the chili powder, cumin, salt and the remaining 1&1/2 cups of chicken broth. Cook until thick and bubbling; lower heat and simmer slowly for about 20 minutes. Use immediately.

While this enchilada sauce can be used on beef enchiladas, it does better with chicken or seafood. The enchiladas pictured here were made with surimi (fake crab). I just chopped the surimi into smaller pieces, mixed it with Monterey Jack cheese and a little of the green enchilada sauce and rolled the filling in tortillas, poured the sauce over them and topped with more cheese. Bake for about 30 minutes or until everything is hot and bubbly. They were light and tasty.

NOTE: I only used 1 teaspoon of mild chili powder. If you like more kick, add more.

Wednesday 2 September 2009

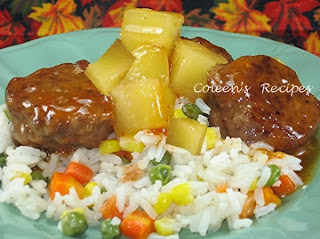
SWEET AND SOUR MEATBALLS

Hubby has a serious sweet tooth; he even likes SOME savory dishes on the sweet side, like this (quick and easy) sweet and sour sauce. It works equally as well with chicken, pork, country style ribs and shrimp.
SWEET AND SOUR MEATBALLS
 
MEATBALLS
1 pound of very lean ground beef
5 tablespoons dry bread crumbs
1/4 cup of milk
1 egg
1 teaspoon salt
1/2 teaspoon black pepper

Mix all ingredients and shape into walnut size balls. Bake for 20 minutes at 375, then drain on paper towels.

SWEET AND SOUR SAUCE
In large sauce pan, mix:
1 cup water
1/4 teaspoon salt
1/2 cup white sugar
1/3 cup apple cider vinegar
1/4 cup ketchup
1 teaspoon soy sauce
1/4 teaspoon dry red chili flakes (I use only a pinch)
(1) 8 ounce can of pineapple chunks undrained

Bring everything to a boil and thicken with 2 tablespoons of cornstarch mixed with 1/4 cup of water. Bring back to a boil, stirring constantly. When the sauce has thickened, turn the heat down to a very slow simmer and add the baked meatballs. Continue simmering for about 20 minutes. Serve over rice.

NOTE: We don't care for a lot of "heat" in our food, so I use a scant 1/4 teaspoon of red pepper flakes.

NOTE: Bake the meatballs for 15 to 20 minutes, depending on how large you make them. I turn on the broiler for the last 2 or 3 minutes to give the meatballs some color.


Tuesday 1 September 2009

PEACH PIE and a QUESTION ABOUT CURRY POWDER

Our fall is revving up...the Alaska State Fair is underway and it is the absolute end of our growing season (we will have frost in less than two weeks). What does all that mean? It is finally cool enough to bake to my hearts content, which makes me a happy camper.
Hubby is the pie eater at our house and he likes thinner pies as opposed to deep dish pies, so I started baking his pies in a two piece tart pan. At first I resisted, but soon discovered that the tart pan not only makes a prettier pie, but they are also much easier to serve (no pie plate corners to maneuver around when your cutting that first piece).

CRUST
2 and 1/2 cups all purpose flour
1/2 teaspoon salt
1 cup ice cold butter
6-8 tablespoons ice water
Place the flour, salt and cold butter (cubed) into a food processor and pulse a few times until you get fine crumbs. Pour this mixture into a bowl and add 6 tablespoons of ice water. If the dough is too dry, add more ice water (1

tablespoon at a time) until the dough hangs together in a ball. Divide your dough in to two pieces (top crust + bottom crust). Wrap one piece in plastic and put it in the fridge. Dust your counter with flour and roll out the other piece of dough to an 1/8" thickness. Place it in the pie plate (or tart pan). Do not stretch the dough. Place this bottom crust in the fridge while you make the fruit filling.

PEACH FILLING
5 cups of fresh peaches (peeled and sliced)
1/2 cup white sugar
1/2 cup brown sugar
1/2 teaspoon cinnamon
1 teaspoon vanilla extract
1/2 cup all purpose flour
1/4 teaspoon salt
2 tablespoons butter
Mix the sugars, cinnamon, flour, salt and peaches (gently) until everything is moistened. Stir in vanilla extract. Remove bottom crust from the fridge and "paint" the INSIDE surface of it with egg wash (1 egg mixed with 1 tablespoon water ). This will help keep the bottom crust from getting soggy while baking. Pour the fruit filling into the bottom crust and dot the filling with small pinches of cold butter.

Roll out the top crust...place it on top of the fruit and pinch the edges (if you are using a pie plate) or run your rolling pin across the edges if you are using a tart pan. Cut a vent hole in the top pie crust. Brush egg wash over the surface of the pie and sprinkle with white sugar. Bake in a PREHEATED 450 oven for 15 minutes, then lower the heat to 350 for 30 more minutes. Remove pie from oven and cool at least 3 hours before cutting.
NOTE:
When I bake a pie in a standard pie plate (especially glass pie plates) I spray the plate with just a little cooking spray. This helps when it comes time to remove the pie, especially if some of the juices have found their way under the crust. This is not necessary with the two piece tart pan.

NOTE: Mix dough as quickly as possible (when using your hands) so that you don't warm up the butter.
NOTE: When you paint the inside bottom crust with the egg wash, be careful not to get too much of it up by the top edge of the tart pan (or the crust will get glued to the pan).

NOTE:
Put a cookie sheet under your pie pan while it is in the oven just in case you have spill overs.

CURRY POWDER QUESTION: I have been looking at some recipes that use curry powder. I have zero experience with curry powder and a quick check on the Internet confused me even more. I guess there are many kinds of curry powders (hot, sweet, etc.). What should I watch for when purchasing curry powder. I want to try a chicken salad recipe that just says " 1/2 tsp. curry powder"...what do I buy? Any suggestions or helpful hints would be appreciated.