Showing posts with label VEGETARIAN. Show all posts

Monday 29 April 2013

BAKED POTATO CHIPS

When I am on a diet, (who am I kidding, I'm always on a diet)my weight loss plan starts to falter when I get a craving for something crunchy and salty. I'm not talking about raw fruits and veggie type of crunchy, I'm talking about potato chip crunchy. If I ignore this craving, it just gets stronger; does that sound familiar to anyone?

I did some online searching for a remedy to my craving that wouldn't have a billion calories. I found three different recipes for baked potato chips that sounded promising.

After trying all three (and immediately tossing all three into the garbage), I decided to make up my own version. I must say I'm quite pleased with it. 

Not only does this little recipe completely satisfy my "crunchy chip craving" but the ENTIRE RECIPE only has one tablespoon of olive oil!!
Wash and dry six golf ball size Yukon gold potatoes. Slice them as thin as possible. A mandolin would work well for this, but I just used my sharpest knife and sliced them; just try to make them all an even thickness.

Toss the sliced potatoes with 1 tablespoon of olive oil, making sure that a little of the oil gets in between every slice. Lay the slices out on a heavy cookie sheet that has been lightly sprayed with vegetable spray, then sprinkle the potatoes lightly with kosher salt.

Baking time is important. One of the recipes I tried (and threw away) called for 2 hours at 200°F. That produced a dull, leathery piece of potato. I even let it cook an extra HOUR and it was still leathery...yuck.  Another recipe called for 18 minutes at 400°F which produced a crisp but burnt taste...yuck again. I then tried sweet potatoes, and while they had promise, they burned before they got crisp.

So I decided to try Yukon gold potatoes. How long you bake them will depend on how thick you sliced your potatoes and how hot your oven runs. I baked mine in a 375°F electric oven for 22 minutes, flipping them over half way through the baking time.


These chips should be eaten right away because there are small "non-crunch" parts on the chips and I'm not so sure they would taste good the next day. However, if you are craving the next best thing to potato chips, I hope you will try these. They have a WONDERFUL flavor and a fantastic, salty crunch!!!

NOTE:  Watch the chips closely the last couple of minutes because once they start to turn golden, they darken quickly.

Friday 19 April 2013

Super Easy Velveeta Mac & Cheese

I know some food snobs will turn their nose up at a recipe using Velveeta cheese and that's OK, I don't use it very often either. However, Velveeta DOES make the creamiest macaroni and cheese, you have to admit it!!

A few days ago, Julie, over at Better than Burgers, posted a recipe she called KFC Mock Mac & Cheese. While I've never tried KFC mac & cheese, the recipe looked great. I made a couple of very minor changes to her recipe (and renamed it, lol). 

We loved it (and it couldn't be easier!!)


My recipe "tweaks" are in BLUE

Boil 2 cups of elbow macaroni for about 7-10 minutes (see note)
8 ounces of Velveeta cheese (see note)
1 cup shredded cheddar (I used sharp)
1/2 cup milk (I used 3/4 cup milk)
1/2 teaspoon salt  (I left this out)
1/2 teaspoon dry mustard powder  (my tweak)

Julie's recipe called for making the sauce in a pan, but I did it this way:

When the macaroni is almost done, put the Velveeta (cubed)+ the shredded cheddar + the milk and mustard powder in a microwave safe bowl. Microwave it on high for 1 minute, remove and stir.  Microwave it for one more minute and stir till smooth.

All microwaves are different, so watch yours for the final 30 seconds as to not over cook. The sauce will be very smooth.

Drain the cooked macaroni and stir into the sauce...that's all there is to it!! If you like "Velveeta Shells and Cheese" out of the box (the one with the foil pouch of cheese sauce) you will love this recipe.
NOTE: This recipe calls for 8 ounces of Velveeta cheese, fortunately, the Velveeta foil wrapper is marked in one ounce sections.
NOTE: Most elbow macaroni is boiled for about 7-8 minutes, but when I make macaroni and cheese, I like to boil the noodles an extra minute or so. It's just a personal preference.

Saturday 6 April 2013

AVOCADO EGG SALAD

This quick and HEALTHY change to mayo-laden egg salad was a huge success; we didn't miss the mayo at all!! It was light and delicious and packed with flavor. I can see countless possibilities with this little recipe (I'm already planning to add a few green onions? hot sauce?).

Personally, I enjoyed this salad just wrapped in a big leaf of lettuce, but Picky-Picky husband went for the traditional sandwich.
4 hard boiled eggs, peeled and chopped
1 large ripe avocado
2 stalks celery chopped finely
1/3 cup diced tomato flesh (see note)
2 tablespoons prepared yellow mustard (see note)
salt to taste (I just added a pinch)
pepper to taste (see note)

NOTE: NO MAYONNAISE!!

Cut the avocado in half, remove the pit and mash the flesh (I mashed about 3/4 of the flesh into a smooth paste and left 1/4 of the flesh in little chunks.

Stir the prepared yellow mustard, salt and pepper into the mashed avocado,  mix well.

Add the chopped eggs, celery and tomato and stir gently until well mixed.  That's it!!


NOTE: I wasn't sure how to explain "tomato flesh"; it just means leave out the juicy-seedy part of the tomato.

NOTE: Two tablespoons of yellow mustard is going to seem like a lot, but the final product does NOT taste overly mustardy, trust me. I just used plain old yellow hot dog mustard.

NOTE: I cook with coarsely ground black pepper, so I used a scant
half teaspoon. If you use finely ground pepper (it measures differently) use less.

NOTE: I put this salad in the fridge for several hours without any avocado darkening problems because I laid plastic wrap right on the surface of the salad and pressed down a little to force out all of the air. I'm not sure if it would turn dark overnight because it never lasts that long at our house.

Sunday 4 November 2012

HOT SPINACH and ARTICHOKE DIP

Party season is coming up and if you are like me, you are starting to surf the Internet for that "next new and exciting" appetizer or party snack recipe. I keep all of those "potential recipes" in a folder on my desk and once in a while I look through it and say to myself..."what was I thinking?!?"  So much for late night Internet surfing I guess!!

Today's post is one of those traditional "never fail" recipes that seems to please everyone. I make it with low fat ingredients but you can't tell it. This tasty dip is hot and creamy (it stays hot for a while which is nice)and very easy to make.


8 ounce cream cheese (low fat ok)
1/4 cup sour cream (low fat ok)
1/4 cup Parmesan cheese (grated, not powdered)
1/4 cup Romano cheese (grated)
2 cloves garlic minced (I used roasted from jar)
1/2 teaspoon dry basil
1/4 teaspoon garlic salt
salt and pepper to taste
(1) 14 oz. can artichoke hearts (rinsed)
1/2 cup red bell pepper (chopped finely)
10 ounces fresh baby spinach
1/4 cup shredded Monterrey Jack cheese

Plunge fresh spinach into boiling water for about 30 seconds, remove and put into large bowl of ice water to stop the cooking. Drain and squeeze dry and roughly chop.

Drain the artichokes and rinse under cold running water, then chop into small pieces.

Mix everything together and place in a (lightly greased) small oven proof dish. Bake at 350F for 25 minutes. Serve with pita chips or any sturdy cracker.

NOTE: This can also be baked in a hollowed out bread bowl instead of a baking dish.  

Monday 22 October 2012

SWEET AND SAVORY RICE


I love savory rice and picky-picky husband loves sweet rice. As a matter of fact, his all time favorite rice is plain white rice with butter and sugar on it, go figure!!

Today's rice is one that we BOTH enjoy. It goes very well with almost anything, but we especially like it with pork chops or baked ham.

.
2 ¼ cups chicken broth
1 tablespoon butter
1 cup raw white rice
½ teaspoon onion powder
½ teaspoon salt
¼ teaspoon black pepper
1 teaspoon ground cumin
1 large cooking apple (cored, peeled and diced)
1/3 cup dark brown sugar
1/3 cup golden raisins
½ cup chopped toasted pecans
.
Melt the butter in a medium saucepan and add the RAW rice.  Cook/stir the rice until it turns sort of opaque white. This will help keep the rice grains separate while it cooks.

Add the chicken broth and everything else in the recipe, except the pecans.  Bring to a boil and then turn the heat way down so that it is at a low simmer. Put a tight fitting lid on the pot and let it simmer for 20 minutes (don't peek).

Remove the pan from the heat, gently stir in the toasted pecans and put the lid back on for 5 minutes (but with no heat).

That's it!! The dark brown sugar and fruit lend a mildly sweet flavor to the rice and the ground cumin gives it a full flavor. This rice makes an excellent buffet dish since it also tastes great at room temperature. I hope you will try it.

NOTE: I've also used canned peaches (when I was out of apples) and it tasted great.

NOTE: Use vegetable broth instead of chicken broth if you are vegetarian

Monday 17 September 2012

DAIRY FREE COLESLAW

There are a zillion coleslaw recipes on-line; there are creamy ones; there are spicy ones; there are slaws made with broccoli; I even saw one with Gorgonzola cheese the other day!! Personally, I have been looking for a basic, no frills, "please everyone" coleslaw recipe to make for large family gatherings.

In my search, I found this quick and easy "recipe gem" over at MGCC, and truly IS a keeper. Not only is it delicious, but there is no dairy in it and it lasts in the fridge for up to a week; as a matter of fact, it just keeps getting tastier and it goes well with everything!!

Thank you for sharing the recipe, Charlotte!!!


3 cups shredded cabbage
1/4 cup diced onion
1/4 cup diced green pepper
1 carrot shredded
3 tablespoons sugar
3 tablespoons vinegar
3 tablespoons oil
1/2 to 1 teaspoon salt
1/4 teaspoon black pepper (my variation)
1/2 teaspoon celery seed (my variation)

How small you chop the veggies is a matter of personal preference. We prefer pieces about twice the size of a grain of rice and my food processor (using the steel blade) makes short work of this step.

In a small saucepan, mix the sugar, vinegar, oil, salt, pepper and celery seed and bring to a boil, stirring just until sugar has dissolved then remove from the heat.

Pour the hot dressing over the vegetables and mix well.  Let this cool a little before covering it and putting it in the fridge to chill until ready to serve. 
NOTE: Toss salad again, just before serving to distribute the dressing.

NOTE: This recipe make four generous side servings (adult size).  When I make it for a crowd, I quadruple the recipe.

Monday 13 August 2012

ZUCCHINI PICKLE RELISH

This time of year, there is an overabundance of zucchini, so I've been making relish out of it. A friend kindly gave me a wonderful recipe last year and I was thrilled with the outcome of my first pickling adventure. Unfortunately, I only made half of the recipe and we ran out quickly because we used it in EVERYTHING from tuna fish, to potato salad, to hot dogs, to you name it... you would NEVER guess it was made out of zucchini.

This season, I'm making TWO batches. I also (nervously) tweaked last years recipe a little with amazing results; we love this recipe, it has a perfect bread and butter pickle flavor.

12 cups unpeeled zucchini (chopped small)
3 cups sweet onion (chopped small)
1 cup celery (chopped small)
2 large red bell peppers (chopped small)
2 cups peeled carrots (chopped small)
1 cup pickling salt (see important note)
3 cups white vinegar
3 cups granulated sugar
2 teaspoons turmeric
2 teaspoons DRY mustard powder
1 tablespoon celery seed
1/2 teaspoon black pepper
1 tablespoon corn starch


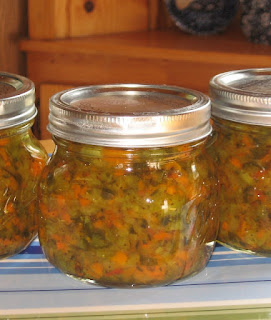
Wash and dry the vegetables before cutting them (the only one you should peel is the carrot).  Coarsely chop the vegetables, then put them in the food processor (2 or 3 cups at a time) and pulse them a few times to get them small enough for a good relish (but not too small). The chop size should look like the next photo.


CLICK ON PHOTO TO ENLARGE
Measure the vegetables AFTER you chop them in the food processor.

Mix the small chopped vegetables and 1 cup of pickling salt. Place this mixture (covered) in fridge overnight (The salt will draw excess moisture out of the veggies).

IMPORTANT NOTE: After the vegetables have chilled overnight, it is VERY IMPORTANT that you rinse the salt off of them.  I used a colander and rinsed the veggies three times (in small batches). Whatever method you choose to rinse the salt off, just make sure you rinse, rinse, rinse then squeeze as much water out of the chopped veggies (with your hands) as you can. Set aside.

In a large, non-aluminum, pot, mix the vinegar, sugar, celery seed, spices and corn starch. Bring to a boil (to dissolve the sugar). Add all of the rinsed vegetables to the pot and bring BACK to a boil. Once it is boiling well, turn heat to medium low and gently boil everything for 20 minutes, stirring every five minutes or so.

While the relish is simmering, sterilize 7 pint jars and 7 (two piece) screw on lids. I do this by putting the jars through a hot cycle in my dishwasher (but I don't put the lids in there). Keep the jars in the (unopened) hot dishwasher after the last cycle.

For the lids, I just wash them with hot soapy water, rinse them well and then pour boiling water over them in a large saucepan which I keep warm on a burner.

Also, while the relish is simmering, bring your  hot water bath to a boil, here's how: Place a rack on the bottom of a large stock pot (or something to keep the jars up off of the bottom of the pan) and fill the pot with water (water should be deep enough to cover the jars by 2". Bring to full boil.

Now that your relish has boiled for 20 minutes, remove it from the heat and place it in the hot jars, leaving 1/4" space at the top of the jars (make sure there are no air pockets in the relish). Wipe the rims of the jars with a clean, hot, wet kitchen towel and screw on the two-piece lids fairly tight. Lower the jars into the already boiling water and keep them in there  10 minutes for half pint jars and 15 minutes for pint jars.

Remove from boiling water and let cool to room temperature on your kitchen counter. As they cool on your counter, you will hear the lids "pop" when they make the correct seal.  If they don't "pop", just keep them in the fridge.

NOTE: Do not use regular table salt for this recipe because the anti-caking agents in table salt cause the relish to discolor.  If you don't have pickling salt, the next best thing to use is kosher salt (but I highly recommend pickling salt).

NOTE: This recipe makes 7 pints of relish.

Monday 30 July 2012

PERFECT FRENCH FRIES

We don't eat homemade french fries very often because they don't turn out very well. I've tried many potato varieties; I've tried various oils and temperatures; I've tried double frying them (what a hassle that was!) and I've tried baking them... they all come out of the oil LOOKING great but turn limp and greasy in a matter of minutes.

Then, recently, I came across this very simple recipe.  Assuming this technique was just too easy to produce great results, I didn't even mention the recipe "experiment" before I served them.
After about the third french fry, picky-picky hubby offered this unsolicited critique: "these fries are REALLY good"... I knew I had a winner.  I will definitely be using this super easy method the next time we decide to treat ourselves to some fries.

2 pounds of Russet potatoes (make sure they are Russet's)
2 tablespoons corn starch
peanut oil   (peanut oil works the best)
kosher salt

Slice the potatoes into shoestring size pieces, trying to make them as even as possible. Rinse the cut potatoes thoroughly and put them in a big bowl of plain cold water in the fridge until dinner time (at least an hour, but overnight is even better).

Take the potatoes out of the cold water and lay them on an absorbent towel, blotting most of the water off. Coat the potatoes lightly with the cornstarch and shake off the excess.  Let them air dry while the peanut oil heats up to 375 degrees.

A word about the oil:  You will get the best french fries using peanut oil; it has a high scorch level and tastes great.  You can also use regular vegetable oil, but avoid canola oil. Canola oil tastes a little "off" if you bring it up to 375 degrees. I was surprised what a difference peanut oil makes.

When the oil reaches 375, put a big handful of the coated potatoes in the oil and stir to separate them.  After they've fried for a minute or so, stir them again to make sure they aren't sticking together (don't overcrowd your pan).

When the potatoes are light golden brown, take them out of the oil and put them on paper towels to wick away some of the oil. Sprinkle generously with kosher salt (it tastes so much better than regular table salt on the french fries).

That's it!! No more limp, greasy french fries (and NO more double frying!!). Who knew that Russet potatoes, a little soak time, a little corn starch and some peanut oil would make such a great french fry?!?!

NOTE ABOUT CUTTING THE POTATOES: Peel (or wash) the potatoes and cut the sides of the potatoes off (making sort of a rectangle). This will give your potato flat sides to rest on while you slice through the potato.  Stack the potato "slabs" and cut into shoestring size potatoes.
Russet's are those big baking potatoes.

Monday 2 July 2012

BRIGHT CITRUS SALAD

In the heat of summer, this great salad is a nutritious combination of crunch (from the broccoli and sunflower seeds) and sweetness (from the oranges and raisins).  It gets its brightness from the lemon juice, green onions and red bell pepper and finally the addition of the black beans give you that wonderful "full feeling" that you do not get with some light meals. This is a GREAT side dish!! Measurements given here are approximate (except for the dressing). YOU decide how much of each ingredient you would like in your salad. The amounts given here are catered to MY taste buds. 


3 small heads of broccoli (broken into small pieces)
1 red bell pepper (diced finely)
1 cup raisins
2 oranges (peeled and sliced thickly)
15 ounce can of black beans (rinsed and drained)
1/2 cup  toasted sunflower seeds
1/2 cup sliced green onion tops

Dressing:
1/2 cup light mayonnaise
2 tablespoons fresh lemon juice
1 tablespoons sugar
1/4 teaspoon black pepper


Wash (and shake dry) the broccoli. Remove as much of the stalk and stems as you can so you can break the florets into bite size pieces. Add diced red bell pepper, raisins, oranges, black beans, sunflower seeds and green onions.

Mix dressing ingredients with a whisk and pour dressing over the salad. Toss gently and serve immediately. NOTE: You may not need or want all of the dressing.


NOTE: Peel the oranges, removing as much of the white as you can, then slice the orange into thick slices; cut the thick slices into four wedges.

NOTE: Let your imagination go wild with this salad, you can add just about anything that strikes your fancy.
Wednesday 16 May 2012

CLASSIC MACARONI SALAD

Everyone seems to have their own tried and true family macaroni or potato salad recipe. Some have lots of vinegar, some have lots of mustard, some have no eggs (yee gads!!) I even had some that had small cubes of sharp Cheddar cheese which was surprisingly tasty.

I remember when I was little, my folks took us back to visit our VERY German relatives in the Dakota's and one of my Aunts gave me some German potato salad. I was a huge fan of potato salad, but let me tell you that hers was not like any other potato salad I had ever tasted. It was not only FULL of vinegar and bacon grease, but it was HOT!! It's been over 50 years but I still can remember my shock!!  lol

What do you put in YOUR macaroni (potato) salad?


2 cups dry small seashell macaroni
½ cup chopped onion chopped (fairly fine)
3 stalks of celery with leaves chopped (fairly fine)
½ cup red bell pepper chopped (optional)
1 cup grated carrot
3 large pickles chopped (favorite flavor)
4 hard-boiled eggs chopped
½ teaspoon black pepper
1 cup lite mayonnaise
3 tablespoons yellow prepared mustard
3 tablespoons pickle juice

Boil macaroni for 8 minutes (or as recommended on box), then rinse under cold water, and drain very well.

NOTE: Many recipes warn you not to rinse cooked macaroni, however, I find that macaroni salad stays creamier if you rinse the starch off of the cooked macaroni before you add the mayonnaise to the salad.

Add chopped veggies, eggs and pickles to the cooked and rinsed macaroni. Whisk the mayonnaise, mustard, pepper and pickle juice together and gently stir into the macaroni-veggies.

IMPORTANT: This salad really needs to sit in the refrigerator overnight so the flavors can blend together…it makes a huge difference.

NOTE: I do not add salt to this salad because there is already a lot of salt in the pickles, pickle juice and mustard.

NOTE: Just before I put this salad into the fridge, for the first time, I put a piece of wax paper (or plastic wrap) on the surface of the salad and then I lay 2 paper towels (folded) on top of the wax paper and snap the Tupperware lid on. The paper towel will attract any condensation in the bowl and the waxed paper (or plastic wrap) will keep the moisture from running down into the salad. Once the salad is in the fridge overnight, discard the wax paper and paper towel.

NOTE: The amount of mayonnaise you use is up to you. Start with 1 cup and add more if you like your salad creamier.


Monday 23 April 2012

FIVE STAR GREEN PEA SALAD

We still have a lot of snow around the edges of the yard (several feet of it as a matter of fact), but it won't be long before it's barbecue season again, so my thoughts are turning towards side dishes that can be prepared ahead of time. 

Summer Pea Salad, jazzed up with crisp bacon and tomatoes is one of my favorites. It is one of those great salads that travels well and tastes even better after it has been in the fridge for a day or two. If you are going to make this salad, in advance, don't add the crisp bacon right away (it will get soggy), just sprinkle it over the salad before serving.
16 ounce bag of frozen green peas
1/3 cup finely chopped red onion
1/2 cup grated carrot
1/2 cup celery chopped
1 cup thinly sliced mushrooms
1/2 cup red bell pepper chopped
3 slices of crisp bacon cut up (optional)
1/2 cup sharp cheddar cheese shredded (I use more)
cherry tomatoes, cut in half
sunflower seeds

Fresh green peas are the best in this salad, but when they are not available, frozen peas work very well too.  Microwave peas (covered) with 1 tablespoon of water for about 3 minutes or until slightly cooked (but not soft) then drain and cool.

In a large bowl, mix all of the above ingredients together (except the cherry tomatoes); gently fold in the dressing.

Dressing
3 heaping tablespoons of light mayonnaise
1 tablespoon freshly squeezed lemon juice
2 teaspoons sugar
1/2 teaspoon black pepper
1-2 tablespoons milk
Whisk the ingredients together and gently fold into salad.

Add cherry tomatoes and an extra sprinkle of cheese to the top of the salad for decoration. Cover and chill.
NOTE: Every microwave cooks at a different rate, so keep an eye on your peas when you microwave them. You don't want them to get overcooked and mushy.

Thursday 5 April 2012

VEGGIE CORN BREAD

This super MOIST and tasty (veggie filled) corn bread starts out with two of those little Jiffy corn bread mixes (what could be easier?) and feeds a crowd. It is equally delicious warm or at room temperature, so it is perfect for a pot luck or holiday brunch.
 
(2) boxes Jiffy corn muffin mix
4 eggs (beaten)
1½ sticks butter (melted)
(2) cups broccoli florets (chopped)
1 cup of frozen corn (thawed)
1 medium onion (chopped) saute until tender
1 cup cottage cheese
1/4  teaspoon dry red pepper flakes (or to taste)

Saute broccoli, corn and onion until tender, set aside. In large bowl, beat 4 eggs together and stir in melted butter, cottage cheese and pepper flakes. Add Jiffy mixes and stir until smooth. Gently stir in broccoli, corn and onion. Spread in a greased 9 x 13 baking dish and bake (375°) for 35 to 40 minutes or until lightly browned.

LOTS OF VEGGIES INSIDE

NOTE: Finely diced sweet red pepper is pretty in this cornbread too, but I was out of it.

Saturday 6 August 2011

"Peanutella" Chocolate Peanut Butter Spread

I found this fabulous recipe over at Smitten Kitchen, and it was so much fun to make and even more fun to eat. If you like Nutella, you will LOVE peanutella, just think of the possibilities!!

Lets see, let me count the ways to enjoy peanutella: on waffles, on pound cake, on warm scones, in a sandwich, with s'mores, on waffles, as a fruit dip and...oh yes...right out of the jar!!!
2 cups shelled, skinned raw peanuts (see note)
½ cup unsweetened cocoa powder (best quality you can find)
1¼ cups powdered sugar
¼ teaspoon salt (plus a pinch?)
2 to 3 tablespoons peanut oil

Spread the nuts on a cookie sheet and roast in a 400F oven for 10 minutes, stirring half way through for even roasting.  NOTE: I couldn't find raw peanuts, so I used dry roasted UNSALTED peanuts and roasted them for only 5 minutes in the oven (to bring out more flavor).

Put the nuts in a food processor and process for five minutes. At first they will get mushy or pasty, but keep processing and the nuts will start to liquefy. Scrape down the sides of the food processor every once in a while.

Once the nuts begin to liquefy, add the cocoa powder, powdered sugar, salt and 2 tablespoons of peanut oil. Process for another minute or so. If the mixture seems too thick (it will thicken more in the fridge) add the other tablespoon of peanut oil. Taste the mixture, add another pinch of salt if you think it needs it.

That's it!! Store in the fridge (tightly covered) for up to a week.  This mixture might seem a bit thin at first, but it will thicken as it "sets" in the fridge.

Tuesday 7 June 2011

BEST PANCAKES EVER !!!

These are absolutely the best home made pancakes we have ever eaten!! They are super tall, light and fluffy and yet they don't get all mushy when syrup is added, they are EXCELLENT!!
 
 
3/4 cup milk
2 tablespoons white vinegar (see note)
1 cup all purpose flour
2 tablespoons white sugar (I used 3)
1 teaspoon baking powder
1/2 teaspoon baking soda
1/2 teaspoon salt
1 egg
2 tablespoons melted butter
1 teaspoon vanilla

Combine the milk and vinegar in a small bowl for 10 minutes to "sour". This is an important step and it is called "soured milk" which is much different that sour milk. I guarantee you will NOT taste the vinegar in the final product. Set aside.

Combine the dry ingredients in a bowl. In a smaller bowl, whisk the soured milk, egg, vanilla and melted butter together. Pour into the dry ingredients and whisk until most of the lumps are gone, but DO NOT OVER BEAT!!

The batter will be thick, don't add any more liquid. LET THE BATTER SIT UNDISTURBED FOR TEN MINUTES!! 

After 10 minutes, you will see bubbles in the batter, very important DO NOT STIR AGAIN.
 
GENTLY dip out (don't pour out) 1/2 cup of batter and place it on a buttered grill or frying pan. Cook until bubbles appear on the surface of the pancake and then flip with a spatula and brown the other side.

NOTE: This recipe only feeds about 3 or 4 people, but doubles or even triples nicely.

NOTE:  Don't skip the soured milk part of this recipe, you will not taste the vinegar in the pancakes. The vinegar super-activates the baking soda.

NOTE:  You can subsitute BUTTERMILK for the milk+vinegar in this recipe, but I have had the best luck (fluffiest pancakes) using the milk and vinegar.

NOTE: A few people have written to me and said that their pancakes weren't quite as fluffy or tall as mine. I suspect they are stirring the batter just before cooking the pancakes which deflates the bubbles in the batter. Stirring or pouring the batter essentially deflates the air bubbles in the batter. Personally, I use a half cup measuring cup and GENTLY dip out batter and put it on the griddle and I always get super fluffy pancakes.

Thursday 28 April 2011

NO FAIL HASHBROWNS FOR THIS WEEKEND

This hash brown recipe is fool proof. It will give you crisp potato patties, just begging for a dash of hot sauce (or ketchup for the kids). The following instructions are for pattys, but you can also spread the mixture out in a big frying pan, then cut into wedges for serving.


3 cups Simply Potatoes (see note below)
¼ cup very thinly sliced green onions
(optional)
2 tablespoons all purpose flour

1 egg (lightly beaten)
1½ teaspoons salt
(or to taste)
¼ teaspoon black pepper
(or to taste)

I use (the shredded hash brown style of) a product called Simply Potatoes (in my store they are sold in the refrigerated section above the eggs), but you can use THAWED Ore Ida shredded (loose) hash browns as well. I have tried fresh potatoes for this recipe and they do NOT work as well as Simply Potatoes or thawed Ore Ida shredded potatoes (fresh potatoes get mushy).
Gently toss the potatoes with the flour, salt and pepper (and onion if you are using it), then gently (I use my hands) mix in the lightly beaten egg. NOTE: I mix the salt & pepper into the egg to make sure the spices are distributed evenly throughout the potatoes.
Pre-heat your heavy frying pan to medium high and brush your skillet with a generous coating of vegetable oil (I like to use my electric frying pan).

Place 1/3 (lightly packed) potato mixture onto HOT, greased frying pan and then gently flatten the mound with your spatula, like this: Fry patties for 4 minutes, per side, or until they are golden brown and crispy.

Drain on paper towels, sprinkle with salt and serve immediately.
I love how these hash brown patties hold together, you can even pick them up and eat them like a commercial hash brown patty, but oh so much better tasting.


NOTE: 3 cups of THAWED Simply Potatoes or Ora Ida equal about a pound.

Monday 11 April 2011

COLEEN's RED RICE

This recipe is one of my original recipes; it is also one that I could probably "live on" if need be (I like it just that much!!) It is my "go to" recipe when picky-picky husband is grilling some huge slab-o-meat (and I want something a little lighter).

This recipe is also very quick and easy, made with pantry staples and if you double (or triple) it, it would be wonderful for a potluck.
 

1 cup raw white rice (not instant rice)
2 tablespoons canola oil
½ cup chopped onion
2 teaspoons chili powder
1 teaspoon ground cumin
½ teaspoon dried oregano
1 teaspoon salt
¼ teaspoon black pepper
15 oz. can diced tomatoes in juice
1 tomato can of water + ½ cup
1 red bell pepper chopped

1 cup red kidney beans


Heat the canola oil, then add the raw rice, onion and spices. Saute this mixture until the onion is transparent and the rice is opaque. Add the red bell pepper, kidney beans, the whole can of diced tomatoes (plus the juice) plus 1 full can of water and another ½ cup of water. Stir well and bring to a boil.

Put a tight fitting lid on the pan and turn the heat down to a slow simmer. Cook for 20 minutes, then turn off heat and let sit for 5 minutes. Fluff with a fork and serve.


NOTE: "Toasting" the spices in the oil/raw rice mixture at the beginning of this recipe really "wakes up" the spices and helps the flavor get deep into the rice.

Thursday 13 January 2011

BAKED ONION RINGS

Don't let this terrible photo fool you, these onion rings are deliciously addicting!! I found this recipe on Donna's blog over at My Tasty Treasures. There are only 2 tablespoons of oil in the whole batch, but you would never know it; this recipe is a keeper!!


The onion rings bake up light as air, super crispy and packed with flavor!!
.
1 medium size vidalia onion
1½ cups corn flakes
½ cup plain dry bread crumbs (I used Panko)
1 large egg
½ cup low fat buttermilk
¼ cup flour
1/8 teaspoon cayenne pepper
pepper to taste
.
Put the corn flakes and bread crumbs in the food processor and pulse until you get fine crumbs (set aside).
.
Mix the egg, buttermilk, flour, cayenne and black pepper. Cut the ends off of the vidalia onion and then cut the center of the onion into four thick slices. Separate the rings.
.
Dip the raw onion rings into the batter and set them on a baking rack so the excess batter will drip off (put a baking sheet under the rack, or set the whole rack in the sink to help reduce any mess).
.
Put 2 tablespoons olive oil (I used canola oil) on a rimmed baking sheet and put it in the oven for 2 minutes to preheat. After 2 minutes, remove the pan and tilt it to redistribute the oil. Coat the battered rings in the fine dry crumb mixture and place on the baking sheet.

Bake for 16 minutes in a 450 degree pre-heated oven (turn them over half way through). Remove from oven and sprinkle with coarse salt.

NOTE: I don't know if these would be as good with a plain yellow onion. I used vidalia's because they are our favorite. Any sweet onion would work.

Tuesday 16 November 2010

HEINZ CHILI SAUCE CLONE

This is a clone recipe for Heinz chili sauce. It is so easy...takes every day ingredients and is even tastier than the original!! Chili sauce was never a pantry staple for me; I always found it on my shopping list for holiday and special occasion recipes, like this shrimp cocktail (which calls for Heinz chili sauce). I will never buy commercial chili sauce again because this is so much better (and cheaper)!!!


1 cup of tomato sauce
1/3 cup light corn syrup
1/4 cup white vinegar
2 teaspoons dry onion flakes
2 teaspoons granulated sugar
1 teaspoon salt
1 teaspoon lemon juice
1/8 teaspoon garlic powder

Whisk everything together and bring to a boil in a small saucepan with a heavy bottom. Turn heat down to a low simmer and cook for 25-30 minutes, depending on how fast you are simmering it (mine was done in 25 minutes). Watch it towards the end so it doesn't scorch.
Cool to room temperature, then cover and chill.
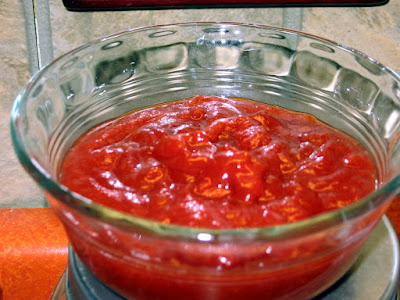
It will get nice and thick like this.

NOTE: I made this recipe, exactly as it is stated above, I don't know how it would effect the final results if you use fresh onions.

Monday 1 November 2010

TOASTED ORZO with PARMESAN & BASIL

This simple (and versatile) little side dish is just delightful. The orzo is toasted in butter before boiling, which adds an extra flavor, then it is tossed with Parmesan and fresh basil. Whether you use it as a side dish or a main dish, it is a very nice change.2 tablespoons butter
1 cup uncooked orzo pasta
2 + 1/4 cups chicken broth
1/2 cup grated Parmesan cheese
1/4 cup thinly sliced fresh basil
1/2 teaspoon salt
1/4 teaspoon black pepper
pinch of red pepper flakes
.
Melt the butter in a heavy bottomed pan that has a tight fitting lid. Add the UNCOOKED orzo pasta and stir until completely coated with the butter. Cook on medium-high until the pasta turns golden to lightly brown (watch it because once it starts to turn, it turns quickly).
.
Stir in the chicken broth, red pepper lakes, salt and pepper and bring to a boil. Cover and reduce heat to a simmer. Simmer until the orzo is tender and liquid is (almost) all absorbed. This will take 15 to 20 minutes depending on how fast your simmer is.
.
When orzo is tender, remove from heat and stir in Parmesan cheese and fresh basil. Serve hot.
.
NOTE: Just about anything can be added to this recipe, next time I think I'll include a little crisp bacon some mushrooms!!!

Friday 24 September 2010

THREE MINUTE MICROWAVE CORNBREAD

When I first found this little recipe that promised fresh corn bread in 3 minutes, I thought "no way". Well, I'm here to tell you "yes way"...it is excellent!!

You won't get the brown crunchy part of corn bread that a lot of people love, but, HEY!! THREE MINUTES!! The taste and texture is surprisingly good and when you weigh the benefits of serving hot corn bread in a snap, well...I will definitely be using this recipe often!!


2 tablespoons vegetable oil
1/2 cup milk
1 egg
1/2 teaspoon vanilla
1/2 cup white flour
1/2 cup corn meal
2 tablespoons white sugar
2 teaspoons baking powder
1/4 teaspoon salt

Mix everything with a whisk and pour into a greased microwave safe baking dish. I used a 6 x 6 x 2 baking dish.

Microwave on high for 3 minutes. If your microwave doesn't have a carousel, then manually rotate the dish half way through the cooking cycle.

 
NOTE: I used a 1000 watt microwave and it took exactly 3 minutes. If your microwave is different than that, you may have to adjust the cooking time.

NOTE: I used cooking spray inside of the baking dish and the cooked corn bread removed very easily.