Saturday 31 October 2009

PEANUT BUTTER-OATMEAL-CHOCOLATE CHIP COOKIES

HAPPY HALLOWEEN FROM OUR NEIGHBORHOOD TO YOURS!! This cookie recipe has something in it for everyone...peanut butter, oatmeal & mini-chocolate chips. It makes a flat, tender, crispy cookie that is delicious all by itself, or you can use them to make ice cream sandwiches, or you can put chocolate frosting in between two of the cookies. It is a very versatile cookie. I hope you all have a spooktacular (and safe) Halloween!!


¾ cup all purpose flour
½ teaspoon baking soda
½ teaspoon salt
¼ teaspoon baking powder
½ cup butter (room temperature)
½ cup peanut butter
½ cup white sugar
½ cup brown sugar (I like to use dark brown)
1 egg
1 teaspoon vanilla extract
1 cup quick-cooking oats
½ cup mini-chocolate chips

In a large bowl, with an electric mixer, cream the butter, peanut butter, sugars, vanilla and egg together until smooth. Add all of the dry ingredients and mix until everything is well incorporated. Roll into balls about the size of a walnut, then roll the balls in granulated sugar.
Place on ungreased cookie sheet and flatten with the end of a cup or glass dipped in sugar.
Bake in preheated 350F oven for 10-12 minutes (mine took 12 minutes). Let these cookies cool on your cookie sheet for a minute or so before you remove them.
This recipe makes about 2½ dozen or so cookies, depending on how large you make them. The cookies are a little fragile when you take them out of the oven, but if you let them cool on the pan for just a minute or so, you won't have that problem.

These cookies make excellent ice cream sandwiches!!!

Friday 30 October 2009

BASIC FOCACCIA BREAD

Today, when hubby asked what we were having for lunch, I told him turkey panini's. He got one of those proud grins on his face, that told me he was getting ready to make a wisecrack; then he told me he didn't know turkeys HAD panini's. He can be delightfully goofy.

Todays sandwiches were made with a no-frills basic focaccia bread. For those of you who are still getting familiar with yeast doughs, this would be an excellent recipe to try; it is a very easy one and the results are fantastic.

Turkey and Smoked Gouda Panini


 2¾ cups all purpose flour
1 teaspoon salt
1 teaspoon white sugar
1 tablespoon dry active yeast
1 clove garlic minced
½ teaspoon black pepper
2 tablespoons olive oil (divided)
1 cup warm milk

Mix the first six ingredients together in the bowl of a stand mixer. Mix in warm milk and one tablespoon of olive oil. Mix well and knead until the dough is smooth and elastic (it only takes a few minutes). Cover with plastic and let it sit in a warm place for an hour. Push all of the air out of the dough and place it on a greased baking sheet. Pat the dough into a ½" thick rectangle and brush with the remaining one tablespoon of olive oil. Cover the rectangle very loosely with plastic wrap and let it sit for 30 minutes (it will raise a little, but not a lot). After 30 minutes, make dents in the dough (with your fingertips) every few inches over the entire surface of the focaccia. Bake at 450 for 15 minutes or until lightly golden. Cool the focaccia completely before slicing it horizontally to make sandwiches.

NOTE: This focaccia is basically a blank slate; you can add anything you like to the dough. If you want an herb focaccia, add 1 teaspoon each of dried oregano, dried thyme and dried basil to the first stage of the dough. If you want a cheesy focaccia, top the dough with a cup of shredded mozzarella and 2 tablespoons grated Parmesan just before baking.

NOTE: I've been using my GF Grilling Machine to make panini's by setting a large heavy can of something on the closed grill top (to weight the sandwich down). It works very well.

Thursday 29 October 2009

TOFFEE CHIP CHEESECAKE BARS

I've been trying out potential sweets for my Christmas cookie boxes and I found a real winner last week. It's from a cookbook called "Brand Name Recipes". The bars have a cocoa based cookie bottom (I used the new Hershey's dark chocolate cocoa which is very tasty) and on top of that is a creamy cheesecake-toffee bit layer and it is all topped with more toffee bits. Need I say more?


 1¼ cups all purpose flour
1 cup powdered sugar
½ cup unsweetened cocoa (I used dark chocolate cocoa)
¼ teaspoon baking soda
¾ cup butter (cold)
(1) 8 ounce package cream cheese (room temperature)
(1) 14 ounce can Eagle Brand Sweetened Condensed Milk
2 eggs
1 teaspoon vanilla extract
1½ cups English toffee bits (divided)

Combine the flour, powdered sugar, cocoa and baking soda in a medium bowl; cut in butter until it is crumbly (I did this step in my food processor). Press firmly on the bottom of an un-greased 9" x 13" baking pan. Bake for 15 minutes.

Beat the cream cheese until it is fluffy then add the sweetened condensed milk (not evaporated milk), eggs and vanilla and beat until it is smooth. Stir in one cup of the English toffee bits. Pour this mixture over the hot crust. Bake at 350F for 25 minutes or until set and the very edges just start to turn golden. Cool 10 minutes and then sprinkle on the remaining one half cup of toffee bits. Cool completely, then refrigerate until the bars are cold. Store leftovers (covered) in the fridge.

NOTE: These bars are to be kept in the fridge, but we think they taste best after they had been out of the fridge for 10-15 minutes.

NOTE: Make sure you use sweetened condensed milk, not evaporated milk

Wednesday 28 October 2009

SUPER SOFT PUMPKIN COOKIES & A BABY MOOSE STORY

These little unassuming cookies are wonderful. They've been sitting on my counter all day and they are still so soft (almost cake like). The recipe makes five dozen velvety cookies that taste like pumpkin pie and have a rich brown sugar glaze on them. They would be an excellent holiday cookie and the recipe says they freeze well (unfrosted). They will never win a beauty contest, but man-o-man are they tasty. I think next time I make them (and hubby says there will be a next time) I'll put a couple drops of orange food coloring in the dough.

2 cups butter, room temperature
2 cups white sugar
2 teaspoons baking powder
2 teaspoons baking soda
1 teaspoon salt
1 teaspoon ground cinnamon
1 teaspoon ground nutmeg
½ teaspoon ground ginger
¼ teaspoon ground cloves
2 eggs
2 teaspoons vanilla extract
(1) 15 ounce can of pumpkin
4 cups flour

In a large bowl, beat 2 cups of butter with electric mixer on medium speed for 30 seconds. Add sugar, baking powder, baking soda, salt and spices. Beat until well combined, scraping the bowl occasionally. Add the eggs and vanilla, beat well, then beat in the pumpkin. Add as much flour as you can with the mixer, and if necessary, use a wooden spoon to add the rest of the flour (my stand mixer mixed it all just fine...but it IS a lot of dough).

Drop by heaping teaspoons on un-greased cookie sheet (2" apart). They don't spread much at all. Bake in preheated 350 oven for 10-12 minutes (I baked mine 11 minutes they don't change color much - just bake them until the tops are set). Cool on wire racks and frost. Brown Sugar Frosting: ½ cup of butter + ½ cup of brown sugar + ¼ cup of milk + 1 teaspoon vanilla. Heat those ingredients in a saucepan until the sugar is melted and smooth. Transfer to a bowl and add 2¾ cups of powdered sugar. Whisk smooth and frost cookies.

After the frosting has "set", you can store the cookies in a single layer in an airtight container at room temperature for three days or freeze the unfrosted cookies for up to 3 months.

NOTE: These cookies are VERY soft, almost like a little mini-cake.

MY BABY MOOSE STORY
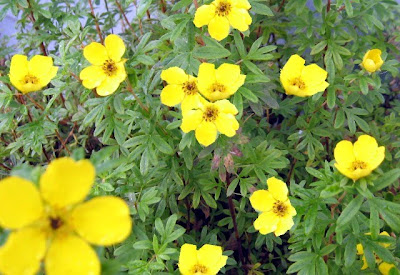
The leaves have been off of our trees for quite a while now and this morning we woke up to an inch of snow which melted quickly. However, in this color-less time of year, there is a hardy little plant that can withstand hard frosts and just keeps blooming and blooming for me. I have several of them right outside my front door just so I can enjoy them this time of year, they are called Cinquefoils.

Last night, about midnight, our dog, Chloe, started growling under her breath. The kind of growl that tells us she's too afraid to really bark. We went to the front window and low and behold there were THREE very small/young moose (probably triplets) standing on our sidewalk and munching away on my beloved cinquefoils!! Even here in Alaska, being less than a foot away from any moose is not an every day occurance...but triplet "moose-lets"? It was a real treat and I happily donated my Cinquefoils to these little babies. I got my camera and walked up to the window as quietly as possible, knowing that ANY noise would spook them away. It was very dark out and for some reason my porch light didn't come on when the moose walked up, so I knew I would have to use a flash. I placed the camera lense right on the glass hoping to reduce the flash reflection. I had only one chance for a photo (because they would be gone instantly when they saw the flash) but it was worth a shot. The photo is a terrible one, but I still wanted to share it with you. The little triplet moose were so cute. I'm sure their mother was near by, but I wasn't going to check. Getting between a mother moose and her babies is something that is extremely dangerous. As soon as the camera flashed, all three little guys were g-o-n-e! They acutally missed one Cinquefoil plant (the above photo), so I am hoping they will come back again tonight. They are also welcome to our pumpkin (moose love pumpkins).

Sorry for the poor photo

You can see this brave little moose, and the leg of her sibling on the left. The third moose is to her right; when we first saw them, all three were shoulder to shoulder on our front steps, if only it were daylight, I could have gotten a good shot. They were about the size of a Great Dane (as adults they will be over a thousand pounds).

Tuesday 27 October 2009

MINI-BRIOCHE ROLLS

I make these rolls about twice a month and freeze them (fully baked) in a high quality freezer container. A frozen baked roll takes about 4-5 minutes (at 350) to reheat. They are also very handy for the holidays because they are more festive than standard dinner rolls and since they are already fully baked, you can just pop them all in the oven five minutes before dinner.


3½ cups all purpose flour
2 tablespoons dry active yeast
½ cup warm milk
1/3 cup white sugar
1 teaspoon lemon zest
4 eggs at room temperature
½ teaspoon salt
2/3 cup unsalted butter at room temperature

In a large mixing bowl, combine 1½ cups of flour, sugar, yeast, zest and salt. In a saucepan (or microwave) heat the butter and milk to 120 to 130 degrees. Add the warmed liquid ingredients to the dry ingredients (stirring quickly with wooden spoon). Add the room temperature eggs and mix well; add one more cup of flour and beat until smooth. Stir in the rest of the flour, but do no knead the dough. Put the dough in a greased bowl and cover and let it raise in a warm place for about an hour. After an hour, push all of the air out of the dough and cover and refrigerate it overnight. (see note about rising times)

The next day, push any air out of the dough and turn it out onto a lightly floured counter; let it rest for 30 minutes (with inverted bowl over it).

If you want the traditional brioche shape, divide the dough so that you have 1/6th (for the little top knots) and divide the rest of the dough into 12 pieces. Roll the larger pieces into a ball and place in individual brioche pans (or cupcake pans) and make a dent in each one. Roll smaller balls (from the 1/6th portion) and set them on the indentation. Lightly spray the rolls with cooking spray (very lightly) and cover with plastic wrap. Let these raise in a warm place for one to two hours or until they are double in size. Gently brush the rolls with egg wash and bake at 375 for 15-18 minutes or until golden. Place a pan of water on the bottom rack of the oven while the brioche bake.

NOTE: I don't make the traditional brioche shape. I roll 12" "snakes" and then tie them in knots, tucking in the loose ends.
NOTE: I don't use an egg wash on mine because they get too crusty when I reheat them. I bake them without the egg wash and just brush them with a little butter when they come out of the oven the first time.
NOTE: Keep in mind that if you have granite counter tops, it is going to take longer for your dough to raise because they are so cool.

Thursday 22 October 2009

DULCE de LECHE (Made in the crockpot!!)

Yes, you heard me right, dulce de leche made in the crockpot!! The first time I tried it, I was very skeptical, but it works like a charm and couldn't be easier.

Fill crockpot with COLD water. Put an UNOPENED can (with paper label removed) of sweetened condensed milk (not evaporated milk) into the cold water, making sure that the water is 2" taller than the can. If you are doing more than one can, make sure there is at least 2" of space BETWEEN each can as well. 

Put the lid on the crockpot and let it "cook" on LOW for EIGHT HOURS. Take the cans out of the crockpot and dry them off and label them. If you are going to use them right away, let them cool down a couple hours before you try to open the can. Cooled and unopened cans can be kept in the pantry like you would any other canned item.


DISCLAIMER: people that make Eagle Brand Sweetened Condensed Milk never anticipated people heating their product in an unopened can. As a matter of fact, I'm sure they would disapprove, so please, if you try this method, use (common sense) caution....but it has worked VERY WELL for me and for many other people I know. 


 Crockpot Dulce de Leche
Right after opening the can; it is unbelievably delicious!!
 
NOTE: One friend that had a white crockpot, said that the can left a permanent "ring" on the bottom of her crockpot; I didn't have that problem (my crockpot is black). If you are concerned, put a layer of paper towels under the can/cans before you add the cold water.

GUILTLESS BANANA MILK SHAKE

This banana milk shake is my latest addiction, and for once, it is guiltless!! Toss some frozen bananas, fat free banana yogurt and some 2% milk in the food processor (or blender) and in 10 seconds you will have the thickest, creamiest milk shake ever!! It is absolutely delicous and totally satisfies that "whats to snack on?" moment in the middle of the day. I hope you try it.

In advance, slice some bananas into ½" slices and freeze them, in a single layer, on some waxed paper. When they are frozen, put them all in a Zip Loc freezer bag and keep frozen. When it comes time to make your milk shake, place 16 slices of frozen banana into the food processor (I don't have a blender). Sixteen slices equals the same amount as a medium size (8") banana.

Add a 6 ounce container of fat free banana yogurt and one cup of 2% milk. Run the food processor about 10 seconds. You will end up with about 2½ cups of thick milk shake. This next photo is not a very good one, but I wanted to show you that the final product is thick enough to support a spoon!!

NOTE: I keep a bag of frozen banana slices just so I can make this treat in a hurry. It is also a great use for those bananas that have a few too many brown spots on them.