Thursday 19 January 2012

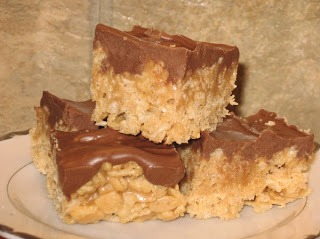
PEANUT BUTTER KRISPIE TREATS

This recipe has been around forever; it is one of those classic sweet treats from our childhood.  Picky-picky husband is a big fan of the old fashioned Rice Krispie treats made with melted marshmallows, so he initially resisted this peanut butter version (he resists change).  However, this evening, I noticed that the pan of treats, on the kitchen counter, had been seriously noshed upon.

This recipe is SUPER easy and uses all pantry ingredients, which is a good thing.  It goes together in just minutes (the longest part of this recipe is the cool down time). They cut beautifully if you let them cool all the way down and they travel well.

1 cup light Karo syrup
1 cup granulated sugar
1 cup peanut butter
6 cups Rice Krispie cereal
1 cup semi-sweet chocolate chips
1 cup peanut butter chips (see note)

Mix the syrup and granulated sugar in a heavy saucepan, over medium heat (stirring). Bring to a boil and immediately remove from heat; stir in peanut butter until smooth and well mixed.

Pour over Rice Krispie cereal and stir to coat evenly.  Press into a lightly greased 11" x 7" pan (see note) and press down evenly with slightly damp hands.

Melt the chocolate chips and stir until smooth (I melted mine in my microwave at 60% power for about 1½ minutes).  Spread evenly over bars.  Cool about an hour before cutting.

NOTE: This recipe calls for half semi-sweet chocolate chips and half peanut butter chips, but any combo would work well.  I found a similar recipe that used half semi-sweet chocolate chips and half butterscotch chips for the frosting (they called them Scotcheroo's).
NOTE: The size of the pan is not really important. Just remember that the smaller the pan is, the thicker the treats will be and the bigger the pan is the thinner they will be.
Wednesday 11 January 2012

SPAGHETTI

On snowy winter days, when it is good to stay close to home, I enjoy making dinner in the slow cooker. One of our favorite's is spaghetti; our kids were raised on this recipe and it is one of picky-picky husbands favorites.

The thick and hearty sauce and tender meatballs really need a solid six hours or more in the slow cooker, so don't be tempted to rush this recipe. I love the way my kitchen smells when I make this sauce.


MEATBALLS
1 pound of lean (90% or better) ground beef
1/2 cup fine dry bread crumbs
1 egg
1 teaspoon salt
1/4 teaspoon black pepper
Mix all of the meatball ingredients and shape into walnut size meatballs. Bake in a 350 oven for 15 minutes then drain well before adding to sauce.

 
SPAGHETTI SAUCE
(1) 14 ounce can of tomato sauce
(1) 12 ounce can of tomato paste
4 cups water
1/2 cup chopped onion
1 cup finely diced carrot
1 clove of minced garlic
1 tablespoon olive oil
2 teaspoons dried sweet basil
1 teaspoon dried oregano
1/2 teaspoon fennel seed
1 teaspoon salt
1/2 teaspoon black pepper
1 tablespoon sugar

Saute the onions, garlic and carrots in the olive oil until they are very aromatic (they don't need to be cooked through). Add the rest of the sauce ingredients and bring to a boil.  Put EVERYTHING in the slow cooker and add the baked meatballs. Cook on high for 6 hours.

The last couple of hours, leave the slow cooker lid open just a crack so the sauce will reduce and thicken. Serve over spaghetti noodles.

NOTE: If you like mushrooms, add them the last hour of cooking.


NOTE: No matter how hard I try to make a "smaller" batch of spaghetti sauce, it always ends up making too much, so now I plan on it. The sauce that we don't use on night one, goes into a lasagna casserole for the freezer. Some sauces just need to be cooked in big batches I guess.

Tuesday 10 January 2012

CHOCOLATE SILK PIE

Have you ever had a cream pie dessert that, was (not only) outrageously delicious, but the  "mouth feel" was absolutely sublime? That is the perfect description for this chocolate silk pie; it is the smoothest, creamiest, chocolate filling we have ever eaten!!


CHOCOLATE SILK FILLING

2 cups semisweet chocolate chips
2 cups heavy whipping cream (divided)
2 tablespoons powdered sugar
2 teaspoons vanilla
8 ounces cream cheese (room temperature)

In a small microwave bowl, mix the chocolate chips and 1/2 cup of the cream. Heat on 50% power for about 2 minutes, then stir. If they aren't completely melted and smooth, continue microwaving on 50% power (30 seconds at a time), stirring each time.  My microwave oven took the initial 2 minutes plus about 20 more seconds. COOL MELTED CHOCOLATE FOR 20 MINUTES BEFORE USING!!

In a different bowl, mix the remaining 1½ cups of whipping cream, powdered sugar and vanilla. Beat on high until stiff peaks form, set aside.

In another large bowl, beat the cream cheese until fluffy, gradually mix in the melted chocolate mixture, beating until very smooth.  Gently fold in the whipped cream with a rubber spatula. Do this slowly so you don't deflate the air in the whipped cream..

Fill your favorite pre-baked pie crust with the filling, smooth the top and chill at least 4 to 6 hours (better overnight).
 
 
This recipe overfills a 9" pie
or is perfect for a  10" pie
 
Top with whipped cream and enjoy!!


Wednesday 4 January 2012

ALMOND TOFFEE GRAHAMS

If you like Almond Roca candy,
you will love this recipe !!

The first time I ate Almond Toffee Grahams was at a cookie exchange about 20+ years ago. With tons of cookies to choose from, I noticed people kept going back to the Almond Toffee Graham plate; one taste and I was "hooked".  When I found out how simple and fast they were to make, I was shocked (they taste complicated). I made them for some friends this Christmas and they were a huge hit !!


What do they taste like? Well, the cooked caramel sauce bakes into the graham crackers and produces a thin layer of candy that tastes like almond roca, then, with the melted chocolate and nuts added, what can I say; they are delicious !!
 
graham crackers
1 cup unsalted butter (no substitutes)
1 cup brown sugar packed (I like dark, but light is good too)
1 teaspoon vanilla extract
1½ cups sliced almonds (toasted)
1 cup semi-sweet chocolate chips

Preheat oven to 350. 

Now, a word about the pan:  This recipe uses a jelly roll pan (mine is 10½" x 15½" x 1").  The recipe says to grease the pan, but I don't like to do that (it makes for a greasy bottomed cookie). Instead, I use the new non-stick aluminum foil by Reynolds Wrap and I don't grease it at all (if you haven't tried it yet, it is well worth the price).  If you use regular foil, make sure you grease it.

Arrange graham crackers in a single layer on the jelly roll pan (should take about 15 graham crackers?). Try to leave as little space between the crackers as possible, but don't overlap them, you may have to break some of the crackers to make it all fit.

In a small saucepan, mix the butter and brown sugar. Bring to a gentle boil, and then set your timer for three minutes (stir constantly).

Remove from heat and stir in vanilla extract.  Pour the caramel evenly over the graham crackers and bake in preheated 350 oven for 10 minutes.

Remove from oven and sprinkle evenly with the chocolate chips.  Wait a few minutes for the heat of the candied crackers to melt the chocolate chips, then spread the chocolate with a knife.
Sprinkle the toasted sliced almonds over the melted chocolate.

Let the whole pan cool in the fridge for about 20 minutes (to set the chocolate).  When the grahams are completely cool, and the chocolate is set, lift out of the pan and peel off the non-stick aluminum foil. Break into pieces and enjoy.


Wednesday 28 December 2011

MINI OREO CHEESECAKES

I've made these little gems many, many times, and I've never had a single crack in any of them and they go together in a snap. They are absolutely delicious and totally addicting. 

The only "extra" step, is that they really need to sit in the fridge overnight after baking (to soften the cookie crust), but this step is WELL WORTH IT. You can eat them as soon as they are chilled, but the cookie will still be crunchy.  If you let them sit in the fridge overnight, the cookie almost becomes part of the cheesecake...scrumptious.


24 Oreo cookies (divided)
1 pound of cream cheese (room temperature)
1/2  cup granulated sugar
1/2  cup sour cream
2  large eggs (lightly beaten)
1 teaspoon vanilla extract

Place 6 (original) Oreo cookies in the food processor and process into fine crumbs (set aside). Preheat your oven to 275 F and put 18 cupcake papers in your cupcake pan. Place a whole Oreo cookie in the base of each cupcake paper and set aside.

With your electric mixer (I used my stand mixer with a paddle attachment), mix the cream cheese on medium speed for three minutes.  Add the sugar and vanilla and mix for another 2 minutes on medium speed, or until very smooth. Add the lightly beaten eggs and mix on LOW until well combined. Fold in the sour cream and cookie crumbs with a spatula.

Fill the cupcake papers almost to the top (I used an ice cream scoop and it seemed to be the perfect measurement). Bake in preheated 275° oven for 30 minutes.

Once they are baked, leave them in the cupcake pan and immediately put them in the fridge. Chill overnight.  Delicious !!!


Tuesday 20 December 2011

SPICED OATMEAL-CRAISIN COOKIES

We have all tried a LOT of oatmeal cookie recipes, some thick and heavy, some thin and crunchy, some bland and doughy. This cookie, however, is everything those "other" cookies weren't; it is tender, chewy, buttery, mildly spiced and they make your kitchen smell heavenly while baking; it is the perfect holiday cookie!!   


1/2 cup butter (room temperature)
1/2 cup butter flavored Crisco (important)
1 cup brown sugar (I like to use dark, but light works well also)
1/2 cup granulated sugar
2 eggs
1 teaspoon vanilla
1½ cups flour
1 teaspoon baking soda
1 teaspoon cinnamon
1/2 teaspoon ground cloves
1/2 teaspoon salt
3 cups quick cooking oats
1½ cups craisins (or raisins)

Cream together the butter, brown sugar, white sugar, vanilla, eggs and butter flavored Crisco (the combo is MUCH better in texture and taste than if you use all butter).

Combine the flour, baking soda, cinnamon, cloves and salt, then mix into the creamed mixture. Stir in the oats and craisins (I do all of this in my big stand mixer).

Roll into balls about the size of a small walnut and bake on ungreased cookie sheet (do not flatten) for 10 to 12 minutes (my oven takes 11 minutes) don't over cook. Let them cool for about 30 seconds before removing them from the cookie sheet.

Store in airtight container. Makes about 5 dozen.

Saturday 17 December 2011

DOG REWARD TREATS

I've been making this reward treat for our dog Chloe for 8 years and she loves them. As a matter of fact, when they are baking, she positions herself in front of the oven and waits "patiently".....well, there's only a LITTLE bit of drooling!!

If you want to make your dog very happy, bake up a batch of these "puppy treats". They are super easy to make and bake up hard and crunchy(they will "keep" forever, much like a commercial milk bone, but tastier).


Since Chloe isn't a BIG dog, I bake little treats, just the right size for her; if you have a big dog, you can cut them bigger.

Another reason WE love giving our dog these treats is that they don't cause the "gas" that many commercial treats cause.

2 1/2 cups whole wheat flour (white flour will work too)
1/3 cup bacon grease (see note below)
1 egg
1/2 to 3/4 cup milk (see update note)
1 teaspoon garlic powder (not salt) (see note)
1 teaspoon onion powder (not salt)
3 heaping teaspoons beef bullion granules

Mix everything ( using the ½ cup of milk) into a STIFF dough (stand mixer works best). Beat until it comes together in a smooth ball. All flour is different, so if the dough seems dry and won‘t hold together in a  smooth ball, just start adding the other ¼ cup of milk (one tablespoon at a time) until it holds together in a nice moist (but not sticky) ball (the dough texture should feel like freshly kneaded Play Doh).

Roll the dough into ropes about ½” in diameter. Cut the ropes into small pieces and put on an UNgreased cookie sheet (try to spread the pieces out; it's ok if they get sort of close to each other, but just make sure they are in a single layer. 


Bake at 350° for 40 minutes; remove the pan from oven  and shake the pan a little (the pieces should slide around easily).  Cool the treats right on the pan. When the treats cool, they will be as dense and hard as a commercial milk bone treat; your dog will thank you!!!


NOTE: This recipe calls for 1/3 cup of bacon fat, sounds like a lot, but the recipe makes a LOT of treats. If you don't have bacon fat, peanut butter works well too.
 
 
UPDATE:  People have written to me saying that garlic is poisonous to dogs. We've fed this recipe to our dog for almost 10 years and she's never had a problem. If you are worried about feeding garlic to your dog, just substitute another spice for the garlic or leave it out all together.