Friday 21 June 2013

STRAWBERRY CHANTILLY

This is a fantastic frozen dessert for those hot summer get-togethers. It is quick, easy, pretty and can be made days ahead.

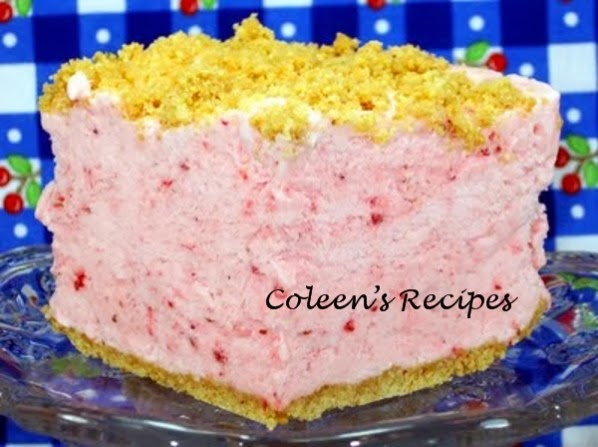
The strawberry mousse filling sits on a shortbread cookie crust and the whole thing is frozen and ready for company at a moments notice. 


COOKIE CRUST
1 cup all purpose flour
1/4 cup brown sugar
1/2 cup cold butter
1/2 cup chopped pecans (optional)

Cut the cold butter into the flour and sugar (I used my food processor)then stir in the nuts if you are going to use them and press the mixture into a 9" or 10" spring form pan.  Bake at 325° for about 20 minutes. Cool completely.

STRAWBERRY FILLING
2 egg whites        (see note below)
1 cup granulated sugar
2 cups fresh strawberries
1 teaspoon lemon juice
1 cup heavy whipping cream
1/2 teaspoon vanilla extract

Chop the fresh strawberries in a food processor until they are a smooth puree.

Put the pureed berries, egg whites, sugar, and lemon juice in a stand mixer and whip it on high for a full ten minutes.

In a different bowl, beat the whipping cream and vanilla until you get stiff peaks, then gently fold it into the strawberry mixture, until well mixed. 

Pour it over the crust and freeze it overnight (or at least 8 hours).

To serve, remove from freezer about 15 minutes before slicing.

If you don't have a spring form pan, you can make this in a 9" x 13" dish.

NOTE: When I don't want to heat up the kitchen by baking the cookie crust, I substitute a graham cracker crust for the shortbread crust and sprinkle a few extra crumbs on top.


NOTE: If your strawberries are really big, cut them in half before you measure out 2 cups.

NOTE: If using raw egg whites freaks you out, I'm assuming you could use powdered egg whites which are pasteurized and safe to eat. I've never tried the powdered egg whites in THIS recipe, but I don't see why they wouldn't work.


Tuesday 18 June 2013

CHUCK ROAST SLOPPY JOES IN THE CROCK POT

When it is hot in Alaska, like it has been this week (85° today, broke an 87 year record), I start thinking about my slow cooker. I certainly do not want to turn on the oven when it gets this hot. 

Heat makes me lazy, which is another reason I love my slow cooker..... I just put the meat and veggies in the crock pot, early in the day, and forget about it. Not only does my house smell wonderful, but meal time is a snap; a stack of burger buns next to the crock pot and a bowl of potato salad and I have a meal fit for company (well, MY kind of company any way).

 
A browned chuck roast cooks low and slow with veggies and seasonings until it is fall-apart-tender. Thicken the sauce a little (right in the crock pot), then put the shredded beef back in and you have a heavenly sandwich.

Personally, I like a swirl of yellow mustard on mine, how do you like yours?

CHUCK ROAST SLOPPY JOE'S

2 pounds lean beef chuck roast (trim any large fatty areas)
1 cup chopped onion
2/3 cup chopped celery
2/3 cup green pepper
2/3 cup ketchup
½ cup water
2 tablespoons Worcestershire sauce
¼ teaspoon red pepper sauce
1½ teaspoons salt
½ teaspoon black pepper
1 teaspoon mustard powder

Brown the beef chuck roast in a frying pan, then place in a slow cooker. In the same frying pan, saute the vegetables until the onions are almost transparent.  Put the vegetables in the slow cooker.

In a bowl, mix the rest of the ingredients and pour over the meat and veggies. Cook on high for 4 to 5 hours or on low for 8 hours. It isn't necessary, but I turn the meat over a couple of times during cooking and spoon the sauce over the meat.

Thirty minutes (or so) before serving, thicken the sauce with a slurry of 1 tablespoon cornstarch and 1 tablespoon of water.  Cut the beef into sandwich slices (or just pull it apart) and top with some of the sauce.  OH SO GOOD!!

NOTE:  My slow cooker took only 4 hours on high to make the meat extremely tender, but still slice-able. If you like your beef more like pulled pork, cook it on high for 5 hours.

NOTE: Browning the meat and veggies isn't absolutely necessary, but it sure improves the overall taste.

NOTE: This is a re-post of one of my original recipes from 2011. 

Tuesday 4 June 2013

DRY RUB FOR GILLING PORK

Even here in Alaska, it is grilling season!! This is a quick, easy and extremely flavorful dry rub for pork.  Personally, I like to buy a pork loin (not the tenderloin) and slice it into 1" thick slices and coat it with this dry rub.  It really perks up the pork and everyone here at our house gives it two thumbs up!!
PORK DRY RUB
2 teaspoons sugar
2 teaspoons paprika
1 teaspoon onion powder
1 teaspoon garlic salt
1 teaspoon pepper
1 teaspoon chili powder
1/2 teaspoon ground cumin
1/2 teaspoon ground coriander

Mix together well.

Coat pork with olive oil and then rub this mixture on liberally. Cover and refrigerate for a couple hours.  Grill outdoors on high heat. Yum!!


Sunday 26 May 2013

KENTUCKY BUTTER CAKE

I'm not sure where I saw this cake for the first time, but I remember finding web page after web page saying how great this recipe was, so I knew I had to try it.

So, today was the day and all I have to say is: Holy Wack-a-Moley (as my grandchildren would say)it is delicious. Even picky-picky husband has had several pieces of cake today. 

It has a rich and moist butter-rum flavor and after it's baked (and still hot) you poke holes into the cake and drizzle over a butter-rum flavored syrup.I'm talking serious flavor here!!

The syrup finds its way down into the cake and the result is pure heaven. I hope you try it.

1 cup butter (room temperature)
2 cups sugar
1 teaspoon rum extract
1 teaspoon vanilla extract
4 eggs
3 cups all purpose flour
1/2 teaspoon baking soda
1 teaspoon baking powder
1 teaspoon salt
1 cup buttermilk

Grease and flour a 10" Bundt pan and preheat your oven to 325°F.
Beat the butter, sugar and extracts on medium high speed for about 3 minutes, scraping down the bowl once or twice.

Add the eggs, one at a time (beating after each) and once they are all included, beat for about another minute or so.

Mix the flour, baking soda, baking powder and salt together and add it to the butter mixture, alternately with the buttermilk (I added it in thirds).

This batter is nice and thick, so spoon it into the prepared Bundt pan and level out the top of the batter.

Bake at 325° for one hour or until a toothpick tests clean. My electric oven took exactly one hour.

Remove from oven and DO NOT REMOVE CAKE FROM THE PAN YET. Poke holes into the hot cake. I used the sharp end of my meat thermometer and it left a nice size hole. Don't poke the holes all the way down to the bottom of the pan, just about 3/4 of the way. I poked about 3 holes across, every two inches.  Drizzle syrup into holes.

SYRUP
3/4 cup sugar
1/3 cup butter
3 tablespoons water
1 teaspoon vanilla extract
1 teaspoon rum extract

Heat this until sugar dissolves and little bubbles form around the edge of the pan, but don't boil.

After you drizzle the syrup over the cake (while its still in the pan) let the cake cool in the pan for a couple of hours before you turn it out onto a serving plate (it won't stick to the pan).

NOTE: Next time I make this cake I plan to double the syrup and use half of it as instructed above, but the other half I will brush onto the cake after it comes out of the pan.  It dries  nice and shiny, so it will make a wonderful (thin) glaze.

Saturday 18 May 2013

CLASSIC CREAMY COLESLAW

The calendar says spring is here, although today (5/18/2013) it is snowing like crazy here in Alaska. I'm not letting that stop me from planning a barbecue this weekend (wish me luck!!).

THIS SALAD COULDN'T BE EASIER!!!

I love "make ahead" salads that go well with ANYTHING you decide to grill. This classic coleslaw recipe is not only refreshing, but it is inexpensive to make and you can make it 2-3 days ahead of time (if need be) which is wonderful for busy summer weekends.

If you make it ahead of time, just gently toss before serving

4 cups shredded cabbage
2 large carrots grated

1/2 cup mayo
1/4 cup sour cream
3 tablespoons sugar
2 teaspoons lemon juice
2 teaspoons Dijon mustard (I use Honey Dijon)
1/2 teaspoon celery seed
1/4 teaspoon salt
1/4 teaspoon black pepper
1/4 cup milk

Whisk the last 9 ingredients together and toss with the shredded veggies. Mix well and Chill AT LEAST 2 hours (overnight is even better).  That's it, quick and simple!!

NOTE: We like a SMALL dice on our cabbage, so I cut up the cabbage then finish it off by pulsing it in the food processor until I get a pretty small dice, but that is just our personal preference.

You can also buy pre-cut coleslaw mix at the grocery store which makes this salad very quick. 

Wednesday 15 May 2013

EASY MINI CHEESECAKES

Picky-picky husband has decided he loves cheesecake. Not just any cheesecake (that's part of his picky-picky-ness), but he loves miniature cheesecakes. I think it is because he can just snag one out of the fridge without plate or utensils.

This recipe for mini-cheesecakes is extremely quick and easy and since you can use any flavor of jam, it is quite versatile. If you don't want to add the jam, just leave it out!!

CRUST
1 cup graham cracker crumbs
2 tablespoons sugar
3 tablespoons butter, melted

Mix these three items until everything is moist and crumbly.
Place paper cupcake liners in cupcake pan (recipe makes 24 miniature cheesecakes).  Place a scant tablespoon of the crumbs in the bottom of each paper liner and tamp down a little.

CHEESECAKE FILLING

(3) 8 ounce packages of cream cheese (room temperature)
3/4 cup sugar
2 teaspoons vanilla extract
3 eggs

Beat the softened cream cheese for 2 minutes; it should be very creamy. Add the sugar and vanilla and beat for about 30 seconds.

Add the eggs, one at a time, beating well (on low) in between each egg.

If you are going to use jam in these cheesecakes (it is completely optional), put a rounded tablespoon of cheesecake batter on top of each graham cracker crust. Swirl a little of your favorite jam over the batter, like this:

Top this with another heaping tablespoon of cheesecake filling and then put another swirl of jam on the top surface.

Bake at 325°F for 25-30 minutes (my electric oven takes 25 minutes).
Leave the baked cheesecakes in the pan and cool to room temperature. After they are at room temperature, put them in the fridge to chill for at least a couple hours before serving.

Friday 10 May 2013

CHOCOLATE MARSHMALLOW BROWNIE PIE

I've noticed a trend on my birthday (which is today); it seems I always treat myself to something  CHOCOLATE!! Today's birthday post is ULTRA-chocolate (and delicious).

It starts with a rich brownie layer that you top with miniature marshmallows while it is still piping hot out of the oven. Then it is topped with a rich chocolate glaze and sprinkled with lots of toasted sliced almonds. It was heavenly!!

 
BROWNIE LAYER
In a small bowl whisk the following ingredients together:

3/4 cup all purpose flour
1 cup sugar
1/4 cup unsweetened cocoa powder
1 teaspoon baking powder
1/4 teaspoon salt

In a different bowl, beat the following together:

1/2 cup butter melted
2 large eggs
2 teaspoons vanilla

Add the wet ingredients to the dry ingredients and mix until smooth.

Place batter in a greased 9" round pan (spring form pan works the best) and bake in a 350°F oven for 25-30 minutes or until toothpick tests clean (my electric oven took 25 minutes).

Remove from oven (and turn oven off). Top HOT cake with miniature marshmallows (I used about 4 large handfuls) and put it back in the hot oven for 2-3 minutes or until marshmallows have puffed up a little. Remove from oven.

FUDGE FROSTING

6 tablespoons melted butter
6 tablespoons BOILING water
6 tablespoons dry cocoa powder
2 cups powdered sugar
1 teaspoon vanilla extract

Whisk until smooth. Gently pour (evenly) over the warm marshmallows and then sprinkle with TOASTED sliced almonds (nuts optional). If you don't like nuts, colored sprinkles look festive too.

Let everything cool off a little, then put it in the fridge for about an hour to "set" the chocolate frosting. Bring the cake back to room temperature before serving.

NOTE: You can bake this in ANY greased 9" cake pan, but a two piece spring form pan will allow you to remove the cake a little easier. If you use a 2 piece pan, make sure you put a cookie sheet under the pan.