Friday 10 January 2014

BEST EVER CHOCOLATE CHIP COOKIES

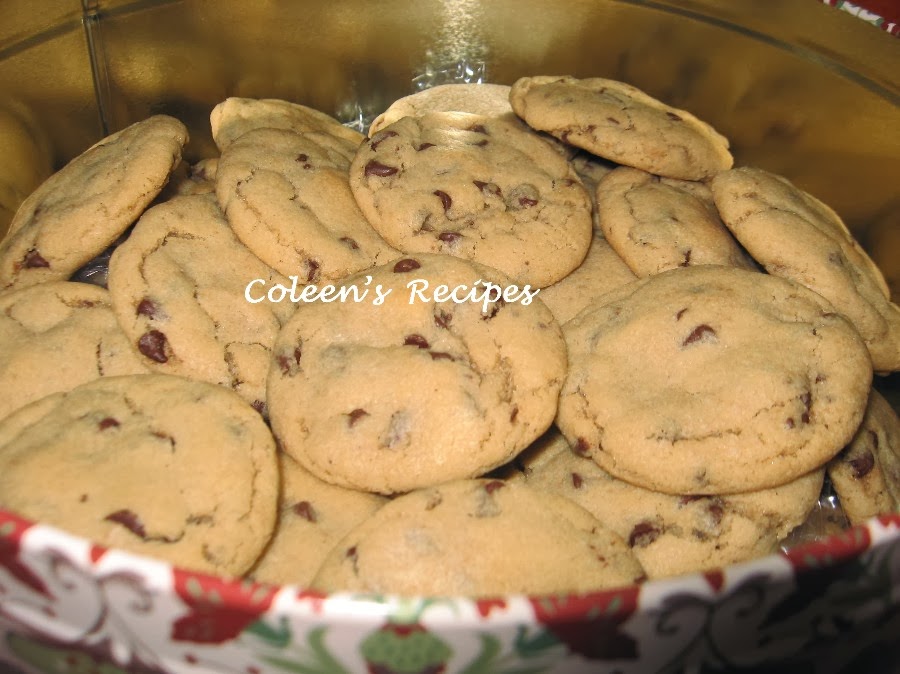
THIS RECIPE MAKES THE BEST CHOCOLATE CHIP COOKIE EVER!!
 
I've been making chocolate chip cookies for 45 years; lets just say I've tried a ba-jillion recipes, but today's recipe beats them all hands down, these cookies ARE THE REAL DEAL !!

Some chocolate chip cookie recipes have great flavor but produce a FLAT/SAGGY cookie that spreads all over the cookie sheet (I hate that). some recipes produce a picture perfect cookie, but they don't have that wonderfully chewy texture and buttery flavor that a good chocolate chip cookie needs. 

Well, I'm here to tell you that today's recipe will give you BOTH a perfectly shaped cookie AND one that tastes FIVE STAR .....THEY ARE
PERFECTION!!


The only word of caution in this recipe is that the cookie dough is THICK. I don't think I'd try it with my hand mixer, but my stand mixer worked great with this recipe.

1  1/2  cups real butter (no substitutions)(room temperature)
1  1/4  cups granulated sugar
1  1/4  cups brown sugar
2       large eggs
1  Tablespoon vanilla
4  1/4  cups all purpose flour(I use bread flour in everything)
1  teaspoon baking powder
1  teaspoon baking soda
1  teaspoon salt
2  cups chocolate chips (I use mini chocolate chips)

In the bowl of your stand mixer, combine the room temperature butter, sugars, eggs and vanilla. Beat until well mixed and smooth.

Mix the flour, baking soda, baking powder and salt together and add it, one cup at a time to the creamed butter-egg mixture. Beat until well mixed then beat in the chocolate chips.

Preheat oven to 375°F and use a UNGREASED cookie sheet. Roll the cookie dough into balls about the size of a small walnut and place on the cookie sheet about 2" apart.


Bake in pre-heated oven for 10 minutes. They will still be pretty soft-ish when they come out of the oven, but that is what you want for a soft chewy cookie. Cool them on a baking screen/rack.

This recipe makes about 5 dozen
perfect cookies
 
NOTE: Don't let the HEAVY (raw) cookie dough freak you out, after they bake, they are very tender, rich, buttery cookies.


I'm NEVER switching chocolate chip cookie
recipes again, THIS ONE is the REAL DEAL !!

Monday 6 January 2014

LIPTON ONION SOUP MIX CLONE

How many times have you set out to put your favorite ingredients into the crockpot, only to realize you do not have Lipton Onion Soup Mix?

Well, this clone recipe is coming to the rescue. It tastes just like boxed Liptons Onion Soup mix (I think it is MUCH better because it has such a FULL flavor). It is quick to make out of pantry staples; it has no soy; it's gluten free; no MSG; you can use low sodium bullion if you want; you can pronounce ALL of the ingredients, and it is VERY BUDGET FRIENDLY!!

I am NEVER buying boxed
Lipton Onion Soup mix again!!

 
This clone recipe is GREAT for dips, pot roast, meat loaf, or anything you would normally use the onion soup mix for.
 
4 tablespoons DRY instant minced onion (toasted)
2 tablespoons LOW SODIUM beef bullion granules
1/4 teaspoon onion powder (not onion salt)
1/4 teaspoon DRY parsley flakes
1/8 teaspoon celery seed CRUSHED (important ingredient)
1/8 teaspoon paprika
1/8 teaspoon black pepper
 
Equals a  single 1 1/4 oz.
envelope of soup mix.
 
NOTES: It is not necessary, but I toast the DRY instant minced onion in a hot DRY pan for a few minutes (watch it closely). When it turns golden, remove from the pan immediately or it will continue to get darker. Toast them so they are this color:
 
 
NOTES: Make sure you crush the celery seed (and don't leave it out). A mortar and pestle work well for this.


NOTES: If you use the GRANULAR TYPE beef bullion (and you are going to make a sour cream type dip) you'll have to mix everything together and let it sit in the fridge for 20 minutes or so........so the bullion granules can dissolve. After 20 minutes, just stir and the granules will disappear.
 
NOTES: This sounds like a LOT of onion, but it is just right!!


Tuesday 31 December 2013

FIVE MOST POPULAR POSTS OF 2013

We wish you all a very HAPPY and HEALTHY 2014!!
 
The five most popular posts on Coleen's Recipes in 2013 were:


Thank you very much for visiting
my recipe blog this year!!


Friday 20 December 2013

FIVE STAR CARAMEL CORN

If you are looking for a last minute gift idea that is super easy to make and even more easy to "consume mass quantities" (as the Coneheads would say); you have to try this caramel corn recipe from the cooks over at Table for Seven. I've tried a lot of caramel corn recipes over the years, and this is BY FAR the best one EVER!!  As a matter of fact, picky-picky husband and I ate the entire batch in one evening, we just couldn't leave it alone!!


1 bag of microwave popcorn (see note)
1 cup brown sugar (I used dark brown)
1/4 cup Karo corn syrup (the clear kind)
2 teaspoons molasses
1/2 cup butter cut into cubes
1/4 teaspoon baking soda
1/2 teaspoon salt
1/2 teaspoon vanilla

Preheat your oven to 250° and lightly spray a large baking sheet (with sides) with vegetable spray, set aside.

In a sauce pan, bring the brown sugar, corn syrup, molasses, butter and salt to a simmer. Cook and stir until this mixture reaches 250° on a candy thermometer (it takes about 5 minutes).

While the mixture is simmering, pop the bag of popcorn in the microwave then spread it out on the prepared baking sheet and let it sit in the preheated oven to stay warm.

When the caramel mixture reaches 250°, remove it from the heat and stir in the baking soda and vanilla.  Stir until very well mixed (it will get just a little foamy).

Pour over the popped corn and stir to coat. Bake coated popcorn in the 250° oven for one hour, stirring every 15 minutes or so.

After it has baked one hour, turn it out onto some waxed paper and let it cool (doesn't take long). Once it is completely cool, break apart any larger pieces and store in an airtight container (or Ziploc bag).

NOTE: I used one bag of lightly salted microwave popcorn. Personally, I don't think I would use the heavy butter flavored variety, although I'm sure it would work.

NOTE: Let the candy coated spoons/utensils sit in a cup of hot water for a little while and the candy will dissolve and wash off easily.

NOTE: Make sure the baking sheet that you use has sides. I used my roaster pan and it worked well.  You just want the sides to be tall enough that, when you stir the caramel corn you won't lose any over the edge.

NOTE: Be careful while you are stirring this caramel sauce so you don't get it on your skin (it is dangerously hot).

Once you turn the finished caramel corn out onto waxed paper, it cools down very quickly.

NOTE: The final caramel corn is lightly crunchy and not at all sticky as long as you keep it in an airtight container.

Monday 16 December 2013

SUPER EASY CREAM PUFFS

If you are looking for something super simple, yet impressive enough to WOW your dinner guests over the holidays, I suggest you make these cream puffs.  They are SUPER easy to make, SUPER economical and SUPER fun to serve.


1/2 cup butter (cubed)(no substitutions)
1 cup water


Bring the water and cubed butter to a boil (just until the butter melts). While it's still boiling, add one cup of flour (all at once) and stir with a sturdy spoon until the mixture turns into a thick "glob" (it just takes a few seconds).


Remove from heat and put "the glob" in your stand mixer. Mix on medium speed while you add 1 teaspoon of vanilla and 1 tablespoon of sugar.

 
Mix on high for a couple of minutes or so, just to cool off the dough a little.

With the mixer still running, add four eggs, ONE AT A TIME, beating well in between each egg. The final dough will be quite sticky.

Either grease your cookie sheet or line with parchment paper (I like to use parchment paper) and place spoonfuls of this mixture (about the size of a golf ball?) on the prepared cookie sheet, making sure they are about 3-4 inches apart since, as they bake, they will puff up a lot.

Put in a PRE-HEATED 400°F oven and immediately turn the oven DOWN TO 350°F. Bake for one hour. 

When you take them out of the oven, poke a small hole in the side of the baked cream puff to let steam escape. I have forgotten to poke that hole before and it didn't seem to make a lot of difference. 

Cool completely on a wire rack.


They come out of the oven
LIGHTER THAN AIR!!
 

To serve, cut in half and fill with sweetened whipped cream or berries and whipped cream or pudding, or ice cream or anything your family likes.


Dust the tops with powdered sugar or drizzle with chocolate sauce.

VARIATION: If you leave out the sugar and vanilla, these puffs are delicious filled with chicken salad, seafood salad, etc.


Saturday 7 December 2013

MELT IN YOUR MOUTH SHORTBREAD COOKIES

'Tis the season for Christmas cookies, and this is one of our favorites. Simple ingredients, simple instructions; you can make them as festive (or simple) as you want and they are still "melt in your mouth" delicious. Try these classic shortbread cookies for the holidays.

 
SHORTBREAD COOKIES
 
1 cup room temperature butter (no substitutions)
1/2  cup brown sugar (packed tight into measuring cup)
2 teaspoons vanilla
2 cups flour
 
In a large stand mixer (using paddle beater), beat the butter, vanilla and brown sugar (on high) for five minutes (scrape down the bowl sides half way through).
 
After 5 minutes, add the flour (one cup at a time) and beat until very well mixed and the cookie dough comes away from the sides of
the bowl.
 
Roll the dough into a log and wrap in plastic wrap. Chill for at least a couple hours (I like to chill overnight).
 
When you are ready to bake these cookies, roll the log in sprinkles or finely chopped nuts, pressing them in with your hands just a little.
 
Using a thin bladed knife, slice the cookie log into 1/4" slices and place on an UNGREASED cookie sheet.  Bake in a pre-heated 325° oven for 20-25 minutes or until edges of the cookies JUST START to change color. My electric oven takes 23 minutes.
 
Remove from cookie sheet and cool on bakers rack.  These cookies do NOT spread out when you bake them, so you can really place them close together on the baking sheet.
 
 
SPRINKLES?
 
NO SPRINKLES?
 
Just make sure you have a
tall glass of milk!!


Wednesday 4 December 2013

BRANDY SNAPS

If you want to impress your guests, make some of these Brandy Snaps for them. They look so elegant and they are definitely not something you see on every dessert tray.

A hard candy shell filled with sweetened whipped cream...do I have your attention yet?  Pretty fool proof if you follow my extra tips below printed in RED, AND you can make them days in advance and fill them just before your guests arrive. 


BRANDY SNAPS


Brandy Snaps are basically a crisp, sweet, lacy, candy shell that you can fill with sweetened whipped cream or your favorite mousse.

They look very hard to make, but it is an illusion; they are pretty easy if you pay attention to the tips below in RED.

2 tablespoons sugar
2 tablespoons white corn syrup
1/4 cup butter  (I used only 3 tablespoons)
2 teaspoons brandy (or) 1 teaspoon vanilla (I used rum extract)
1/4 cup all purpose flour

Since this whole process goes VERY fast, it is best to have everything ready before you start cooking the above ingredients.

Preheat your oven to 350° and line a cookie sheet with parchment paper (important). These candy shells REALLY spread as they cook, so only plan on making six of them on each cookie sheet.

Mix the sugar, corn syrup and butter in a small saucepan. STIR over medium heat until the mixture is good and bubbling, then remove from heat and stir in the flour and flavoring.

Drop one measuring teaspoon (per candy shell) of the cooked mixture onto the parchment paper. This will spread out into a circle about 4" in diameter as it bakes for about 6 to 7 minutes, but watch them very carefully after six minutes, as they can go from caramel colored to DARK very fast. It sounds tricky, but it isn't.

My candy circles were fairly pale in color until they hit the 6 minute mark in my electric oven, but they were a beautiful light caramel color at 6 1/2 minutes.

When they have turned a nice light caramel color, remove from the oven and let them sit on the cookie sheet for about 30 seconds. If they look a little oily, LIGHTLY dab them with a paper towel.

Use a pointed knife and lift the edge of the candy circle up a little so that you can grab it with your fingers (be careful, this is VERY  hot). One at a time, quickly roll the candy circle around the handle of a wooden spoon (they will cool almost immediately and hold their shape).

Once you form it around the spoon handle, it will instantly be cool enough to slide the candy tube off of the handle, and it's done!! 

If the other candies get too "hard" to roll, put them back in the oven for 30 seconds or so (but that shouldn't be a problem, as they stay fairly pliable as long as they are on the hot cookie sheet), they only become rigid once they cool off.


I didn't use a spoon handle, I used some metal cannoli tubes I have and they worked perfectly (no need to grease the spoon handle).

Keep the cooled candy tubes in an air tight container until you are ready to serve them. Fill them with sweetened whipped cream (the candy tubes can be filled up to about an hour before serving).

Don't be scared off by any of my "warnings' about this recipe, it may sound complicated, but it really is pretty easy and I hope you try it.

NOTE: I substituted rum extract for the vanilla, the candy tasted like butterscotch. I think ANY extract would work.

NOTE: You don't have to fill these with whipped cream. Almost any mousse like whipped filling would work wonderfully.