Tuesday 19 August 2014

BEST EVER STRAWBERRY TOPPING

This topping rates 5 out of 5 stars for an ice cream topping, but it is also DELICIOUS over pancakes, pound cake, cheesecake and right out of the jar with a big spoon!! It is nice and thick and bright red (not a hint of watery-ness........is that a word?) 

It is economic to make for a large crowd and it keeps well in the fridge for a couple of weeks.

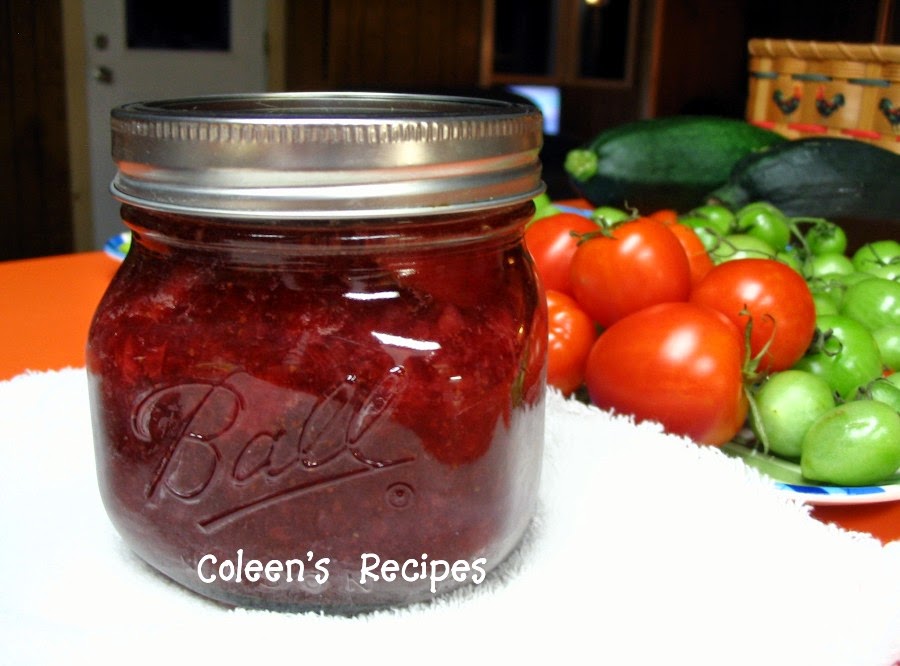
Only TWO ingredients!!
 
 
2 pounds of frozen strawberries
1 cup of sugar
 
I buy large bags of bulk frozen strawberries from our local discount store. I let them thaw for about 1/2 hour or so, then I pulse them in the food processor several times until you get a fairly small dice.
 
Add 1 cup of sugar, stir and put it in a heavy bottom kettle (heavy bottom kettles help it cook but not scorch). Cook on medium high heat until you get a good boil going, then turn down the heat to a medium low boil and cook for 20 minutes, stirring every few minutes.
 
After 20 minutes, remove from heat and skim off any pink foam. That's it!!  Chill in the fridge before using. Makes 4 cups of topping.
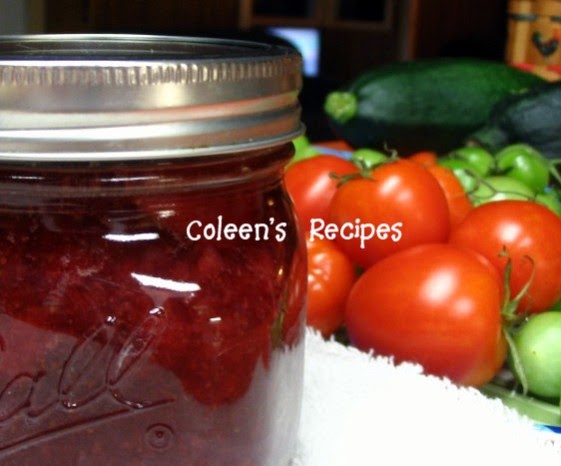
 
 
ENJOY !!


Friday 15 August 2014

SUPER EASY FLOUR TORTILLAS

I throw away a lot of tortillas, do you? I use 5 or 6 out of a package and freeze the rest with good intentions of using them later, but I never do. Before long they are covered with ice crystals and hiding in a dark corner in the freezer.

So I recently decided to teach myself how to make flour tortillas.
I was pleased to discover that they are very easy to make in the food processor and very inexpensive as well. They also taste worlds better than the ones from the store, I promise!! It is like the difference between store bread and bread out of the oven.


This recipe makes (8) 8" tortillas

1+3/4 cup all purpose flour
1/4 teaspoon baking powder
1/2 teaspoon salt
3 tablespoons canola or vegetable oil (see note below)
1/2 cup of hot tap water

In a food processor, place the flour, baking powder, salt and vegetable oil.  Pulse several times until it looks like coarse corn meal.

While the food process is still running, stream in the hot water (it doesn't have to be super hot, just hot right from the sink). When dough starts to form a ball, stop the food processor and dump the mixture out on the counter.

Knead it together with your hands a few times until it makes a  nice smooth ball (only takes a minute or so). Cover with plastic wrap and let it sit on the counter for about 30 minutes.

Cut the dough into 8 pieces and roll each piece into a ball (cover them and only roll out and cook one at a time).

Using a rolling pin, roll each ball (I don't use extra flour, but some people do) out into a large circle. Roll it as thin as you can, then roll it even more. My rule of thumb is to roll them thin enough so you can see the color of your counter just a little........well, maybe that's an exaggeration, but not by much (wink) the thinner the better

DO NOT WORRY IF THEY ARE NOT PERFECTLY ROUND,
THAT WILL COME WITH EXPERIENCE

One at a time, cook on hot UNGREASED pan (I use my electric griddle at 375F, for about one minute a side or until bubbles start to appear like this


As the bubbles appear, very gently press them down a little with a spatula. After it has cooked for about a minute (peak under and make sure that there are little golden brown spots on the underside), then flip it over and cook the other side for another minute. Keep them warm inside of a clean dish towel until you get them all cooked.


These tortillas are truly delicious.  Now, if you want to live really dangerously, you can replace the heart healthy canola oil with un-healthy but over-the-top delicious bacon fat.  Talk about WOW!!  I don't recommend this very often, but on a special occasion, you just have to try it with the bacon fat, it is excellent. (Note: on the days I fry bacon, I put the bacon fat into a clean jam jar and keep it in the fridge or freezer).


ENJOY !!

Friday 8 August 2014

CROCKPOT PORK LOIN

This recipe is ultra easy, ultra fast and ultra delicious!! What more can you ask for? And, oh, did I mention...it cooks by itself in the Crockpot!!

The end result is moist, fall apart tender, sweet-ish, completely full flavored and very versatile. It is going directly into my "make often" recipe box!!

2 pounds (approx.) pork loin (tenderloin will work too)
1/4 cup LOW SODIUM soy sauce (regular will be too salty)
1 tablespoon regular old yellow mustard
1/4 cup real maple syrup (not pancake syrup)
2 tablespoons canola oil (or vegetable oil)
2 tablespoons dried onion flakes
3/4 teaspoon garlic salt

Put the oil in your crockpot and rub it around to cover the cooking surface. Put the pork loin in.

Mix everything else and pour over the meat.  Put the lid on and cook on LOW for 6 hours. Turn it over half way through if you can, but its  not necessary.

After 6 hours, remove meat and thicken the sauce (if you want to) and put the meat back in. Whether you thicken the sauce or not, is just a matter of preference, it tastes the same.

NOTE: I use this recipe using a 2 pound pork loin roast, but a tenderloin will work too. I haven't tried the recipe with any other cut of pork.

NOTE: Make sure you use low sodium soy sauce or the final dish might be a tad salty for you.

Saturday 26 July 2014

SWEET AND STICKY CHICKEN

This recipe is one of picky-picky husbands all time favorites. There are several steps, but none of them are hard and the end result is oh so tasty!!

Yes, it IS very sweet (after all it is called "Sweet and Sticky Chicken"), but it is a real crowd pleaser and any leftovers are excellent for lunch on day two!!

You can use white or dark meat chicken, but we LOVE it made with boneless and skinless chicken thighs (and we don't usually eat dark chicken), but the thigh meat in this recipe stays very moist and flavorful (and some times, chicken breast meat, cooked like this, can be a little dry.


Cut 4 boneless skinless chicken thighs into 1" cubes. Marinate the cubes in the following mixture:

2 tablespoons cooking sherry (see substitution note below)
1 teaspoon powdered chicken bullion (or one cube crushed)
1/8 teaspoon black pepper
1  1/2  teaspoons sugar
1/2 teaspoon sesame oil

Toss cubed chicken in the above mixture and chill for about an hour.


Now, to bread the chicken:

In bowl #1, put:
1 cup flour

In bowl #2, mix
2 large eggs

In bowl #3, put
1 cup cornstarch


Toss the cubed and marinated chicken in bowl #1. Toss them around until well covered.

Shake off all excess flour mixture and put the meat into bowl #2. Stir them around until well moistened, then but them into the cornstarch in bowl #3, toss to coat well. 

Shake off excess cornstarch and fry in 1" vegetable oil (I use my electric skillet for this step).  Fry until lightly golden and well done. Drain on paper towels.

While the chicken is frying....make the sauce:

1/3 cup honey
1/4 cup sugar
1/4 cup ketchup
2 tablespoons white vinegar
1 tablespoon soy sauce
1 tablespoon of sweet chili sauce (see note below)

Put the sauce ingredients into a saucepan and simmer GENTLY for about a minute or two (don't boil hard or it will turn into candy).

Drizzle the sweet sauce over the cooked chicken. Toss to coat well.  Keep hot till serving time.

We like this served over rice.


NOTE:  We are very shy when it comes to spicy foods, so I  use one tablespoon of Sun Luck brand sweet chili sauce in this recipe and the final sauce has next to NO heat, but its a great addition to the flavor.  If you like spicy, then I'd suggest you use something with more heat.
 
 
NOTE:  I never seem to have cooking sherry around, so in this recipe I used 1 teaspoon of vanilla + enough water to make 2 tablespoons. Sounds weird I know, but trust me, it works well in this recipe.


Friday 18 July 2014

NO WEEP MERINGUE

We love lemon meringue pie, but since we are "empty nesters" it takes us several days to eat the pie, and by then my meringue starts to "weep" a clear liquid that makes everything.......well, we throw it away when that happens.

Recently, I found a recipe online for a "No Weep Meringue" and it truly is, just that, it doesn't weep!! Not only does it taste excellent, but the pie has been in the fridge for three days now and not a DROP of liquid has appeared!! 

For the life of me I can't remember where I found this recipe, so I apologize to the original author. Where has this recipe been all my life!?!?!?


NO WEEP MERINGUE

1 tablespoon cornstarch
1/2 cup + 2 tablespoons cold water

Bring this to a boil (whisking all the time) and cook until it gets very thick.  Remove from heat and set aside to cool to lukewarm.

In a large glass or stainless steel bowl (NO PLASTIC) beat three egg whites until they are thick and foamy (they shouldn't hold a peak yet).

With mixer on high, add 6 tablespoons sugar (one tablespoon at a time) beating well in between each addition. Add 1 teaspoon vanilla extract + a pinch of salt and beat until stiff and glossy.

With mixer running, add the lukewarm cornstarch mixture and beat on HIGH for 3-4 minutes.

Spread on filled and cooled 9" lemon pie.  Bake at 350° for about 10 minutes or until meringue peaks begin to turn golden.

Keep finished pie in fridge.

Friday 11 July 2014

SUPER EASY-PERFECT FROSTING

I've decorated cakes for decades and I've tried a ton of basic vanilla frosting recipes. Today's frosting is BY FAR the fastest, easiest and tastiest vanilla frosting I've ever used. It is light, fluffy, super easy to work with and it TASTES REALLY GOOD!!


BASIC VANILLA FROSTING
1 1/2 cups powdered sugar
1/2 cup UNSALTED butter (see important note below)
2 teaspoons vanilla extract (not imitation vanilla)
1/4 teaspoon almond extract (optional)
1-4 tablespoons cream  (milk will work in a pinch)

IMPORTANT NOTE: This frosting will taste terrible if you use regular salted butter; well, maybe that is a little misleading. Let's just say I DISLIKE this frosting when regular salted butter is used (it just tastes weird). So, use UNSALTED BUTTER !!

With an electric mixer (I like my stand mixer with the whisk attachment for this), beat the ROOM TEMPERATURE unsalted butter + sugar + extracts + 1 tablespoon of the cream until well mixed. If it seems dry, add another 1-3 more tablespoons of cream (1 tablespoon at a time) and  once you get the spreading consistency you want...beat it for a couple of minutes more, or until light and fluffy.

That's it!! It's so easy and pipes well through a bag and tip or spreads well with a knife. Sounds too simple, but try it, you'll love it.


ENJOY !!

Thursday 3 July 2014

SWEET BABY RAYS BARBECUE SAUCE CLONE

We love thick and sweet barbecue sauce, and our favorite (for years) has been Sweet Baby Ray's brand.  Recently, I did an panic-internet search for something similar to SBR barbecue sauce because I had one of those "I forgot my grocery list on the kitchen counter again" days at the market and dinner was planned around grilling.

Well, I found this recipe on a ton of web sites, all crediting www.halfbakedharvest.com, so I thought I would give it a try and we were thrilled with the results.  I hope you like it too.


Bacon wrapped Shrimp coated with
BBQ Sauce and Baked
 
 
1  1/4 cups regular ketchup
1  cup dark brown sugar (gives much better flavor than light brown)
1/4  cup molasses
1/4  cup pineapple juice
2  teaspoons hickory liquid smoke
2  1/2 teaspoons ground dry mustard
2 teaspoons paprika
1/2  teaspoon garlic powder (not salt)
pinch of cayenne pepper
1  1/2 teaspoons kosher salt (not fine table salt)
1 teaspoon black pepper

Put everything into a saucepan and whisk it together. Bring to a boil, then reduce heat to slow simmer and simmer 5 to 15 minutes, depending on how thick you want it to be.

You can use this immediately or store in fridge for a week or so or portion it out and freeze it for future use. 

NOTE: If you don't have kosher salt, you can use regular table salt, just use LESS, since kosher salt and table salt measure very differently.


 Happy Grilling!!