Saturday, 7 November 2009

EASY PLAY DOUGH - A GREAT WEEKEND PROJECT FOR THE KIDS or GRANDKIDS

I've tried many play dough recipes over the years and this one is, by far, the best yet. It is made with common pantry items and is ready to play with, literally, in a few minutes!! It's soft, pliable and super easy to work with. When the kids are done with it, recipe says to keep it in an airtight container in the fridge, but with all that salt, I doubt that is necessary.
EASY PLAY DOUGH
2 cups all purpose flour
1 cup table salt
2 cups water
4 teaspoons cream of tartar
2 tablespoons vegetable oil
food coloring (see note)

Put everything in a large, heavy bottomed, sauce pan and cook (stirring) on medium high until this comes away from the sides of the pan and thickens to the consistency of Play Doh (it just takes a couple minutes). Make sure you have a very sturdy wooden spoon to stir this with and it takes a little elbow power at the very end.

Remove the cooked dough from the sauce pan and knead it for a minute or so until it becomes smooth. I did this kneading stage with my stand mixer which cooled the dough down almost immediately (a good thing).

If you want the play dough to be all the same color, add the food coloring with the water before cooking. I wanted to try two colors, so I divided the cooked dough in half and put half in my stand mixer (for the kneading step) and I added food color paste to the dough while the machine was kneading the dough (this step can be done by hand, but I would suggest you use rubber gloves so you don't get green fingernails).

My one concern with using the concentrated food color paste was that it would come off on my hands when I "played" with the final product...it did not!! This is a great weekend project for the kids!!

NOTE: The colors in this photo were obtained by using Wilton frosting color paste, which is very concentrated color. You can use ANY food coloring (or NO food coloring) that you like.

Thursday, 5 November 2009

CREAM CHEESE WAFFLES

More often than not, we have sourdough waffles or sourdough pancakes on the weekends. However, recently I've been searching for a quick-fix waffle recipe and I have found a great one in our electric co-op newsletter, submitted by a lady named Sarah Wolcoff. Her deliciously moist and fluffy cream cheese waffles are oh so good!!!

1¾ cup all purpose flour
2 tablespoons brown sugar
1 tablespoon baking powder
1/8 teaspoon salt
(1) 3 ounce cream cheese (room temperature)
2 eggs (separated)
1½ cups milk
2 tablespoons vegetable oil
1 teaspoon vanilla extract (my tweak)

Mix the cream cheese and 2 egg yolks together until smooth; stir in milk, vanillaextract and vegetable oil. Add dry ingredients and stir just until combined, it will be a little lumpy. Beat 2 egg whites until stiff peaks form and then fold them gently into the batter, leaving lots of fluffs of egg white (don't over mix). Cook in waffle iron. Recipe makes about 6 good size waffles

Wednesday, 4 November 2009

CHOCOLATE FUDGE & DULCE de LECHE TASSIES

Chocolate Fudge and Dulce de Leche Tassies
All Rolled Into One Gem of a Cookie


PASTRY CRUST½ cup butter softened
(1) 3 ounce package cream cheese
1 cup all purpose flour
Beat the cream cheese and softened butter with electric mixer until well mixed. Add 1 cup of flour while mixer is on low speed, just until well combined. Cover and chill dough for 30 minutes or until it is easy to handle (I never chill this dough). Divide this dough into 24 balls. Press the balls into the bottom and up the sides of an (UNgreased) mini (1¾ inch) muffin pan (see note).


FILLING1/2 cup miniature semisweet chocolate chips
2 tablespoons butter
1/3 cup white sugar
1 egg
1 teaspoon vanilla
1 cup dulce de leche

In a small saucepan, combine the chocolate and butter; heat and stir over low heat until melted. Remove from heat and whisk in sugar, egg and vanilla.
ASSEMBLYIn the bottom of each pastry-lined cup, place a teaspoon of dulce de leche (you can find a super-easy method for making this caramel HERE. Put the chocolate mixture on top of the dulce de leche (filling pastry cups  3/4  full).


BAKEBake in preheated 325F oven for 25 minutes (mine baked for almost 30 minutes) or until filling is puffed. Cool in pan for five minutes then gently lift them out. If they do not come out easily, use the tip of a butter knife to help you lift them out. Cool on wire rack.
NOTE: I imagine you could use any caramel in this recipe, although the dulce de leche is super thick and does not get runny when baked.

NOTE: I never chill this dough. Instead, I place the ball of dough in the mini-muffin cup and use the rounded end of my wooden meat grinder plunger (fits perfectly). I just push down gently and evenly on the dough and the pastry cup almost forms itself. If you don’t have anything to try this method with, just use your fingers.

Monday, 2 November 2009

CROCK POT BBQ PORK SANDWICHES

This is a great weekend crockpot recipe because you can turn the "extras" into many different things over the weekend. The crockpot method makes the best pork sandwich ever (and there is lots of sauce in the crockpot to make them extra juicy)...plus you can turn the extra pork into tacos, or burritos, or pork and rice just to name a few. I like to make this recipe with pork tenderloin but any pork roast will work.


2½ pound pork tenderloin
2 teaspoons chili powder
1 teaspoon ground cumin
1 teaspoon salt ½ teaspoon black pepper
1 cup favorite barbecue sauce
2 tablespoons honey
¼ teaspoon dried red chili flakes
Our market sells pork tenderloin in 2½ pound packages and there are two tenderloins in each package. Cut each tenderloin in three pieces. If you are using a pork roast, trim obvious fat and cut it into pieces about the size of your fist. Mix the dry ingredients (except for the chili flakes) and rub all surfaces of the meat; place, covered, in refrigerator for an hour or so.

Brown the meat in a couple tablespoons of canola oil then put it in the crockpot. Mix the honey & dried red chili flakes into the barbecue sauce and pour over the meat. Cook on low for six or seven hours - every crockpot is different. To check for readiness, use two forks to see if the pork will pull apart easily.

Remove meat from crockpot and pull apart with two forks. Stir sauce and put the meat back in the sauce to keep it hot.

The above sandwich was made with my bun recipe which you can find HERE

NOTE: It isn't absolutely necessary to put the meat in the fridge after you put the dry rub on it, but it strengthens the flavor.
NOTE: Turn the meat over a couple of times during the cooking cycle...not absolutely necessary.

Saturday, 31 October 2009

PEANUT BUTTER-OATMEAL-CHOCOLATE CHIP COOKIES

HAPPY HALLOWEEN FROM OUR NEIGHBORHOOD TO YOURS!! This cookie recipe has something in it for everyone...peanut butter, oatmeal & mini-chocolate chips. It makes a flat, tender, crispy cookie that is delicious all by itself, or you can use them to make ice cream sandwiches, or you can put chocolate frosting in between two of the cookies. It is a very versatile cookie. I hope you all have a spooktacular (and safe) Halloween!!


¾ cup all purpose flour
½ teaspoon baking soda
½ teaspoon salt
¼ teaspoon baking powder
½ cup butter (room temperature)
½ cup peanut butter
½ cup white sugar
½ cup brown sugar (I like to use dark brown)
1 egg
1 teaspoon vanilla extract
1 cup quick-cooking oats
½ cup mini-chocolate chips

In a large bowl, with an electric mixer, cream the butter, peanut butter, sugars, vanilla and egg together until smooth. Add all of the dry ingredients and mix until everything is well incorporated. Roll into balls about the size of a walnut, then roll the balls in granulated sugar.
Place on ungreased cookie sheet and flatten with the end of a cup or glass dipped in sugar.
Bake in preheated 350F oven for 10-12 minutes (mine took 12 minutes). Let these cookies cool on your cookie sheet for a minute or so before you remove them.
This recipe makes about 2½ dozen or so cookies, depending on how large you make them. The cookies are a little fragile when you take them out of the oven, but if you let them cool on the pan for just a minute or so, you won't have that problem.

These cookies make excellent ice cream sandwiches!!!

Friday, 30 October 2009

BASIC FOCACCIA BREAD

Today, when hubby asked what we were having for lunch, I told him turkey panini's. He got one of those proud grins on his face, that told me he was getting ready to make a wisecrack; then he told me he didn't know turkeys HAD panini's. He can be delightfully goofy.

Todays sandwiches were made with a no-frills basic focaccia bread. For those of you who are still getting familiar with yeast doughs, this would be an excellent recipe to try; it is a very easy one and the results are fantastic.

Turkey and Smoked Gouda Panini


 2¾ cups all purpose flour
1 teaspoon salt
1 teaspoon white sugar
1 tablespoon dry active yeast
1 clove garlic minced
½ teaspoon black pepper
2 tablespoons olive oil (divided)
1 cup warm milk

Mix the first six ingredients together in the bowl of a stand mixer. Mix in warm milk and one tablespoon of olive oil. Mix well and knead until the dough is smooth and elastic (it only takes a few minutes). Cover with plastic and let it sit in a warm place for an hour. Push all of the air out of the dough and place it on a greased baking sheet. Pat the dough into a ½" thick rectangle and brush with the remaining one tablespoon of olive oil. Cover the rectangle very loosely with plastic wrap and let it sit for 30 minutes (it will raise a little, but not a lot). After 30 minutes, make dents in the dough (with your fingertips) every few inches over the entire surface of the focaccia. Bake at 450 for 15 minutes or until lightly golden. Cool the focaccia completely before slicing it horizontally to make sandwiches.

NOTE: This focaccia is basically a blank slate; you can add anything you like to the dough. If you want an herb focaccia, add 1 teaspoon each of dried oregano, dried thyme and dried basil to the first stage of the dough. If you want a cheesy focaccia, top the dough with a cup of shredded mozzarella and 2 tablespoons grated Parmesan just before baking.

NOTE: I've been using my GF Grilling Machine to make panini's by setting a large heavy can of something on the closed grill top (to weight the sandwich down). It works very well.

Thursday, 29 October 2009

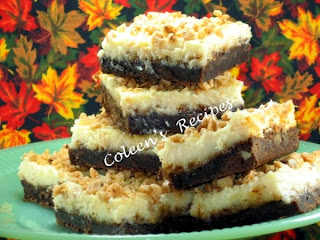
TOFFEE CHIP CHEESECAKE BARS

I've been trying out potential sweets for my Christmas cookie boxes and I found a real winner last week. It's from a cookbook called "Brand Name Recipes". The bars have a cocoa based cookie bottom (I used the new Hershey's dark chocolate cocoa which is very tasty) and on top of that is a creamy cheesecake-toffee bit layer and it is all topped with more toffee bits. Need I say more?


 1¼ cups all purpose flour
1 cup powdered sugar
½ cup unsweetened cocoa (I used dark chocolate cocoa)
¼ teaspoon baking soda
¾ cup butter (cold)
(1) 8 ounce package cream cheese (room temperature)
(1) 14 ounce can Eagle Brand Sweetened Condensed Milk
2 eggs
1 teaspoon vanilla extract
1½ cups English toffee bits (divided)

Combine the flour, powdered sugar, cocoa and baking soda in a medium bowl; cut in butter until it is crumbly (I did this step in my food processor). Press firmly on the bottom of an un-greased 9" x 13" baking pan. Bake for 15 minutes.

Beat the cream cheese until it is fluffy then add the sweetened condensed milk (not evaporated milk), eggs and vanilla and beat until it is smooth. Stir in one cup of the English toffee bits. Pour this mixture over the hot crust. Bake at 350F for 25 minutes or until set and the very edges just start to turn golden. Cool 10 minutes and then sprinkle on the remaining one half cup of toffee bits. Cool completely, then refrigerate until the bars are cold. Store leftovers (covered) in the fridge.

NOTE: These bars are to be kept in the fridge, but we think they taste best after they had been out of the fridge for 10-15 minutes.

NOTE: Make sure you use sweetened condensed milk, not evaporated milk