Thursday, 4 February 2010

Baked Eggs - A Sunday Morning Treat

This is such an easy method for making eggs, that you can not even call it a recipe. It would be great for any breakfast buffet...even for a crowd. It is delicious and requires only a couple ingredients. I hope you try it.

Put an un-greased cupcake or muffin pan into a pre-heated 400F oven (to let it get good and hot). When the pan is very hot, increase your oven temperature to 450F and remove the pan. Working quickly, spray the pan with a little vegetable spray and line each muffin cup with a slice of thin sliced deli ham (see note). Crack an egg into each ham lined cup and sprinkle with a little salt and pepper. Bake in the 450F oven for about 10 minutes or until the eggs are set.

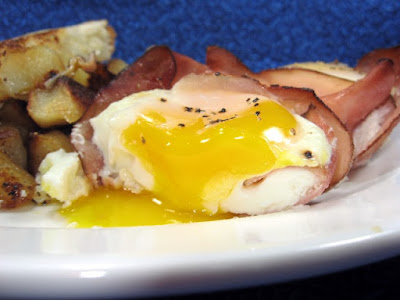
Remove from oven and use a spoon to help you lift the eggs and ham out of the pan (they come out easy). I left my eggs in the oven for 10 minutes, then shut off the oven and let them sit in there for another two minutes; it gave me a soft set egg like this:

My kids used to call eggs cooked to this degree "dipping eggs" because they were just right for dipping toast. If you like your eggs cooked more, just leave them in the oven for another minute. The eggs pick up the flavor of the ham and they are delicious and kind of "cute", don't you think?
NOTE: If you have ham sliced at the deli, the slices should be big enough for this recipe. If you use pre-packaged sandwich ham, the slices might be a little small, so just use two of them to make sure the ham is taller than the muffin cup edge.
Monday, 1 February 2010

CLASSIC CHICKEN-RICE BAKE


I think all cooks have their own version of this baked chicken and rice recipe. Some people use cream soups, some use broth, but they all call for baking chicken and rice together in the oven. This is our version (my favorite part is the rice). I usually put in tons more chicken than the recipe calls for, because it is a "freebie" way of making sandwich fixings (not to mention, chicken cooked this way has a wonderful flavor).
.
4 boneless, skinless chicken breasts
1 can cream of chicken soup
2 cups chicken stock
2 tablespoons chicken bullion granules
1 cup raw long grain white rice
½ teaspoon black pepper
¾ teaspoon poultry seasoning (see note)
½ cup chopped onion
½ cup chopped celery
16 ounce bag frozen peas and carrots
.
Brown the chicken breasts in a couple tablespoons of butter then set them aside. In the same pan that you browned the chicken in, saute the onion and celery until tender, then stir in the raw rice (you stir in the rice so that it will get coated with butter and not stick together while baking). Once the rice has sauteed for a minute or so, add the soup, stock, chicken bullion and spices. Whisk until smooth. Pour this mixture into a greased 9 x 13 baking dish and stir to distribute the rice evenly. Set the browned chicken on top of the rice (push it down into the liquid a little) and top the whole casserole with frozen peas and carrots. Cover tightly and bake at 325F for 1½ hours (if the chicken breasts are large).


NOTE: I don't buy poultry seasoning because I use it so seldom and it goes to waste. Instead, I use equal parts of dry rosemary, rubbed sage leaf and thyme leaves and a pinch of marjoram. I grind these together then measure ¾ teaspoon.

Sunday, 31 January 2010

CRUSHED PINEAPPLE JAM

There are a thousand uses for a good pineapple jam: toast, muffins, ham glaze, roast chicken glaze, pork roast glaze, cookie fillings and many more. My first attempt at making fresh pineapple jam was not totally successful since it never really "set" and I ended up using it as ice cream topping. I think the acidity or sugar level in any given pineapple varies greatly, so it was hard to get the right pectin ratio, but that's just a guess.
.
Now I use this excellent, super quick and super tasty recipe for pineapple jam that calls for canned crushed pineapple. I'd like to say that I, normally, would never consider making jam from a canned fruit (I make jam from berries that grow around the house); but, pineapple jam is the exception and this one gets five stars from Hubby.

(1) 20 ounce can of crushed pineapple (sweetened)
unsweetened pineapple juice (see note)
3 cups white sugar
(1) 1.75 ounce box Sure Jell pectin powder
(or the equivalent of liquid pectin)

GET READY
1. Wash your jam jars and rinse well (dishwasher works well) keep jars hot.
2. Place your 2 piece jar lids in boiling water, then turn the heat to low and let
them sit in the hot water till you need them.
3. Measure 3 cups of sugar and set it aside.
4. Add enough pineapple juice to the crushed pineapple, to equal 3¼ cups. One 20 ounce can of un-drained crushed pineapple and one six ounce can of unsweetened pineapple juice equals 3¼ cups.
TIME TO MAKE JAM
Place the fruit + juice + pectin in a six quart, heavy bottomed saucepan and bring the mixture to a rolling boil over high heat. Add the sugar, all at once, and bring back to a full rolling boil (one that can not be stirred down) stirring constantly. Boil for one minute. Remove from heat and skim off (and discard) any foam that is on the surface of the hot jam. Ladle hot jam into jars, filling to within ¼" of the top.
With a clean, warm, damp cloth, quickly wipe off the rims of the full jars and put the two piece lids on. Process the jars in a hot water bath for 10 minutes. Remove and cool on the counter.
NOTE: If you have concerns about the hot water bath step, check out the simple step-by-step instructions at: PICKYOUROWN.ORG
.
NOTE: Recipe makes five cups of jam.
.
NOTE: I keep individual (6 ounce) cans of unsweetened pineapple juice in the pantry for cooking, rather than a big jug that spoils before it gets used up.
.
NOTE: We don't care for jam that has big (unspreadable) chunks of fruit in it, so I pulsed the pineapple in the food processor a few times before I started cooking the jam. The final product still had a pineapple texture, but no hard chunks. I think next time I make this, I will put in a few chopped maraschino cherries for fun & color.

Friday, 29 January 2010

CHOCOLATE WAFFLES THIS WEEKEND!!

There is no earthly justification for chocolate waffles, except to have fun!! You won't find these on any weight watchers menu, nor are they as easy as "instant" waffle mix. However, they are delicious and a fun weekend treat for the "kids". Hot chocolate waffles with a scoop of vanilla ice cream...or hot chocolate waffles with whipped cream & sprinkles...better yet, hot chocolate waffles with peanut butter? I figure if you are going to "go for it" you might as well do it right with chocolate waffles.


1½ cups all purpose flour
¼ cup sugar
½ cup unsweetened cocoa powder
1 teaspoon baking powder
1 teaspoon salt
½ teaspoon baking soda
3 eggs, beaten
¼ cup melted butter
1 teaspoon vanilla extract
2 cups buttermilk (see note)
¾ cup miniature chocolate chips
.
Whisk first 6 ingredients together in large bowl. In a small bowl, whisk together eggs, melted (and cooled) butter, vanilla and buttermilk. Add this wet mixture to the dry mixture, then stir in chocolate chips. Let this batter rest for about 5 minutes while you heat up your waffle iron. (Batter needs to rest a little before use).
.
Spray your waffle iron with a little vegetable spray (you only need to spray it that first time). Cook waffles as you would any other waffle. Serve hot.
.
NOTE: For those occasions when I want to bake something, at the last minute, and I'm out of buttermilk, I use a product called SACO Cultured Buttermilk powder; you can find it in the baking section of any grocery store. Its strictly for baking, but it works wonderfully and I can't really tell the difference in baked goods. It worked great in these chocolate waffles, just make sure you follow the directions on the SACO can and add the right amount of water. It is a good thing to have on hand (make sure you keep it in the fridge).

Wednesday, 27 January 2010

CLASSIC BAKED CHICKEN

It seems there are two schools of thought when it comes to baking a chicken. Either you are an "old hand" at it...... OR you have avoided trying it because (even the thought of) touching the raw chicken carcass freaks you out. If the "freaking out" part sounds familiar, this post is for YOU!! It really is easy to do and opens up a whole world of recipes.

First of all, I do admit that it is hard to beat a (deli made) rotisserie chicken for convenience (and they taste pretty good too), but they aren't cheap and require ANOTHER trip to the market.

I buy whole chickens when they are on sale and freeze them. It takes 2-3 days to thaw a big raw chicken in the refrigerator, so plan ahead.

I used to bake chickens whole (like you would a turkey), but I was GROSSED OUT by the empty chicken cavity that filled with unappetizing-colored mystery juices as it baked (shudder). To remedy that, I split the chicken open, removing the backbone so the chicken could lay flat while it baked.

Start off with a whole chicken that is 3 to 4 pounds. Remove it from the wrapper and use SHARP kitchen scissors to cut down along each side of the backbone (neck to tail) of the chicken. You can do this step with a sharp knife, but it is safer and easier with kitchen shears. Remove the backbone and discard (or see note). 

Once the backbone is removed, rinse the chicken thoroughly in running cold water, rubbing down all parts of the meat then dry with paper towels.

At this stage, the chicken still won't want to "lay flat" like in the photo  below. To get it to do that, turn the chicken over so you can see the breast bone; make a small cut at the center-top of the breast bone and flex that bone with your hands, it will easily lay out flat. Sounds complicated (but it isn't) and it just takes a second to do.

Ready for the Oven

Brush the chicken skin, lightly, with butter and sprinkle with a little onion powder and dry (and crushed) rosemary (see note) then generously sprinkle with salt and pepper. Surround with favorite veggies if you like (but not necessary). If you have a nice big roasting pan, leave out the veggies and bake TWO of these fat hens at the same time. You'll have enough chicken on hand (for sandwiches, salads, quick dinners, etc.) for the whole week, not to mention lots of broth for gravy!!

Bake, uncovered, in pre-heated 375° oven for 1½ hours (for a 4 pound chicken). Remove from oven and cover loosely with foil and let it rest for 10 minutes. This produces very tender and juicy chickens.


CAUTION: It doesn't matter where you get your chicken from or what brand you buy; you still need to be very careful about cross-contamination when it comes to chicken.

ANYTHING that touches raw chicken (from your hands to utensils, to cutting boards, to dish towels and sinks) needs to be washed thoroughly with warm soapy water before you touch ANYTHING else. I go a step farther and use a bleach based kitchen cleaner on all surfaces after preparing chicken.  Personally, I worry about this step being ignored when it comes to deli roasted chicken.


NOTE: The backbone that you removed makes GREAT chicken stock. Keep a re-sealable bag in the freezer and throw the backbones in there. When you get half dozen or so, you can make a fantastic chicken stock by throwing them into the crock pot with 2 quarts of water and some onion, celery, carrots and peppercorns; let it cook on low all night. The next morning, strain and let it cool and skim off any fat. You can either use this right away or freeze it. It is WORLDS BETTER than canned chicken broth!!

NOTE: Rosemary goes wonderfully with baked chicken, it sort of tastes like stuffing to me. It looks like hard pine needles, so I crush mine up before I put it on the chicken.

Friday, 22 January 2010

CHOCOLATE-PECAN ICE CREAM CUPS

I tried this recipe for the first time, this week, and it has a LOT of potential. I think it will take another time (or two) to get the upper edge thick enough to hold its shape perfectly, but other than that, the chocolate cups are really delicious. You have to keep them in the freezer, but even frozen solid, they are the consistency of a GOOD fudge. They are super simple to make and fun to have on hand in the freezer.


 2 cups semisweet chocolate chips
14 ounce can of sweetened condensed milk (not evaporated)
1 cup finely ground pecans (I used the food processor)

In a heavy saucepan, over low heat, melt chocolate chips with sweetened condensed milk. Stir until very smooth then stir in finely chopped pecans. Insert paper liners into cupcake tins; spread about 2 tablespoons of this mixture on the bottom and up the sides of the paper liners. Freeze for at least 2 hours. Remove paper liners and fill with a scoop of your favorite ice cream. Makes about 18 cups.


NOTE: I melted my chocolate with the sweetened condensed milk in the microwave (on high); it took about 30 seconds, stirring half way through.

NOTE: Recipe calls for finely ground pecans. I used the food processor to chop the nuts super fine.

NOTE: Make sure you leave the chocolate at the top edge of the cupcake paper nice and thick, so it doesn't break/tear when you remove the paper. Chocolate cups are not super hard/brittle like other chocolate cups.

NOTE: Letting the chocolate cups sit at room temperature for about 3 or 4 minutes before removing the paper liner, makes it easier.


Saturday, 16 January 2010

FIVE STAR CHOCOLATE FUDGE GLAZE

Once you try this very simple, chocolate fudge glaze, you will be sold on it. I use it for a wide variety of things because it just takes a minute to whip up, it is delicious and provides a thick shiny glaze. I pour it on brownies while they are still hot & in the pan. You can dip cupcakes or cookies into it or pour it over a cake. It is thick, sweet, super smooth and even stays shiny after it dries (very pretty). I hope you try it. If you find some new, unique use for this glaze, please let me know. Sorry about todays poor photo quality, these photos were taken in a hurry.
½ cup light corn syrup (like Karo)
5 tablespoons water
5 tablespoons butter

Bring these three ingredients to a full boil, and boil for 20 seconds. Remove from heat and add: 12 ounce bag of semi-sweet chocolate chips.

Stir until melted and smooth. Cool to room temperature before you use it.

NOTE: I have not tried it, but I do not see any reason that you could not use ANY flavor baking chips for this recipe...I believe white chocolate would be very pretty.
NOTE: This glaze does not dry to the touch until the next day, so I wouldn't use this on anything that you have to pack for shipping.