Showing posts with label PARTY SNACKS. Show all posts

Tuesday 11 August 2009

HOME MADE TATER TOTS

This recipe is one the kids will get a kick out of...home made tater tots!! Super quick and simple to make, they are a mixture of chopped potatoes, shredded cheddar, egg, flour, seasonings and fried crisp in a little oil. They are excellent dipped in your favorite barbecue or ranch dressing...inexpensive too!!


2 medium Russet potatoes (see note)
1 cup shredded cheddar cheese (don't pack)
1/3 cup all purpose flour
1 teaspoon seasoning salt
1/4 teaspoon onion powder
1/4 teaspoon black pepper
1 beaten egg

Peel and cube potatoes into your food processor bowl. Pulse them a few times but don't chop them so fine that they become mush. (First picture is the cube size, second picture is the desired chopped size)

In a bowl, mix the chopped potatoes & 1 cup of loosely packed shredded cheddar cheese. Thoroughly mix in the flour (make sure everything is coated). Then add the rest of the ingredients and mix well. Let this mixture sit for about 5 minutes before you fry them. Heat 1/2" vegetable oil to 375.


Scoop spoonfuls of the potato mixture and compress it a little with your fingers while it is on the spoon. Push the "tater tot" off of the spoon (gently) into the shallow (hot) vegetable oil. Fry until golden brown (about 2 minutes per side). Season with salt while still hot.


NOTE: For those of you who live in Alaska, I don't think our Alaska potatoes would work very well in this recipe (the hold too much water and won't crisp up). Recipe calls for Russet (or baking potatoes).
NOTE: For a variation, I am going to try pepper Jack cheese in this recipe instead of the cheddar. I'll let you know how it goes.


Tuesday 21 July 2009

HOT SOFT PRETZELS

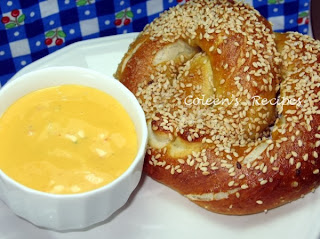
I love hot pretzels, especially nice big puffy ones. This recipe is not hard at all, but it does have a few pesky steps. The pretzels are deliciously chewy on the outside and soft and fluffy on the inside and you can top them with just about any seed or seasoning you prefer. I made these with toasted sesame seeds and a light sprinkle of coarse ground salt. This recipe makes 8 large pretzels.


1  and 1/2 cups warm water
1 tablespoon white sugar
2 teaspoons kosher salt
1 generous tablespoon of dry yeast
4 cups all purpose flour (divided)
2 tablespoons canola oil


In your stand mixer, mix two cups of the flour, sugar, yeast and kosher salt. Pour the warm water and oil over the top and mix with wooden spoon until all ingredients are wet. Let this stand for about 10 minutes.

Attach the dough hook to your mixer and gradually beat in the additional 2 cups of flour (1/2 cup at a time). If dough is still sticky after you get the 4 cups of flour mixed in, had a little more flour (tablespoon at a time) until the dough pulls cleanly away from the inside walls of your mixing bowl. Once it does that, knead on low for about five minutes (see note).

Remove the dough from your mixing bowl and spray the inside of the bowl with vegetable spray; return the dough to the bowl and spritz the top of the dough with vegetable spray; cover the bowl with plastic wrap and let dough sit for an hour or until it doubles in size.

Preheat your oven to 450. Line two large baking sheets with parchment paper and spritz the paper with vegetable spray then rub a paper towel over the parchment paper to remove excess spray. Set aside.

Punch down the dough and cut it into 8 pieces. Roll out each piece into a 24" rope and twist it into a pretzel shape (pinching ends together tightly). Place pretzels on the prepared parchment paper.

In a large (wide bottomed sauce pan), bring 10 cups of water + 2/3 cup baking soda to a rolling boil (it will really bubble). Gently place one of your pretzels onto a slotted FLAT spatula and gently lower the spatula (with pretzel) into the boiling water. Shake the spatula very gently and the pretzel will float off into the water. COOK ONLY ONE PRETZEL AT A TIME.

Boil each pretzel for 30 seconds then gently lift it back out of the water and (before you put it BACK on the parchment paper) rest the slotted spatula/pretzel gently on a kitchen towel (for a couple of seconds) so that it will absorb any water drips......THEN put it back on the parchment paper. Repeat this process for each pretzel.

When all pretzels have been through the water bath, gently brush the tops of them with egg wash (1 egg yolk beaten with 1 tablespoon water) and sprinkle with salt and/or seeds.

Bake in 450 oven for 12 minutes or until they are dark golden brown. Cool on a wire rack for five minutes before serving.

 Not the best for you, I'm sure, but the cheese dip recipe that is on the back of the Velveeta box is still my favorite: 1 pound of Velveeta (cubed) + 8 ounce jar of your favorite salsa. Mix and microwave on high until cheese is really melted (about 4 or 5 minutes...stir once in a while). When it's completely melted, add 2 tablespoons chopped cilantro. Yum!

This evening, hubby had sweet chicken wings for dinner (not my favorite) so I sliced one of the big pretzels and made an egg salad sandwich with it. Oh man, what a sandwich!

 NOTE: I have not tried it, but I do not see why the initial dough mixing and kneading couldn't be done with a bread machine.

NOTE: Be very gentle with the pretzels when you transfer them from the boiling water back to the parchment paper lined baking sheet.

Friday 3 July 2009

FRESH HERB & VEGGIE DIP

I learned to cook with dried herbs because fresh herbs were not always available where I live. Fresh herbs not only measure differently, but they taste entirely differently, so learning to cook with them is an on-going process for me.

This summer, I have several pots of herbs growing fairly successfully. I am growing rosemary, thyme, basil, chives, sage, oregano and apple mint. I am on the search for recipes calling for fresh herbs, so if you have a favorite one to share, please let me know.
Many of us will be entertaining company over the 4th of July. This is a recipe for a very light tasting cream cheese dip, using fresh herbs. It is sure to please your company.

FRESH HERB and VEGGIE DIP
12 ounces of whipped cream cheese spread
2 tablespoons finely chopped fresh chives
1 tablespoon finely chopped fresh oregano leaves
1 tablespoon finely chopped fresh thyme leaves
1/8 teaspoon cayenne pepper
dash of salt
1/2 cup shredded carrots
1/4 cup green onions (sliced extremely thin)
3 radishes diced very small

Mix everything in a small bowl and let it sit (covered) in fridge overnight. Serve
with crackers, pretzels or raw veggies.

NOTE: Next to my herb garden, I have a large planter of catnip growing; it is just starting to show a few small blue flowers. Our cat, as well as our neighbors cat, sit next to it and purr loudly while they rub up against the planter, lol.


I think Tabitha's had enough catnip for today...don't you??

Monday 29 June 2009

SPEEDY SZECHWAN SHRIMP

Szechwan shrimp is supposed to be pretty spicy, but we are "heavy-spice" cowards, so I adjusted the heat WAY down on this recipe and it was still very tasty. It is nice, light and healthy and made a great Sunday meal served over my garden rice.

Peel and devein a pound of large shrimp and set aside.

In a bowl, mix the following and set aside.
4 tablespoons water
2 tablespoons ketchup
1 tablespoon soy sauce
2 teaspoons cornstarch
2 teaspoons honey
1/2 teaspoon crushed red pepper flakes (I used a scant 1/4 tsp.)
1/4 teaspoon ground ginger (I used some fresh ginger)

Heat 1 tablespoon of canola oil in a large skillet, over medium high heat and add 1/4 cup sliced green onions and 2 cloves of minced garlic. Saute the onions and garlic about 30 seconds then throw in the shrimp and saute them for a couple minutes or until pink. Stir in the sauce and cook until the sauce thickens up (it will just take a minute at most).

NOTE: Since I was sure that the sauce was going to be too spicey for hubby, I took the shrimp out of the sauce and put them under the broiler to crisp them up a little, but that's not necessary. The sauce was excellent tasting if you can handle the heat. I served these over garden rice.

GARDEN RICE
In a large sauce pan that has a tight fitting lid, saute half of a small sweet onion (diced) and half cup diced celery in 1 tablespoon butter or canola oil. Stir in one cup of raw long grained rice and coat the rice with the butter. Add one cup (diced) of your favorite veggies (I usually use a frozen mixed veggie) and one ear of corn sliced into one to two inch sections. Add 1 and 1/2 cups of chicken broth and 1/2 teaspoon of black pepper. Bring to boil, stir, put lid on, lower heat to a simmer and cook for 20 minutes. After 20 minutes, turn off heat and let it sit for 5 minutes. Serve shrimp over garden rice.

NOTE: We love corn on the cob "coins" cooked in chicken broth right along with the rice and other veggies. It gives the corn a wonderful flavor.

Friday 12 June 2009

CANDIED APPLES

What says summer fun, more than candied apples? They are very easy to make (if you follow a few tips at the end of this post) and would be a nice addition to any summer birthday party, barbeque or even for a 4th of July picnic!


 The ingredients are very basic:

10 small (snack size) apples
10 popsicle sticks
2 cups white sugar
1 cup light Karo syrup
1 & 1/2 cups water
1/2 teaspoon cherry UNsweetened Kool Aid powder

Wash any wax or soil from the apples and thoroughly dry them (remove stems). Insert wooden stick into the stem end of the apple (push about half way into the apple).

Line a baking sheet with waxed paper and spray it with cooking spray (keep this close to your work station).

In a medium size, heavy-bottomed sauce pan, attach your candy thermometer and make sure that the glass tip is not setting on the bottom of the pan (it will give you a false reading). Put all of the candy ingredients in the pan and cook on medium high, stirring constantly, until it comes to a boil. DO NOT STIR THIS AFTER IT COMES TO A BOIL. Turn the heat down just a little, so that you have a nice gentle boil and then keep an eye on the thermometer. Cook until it hits 300 or hard crack stage; this can take up to 30 minutes, but on my stove it takes about 25. Keep a close eye on the candy after it reaches 285 because those last 15 degrees go faster than you think. DO NOT STIR!!

Remove the pan from the heat and work fast. Holding the apple by the stick, dip it into the pan (hold the pan at a tilt, so the candy will "pool". Twirl the apple and then let the candy drip off of the apple for a few seconds and then place on the prepared waxed paper. DON'T GET THIS STUFF ON YOUR SKIN!!!!! Apples will be hard and ready to use five to ten minutes after they are dipped. If you are going to add sprinkles or any decorations, you will have to add them with lightening speed because these cool off and become hard FAST (an extra person would be a big help if you are going to add sprinkles).
NOTE: Keep a bowl of ice water near your work station just in case you get some of this on your fingers (definitely not safe for younger kids).

NOTE: In the first stage of making the candy, try not to splash any liquid onto the sides of your pan (it can make crystals in the candy).

NOTE: I keep an electric frying pan, preheated to 200, at my work station. When the pan of candy comes off of the stove, I set it on the DRY, warm frying pan so that it doesn't cool down too fast and lengthens the amount of time you have to dip the apples.

NOTE: The best tip I can give you is to have EVERYTHING at your fingertips BEFORE you start dipping the apples. Once you are at that stage, you have zero time to run to the pantry and find something.
NOTE: Any candy left over can be poured out onto a pan that has been sprayed with cooking spray. When it's cooled, you can break it up and eat it (tastes like cherry life savers.

NOTE: There is a teaspoon of UNsweetened Kool Aid powder in each small envelope, so you can get two batches of candied apples per Kool Aid envelope (any flavor will work).

NOTE: Clean up can be a pain if you don't have a dishwasher. If you have a dishwasher, just put all of the stuff in the hot cycle.

NOTE: These are best eaten the day they are made. If you HAVE to make them a day ahead of time, do NOT cover them because the moisture from the apples will degrade the candy coating.

NOTE: Someone told me (I haven't tried it) that you can candy grapes, cherries and other small fruit (use their stems to hold onto instead of using a stick).

Tuesday 12 May 2009

NO-BAKE ECLAIR CAKE

In a late night surfing session, I found a recipe called Eclair Cake. It is not really a cake, but a combination of ready made ingredients that(when put together)make an ooey-gooey dessert that looks heavenly. I didn’t even write down the ingredients, I just sort of filed the idea away. Well, last weekend, I made my version and it was even better than I hoped for! Even Picky-picky husband loves this one.

Basically, it is three layers of graham crackers separated by two layers of vanilla pudding and topped with a fudge-y frosting. Make sure you make it a day BEFORE you want to serve it so that the graham crackers absorb a little moisture from the pudding and become “cake like”. This was so good that I made it for my own birthday!


(2) 3½ ounce instant French vanilla pudding
1 pound of graham crackers
8 ounce Cool Whip thawed
3 cups of milk


CHOCOLATE TOPPING

6 tablespoons butter (melted)
6 tablespoons boiling water
6 tablespoons baking cocoa
2 cups powdered sugar
1 teaspoon vanilla

Place a single layer of graham crackers in the bottom of a 9x13 dish (breaking to fit if necessary). In a large bowl, whisk the instant pudding with 3 cups milk until well mixed, then fold in the Cool Whip. Immediately pour half of this mixture over the graham crackers, spreading it out evenly.

Put another layer of graham crackers on top of the pudding and then another layer of pudding mixture. Top second layer of pudding with a final layer of graham crackers. Cover the dish tightly, with plastic wrap, and refrigerate for about an hour before you frost it.

After an hour of chilling, mix melted butter, boiling water, cocoa and vanilla until well blended. Add powdered sugar and whisk until smooth. Immediately pour the frosting over the chilled pudding dessert and smooth it out.

Place dessert (uncovered) in fridge for an hour or so (until the frosting feels dry to the touch),then stretch plastic wrap over the pan(stretching it tightly so that it doesn't sag and touch the frosting). Refrigerate overnight (important).
NOTE: I use a glass 9x13 pan so that the plastic grips tightly to the glass and doesn’t sag down onto the frosting. Not necessary, but it looks prettier if the plastic doesn’t leave wrinkles in the frosting. A Tupperware 9x13 with snap-on lid works great too.

NOTE: After this "cake" has been in the fridge, overnight, it is easy to cut into squares to serve because the graham crackers are soft.

Saturday 9 May 2009

CHICKEN FINGERS

Chicken Fingers are an excellent appetizer for parties (for all age groups). It is also a quick “go to” meal for a weeknight dinner. Simple and delicious, what more can you ask for? If you have any leftovers, this chicken (chopped up) makes a fantastic chicken and grilled cheese sandwich on day two.


6 boneless, skinless chicken breast halves
2 cup of buttermilk
1 teaspoon garlic powder
2 cups flour
2 eggs, beaten
1 teaspoon salt
½ teaspoon black pepper
½ teaspoon onion powder


Combine the buttermilk, beaten egg and garlic powder and pour it into a large Ziploc bag. Cut the chicken breast into long half inch wide strips and put them in the same Ziploc bag. Refrigerate this until you are ready to cook (or at least 2 hours). In another large Ziploc bag, combine the flour, salt, pepper and onion powder.

When it is time to cook, follow these steps:
1. Drain chicken (saving liquid) and coat chicken in flour mixture.
2. Shake off excess flour mixture and put BACK INTO liquid again.
3. Repeat step one, then THROW AWAY BUTTERMILK LIQUID
Fry chicken fingers in ½” vegetable oil until golden. Keep warm in oven.
photo

BARBEQUE DIPPING SAUCE
1 cup ketchup
¼ cup white vinegar
½ cup brown sugar
2 tablespoons chopped onion (sautéed)
1 teaspoon Worcestershire sauce
½ teaspoon liquid smoke
¼ teaspoon black pepper
¼ teaspoon celery salt
½ teaspoon powdered mustard
Combine and simmer slowly for about 10 minutes.


We like barbeque flavored Chicken Fingers. To do that, I simply put one half cup of barbeque into a large frying pan, let it heat up.

Then I put the cooked chicken fingers in
the sauce and toss lightly.


 NOTE: Personally, we like this recipe best with boneless, skinless chicken thighs because they are so moist. This is also excellent with chicken tenders as well.

Friday 1 May 2009

LIGHT AS AIR PINWHEELS

I found this fabulous recipe for Phyllo Pinwheels on a blog called Cindy’s Place. It is very quick and easy and yet so impressive to look at. They are deliciously light as air and would look fantastic on a baby shower or wedding shower table.
1 package of Pepperidge Farm phyllo dough (freezer section)
1 egg
maraschino cherries


Thaw both sheets of phyllo dough for 40 minutes or until soft enough to handle. Work with one sheet at a time. Unfold the phyllo dough and press out any fold marks. Cut the phyllo dough into 3 full length rectangles, then cut each rectangle into 3 squares each (total 9 per sheet).

For each square, cut (starting in the corners) ¾ of the way to the center (see diagram). Lift a cut corner and secure it in the center (using a micro-dot of water if necessary).Repeat for other corners like this:

Place pinwheels on parchment paper lined baking sheet and brush them with egg wash (1 egg beaten with a little water). Set half of a maraschino cherry in the center. Bake in preheated oven (350°) for 30 minutes or until golden. Remove to cooling rack. Bring 1 cup of powdered sugar + 2 tablespoons of water + 1 teaspoon of vanilla extract + ¼ teaspoon of almond extract to a boil and remove from heat. Brush the cooked pinwheels with this glaze. The glaze will dry to the touch after a little while. These are SO tasty!

NOTE: Cindy's web page is in Portuguese, however, she has been more than helpful in interpreting recipes. I hope you go visit her.

Thursday 30 April 2009

NO-BAKE CANDY CAKE


Follow Me on Pinterest
I found this idea on a web site a few years ago (long before I was aware of the blogging world). It is a fun (and easy) project which can be tailored to any age, holiday or special occasion.

Need a gift for someone at work or school? Make them a small version. Make a huge version for a table centerpiece at a teenager’s birthday party. The possibilities are endless.

The “candy cake” pictured was made with a 9” cardboard circle for a base. Since the candy you are going to fill this with is heavy, the base cardboard needs to be pretty rigid, so…if in doubt, double-up your cardboard. If you double up your cardboard, wrap it in foil to disguise it.

Next, I hot glued two (FLAT) 8” Styrofoam wreath circles (craft dept. at Walmart) on top of each other, then wrapped them with wide ribbon (to disguise them) and glued them to the cardboard circle base. Now you should have a flat base with a ribbon wrapped “lip” around the outer edge of the base.

Next, attach mini-candy bars or mini-boxes of candy to the outside of the “lip” by placing a SINGLE SMALL DOT of hot glue on the back of the candy wrapper (use my photo as a guide).


Now fill the hollow area inside of the Styrofoam wreath "lip" with loose, wrapped candies, fill to the top.Next, think about decorating the flat top of the Styrofoam “lip”. You can either glue more candy to it, or push lollipops, blow pops, or any candy on a stick, into the Styrofoam so it will add height (see my photo).

TIP: Plan ahead and make sure all of your candy bars are facing in the same direction. Keep your design or color theme in mind when you are choosing candy bars.


TIP: If you are using hot glue on chocolate bars, remember just one little dot will suffice and if you are concerned about it, freeze them first.

TIP: Do not use any unwrapped candy.
TIP: If giving as a gift, this looks especially festive if you wrap it in clear cellophane and decorate it with lots of curly ribbons.

The hardest part of this project is not snacking on the candy while you are constructing it!!!

Friday 10 April 2009

BACON WRAPPED SHRIMP


Your guests will never guess how simple these shrimp are to make and YOU will be amazed how quickly they disappear; they are an absolutely delicious hors d’oeuvre.

(1) 16 ounce bag of frozen 16-20 count RAW shrimp (see note)
1 pound of smoked bacon (not the thick kind)
1 cup of your favorite barbeque sauce

In our Fred Meyer store, these shrimp are sold frozen (near the meat case). The one pound package says they are 16-20 count “Wild Caught” with shell on and heads off. Let them thaw in your fridge overnight. The next day, remove the shell (leave tails on). With a small sharp knife, make a shallow cut down the back of the shrimp and rinse out any “vein” you see there. Drain the shrimp on a paper towel and sit in fridge for a few minutes while you prepare the bacon.
If you use the 16-20 count shrimp (16 to 20 shrimp per pound), it will take a whole slice of bacon per shrimp. Make sure you use regular cut bacon (not thick sliced). Partially cook it, to remove some of the fat, but don’t let it get crispy (drain on paper towels). It should look like this:
Wrap the partially cooked bacon around the raw shrimp. Starting at the wide end of the shrimp, attach the bacon to the shrimp with a toothpick. Wind the bacon around (in a single thickness) and all the way down to the tail and secure it with another toothpick like this:
Baste the shrimp on both sides with your favorite barbeque sauce (I recommend Sweet Baby Ray’s barbeque sauce). Cover with plastic wrap and refrigerate for two hours.

Line a large baking sheet with foil (to help with cleanup) and put a baking rack on the foil (spray the rack with cooking spray). Place the shrimp on the rack and bake in a PREHEATED 450° oven for 10 minutes. After 10 minutes, TURN OFF THE OVEN (do not open the door) and let the shrimp sit in the hot oven for another five minutes. Remove the toothpicks and enjoy!