Saturday 28 April 2012

SUNDAY MORNING FLUFFY BISCUITS

I have been biscuit "challenged" for many years, so when I'm in a hurry, I usually resort to a tube of commercial rolls and try to jazz them up, but they are pretty unmistakable (and getting expensive!!). 

The last few years, I've tried out a lot of biscuit recipes, in hopes of finding the perfect one; one that is flavorful, light, fluffy and EASY............here is my latest success...YUM!!!

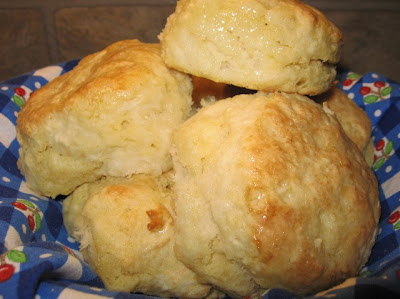
Made with baking powder, baking soda, buttermilk AND yeast, these biscuits are light and fluffy. Hot out of the oven with butter and honey, they are a winner!!!

In a small bowl, mix 1 packet of dry active yeast, a pinch of sugar and ¼ cup of warm water (set aside). After a few minutes, it should be foamy like this:
2½ cups of all purpose flour
½ teaspoon baking soda
1½ teaspoon baking powder
½ teaspoon salt
1 tablespoon of white sugar
6 tablespoons Crisco flavored shortening
1 cup buttermilk (see note)

Stir dry ingredients together and then cut in the shortening until it is about the size of small peas. Stir in the dissolved yeast and buttermilk. Mix well, but do not over mix. Turn out onto floured board and roll to ¾” thick. Cut with a 3” biscuit cutter. Place on parchment paper and bake in preheated 400° oven for 12-14 minutes or until nice and golden. Brush with melted butter when they come out of the oven; they make fantastic breakfast sandwiches!!

NOTE: No kneading needed.

NOTE: This recipe does not work as well if you use butter instead of shortening. I use butter flavored Crisco in all my recipes that call for shortening.

NOTE: Don't be tempted to use your food processor when cutting in the shortening, it will process the shortening to much, it is better to have larger pieces of butter than super fine. I use my pastry cutter.
NOTE: Do NOT add all of the buttermilk at once. Add about 2/3 of it and see if that is enough. Personally, I think 1 cup of milk is too much, but everyone’s flour is different. Just flour your board enough so that the biscuits are not sticky.

NOTE: If you don’t have parchment paper, spray your pan with vegetable spray.

NOTE: Don’t use a twisting motion when you are cutting your biscuits. It seals off
the edges and they won’t raise very high.

Monday 23 April 2012

FIVE STAR GREEN PEA SALAD

We still have a lot of snow around the edges of the yard (several feet of it as a matter of fact), but it won't be long before it's barbecue season again, so my thoughts are turning towards side dishes that can be prepared ahead of time. 

Summer Pea Salad, jazzed up with crisp bacon and tomatoes is one of my favorites. It is one of those great salads that travels well and tastes even better after it has been in the fridge for a day or two. If you are going to make this salad, in advance, don't add the crisp bacon right away (it will get soggy), just sprinkle it over the salad before serving.
16 ounce bag of frozen green peas
1/3 cup finely chopped red onion
1/2 cup grated carrot
1/2 cup celery chopped
1 cup thinly sliced mushrooms
1/2 cup red bell pepper chopped
3 slices of crisp bacon cut up (optional)
1/2 cup sharp cheddar cheese shredded (I use more)
cherry tomatoes, cut in half
sunflower seeds

Fresh green peas are the best in this salad, but when they are not available, frozen peas work very well too.  Microwave peas (covered) with 1 tablespoon of water for about 3 minutes or until slightly cooked (but not soft) then drain and cool.

In a large bowl, mix all of the above ingredients together (except the cherry tomatoes); gently fold in the dressing.

Dressing
3 heaping tablespoons of light mayonnaise
1 tablespoon freshly squeezed lemon juice
2 teaspoons sugar
1/2 teaspoon black pepper
1-2 tablespoons milk
Whisk the ingredients together and gently fold into salad.

Add cherry tomatoes and an extra sprinkle of cheese to the top of the salad for decoration. Cover and chill.
NOTE: Every microwave cooks at a different rate, so keep an eye on your peas when you microwave them. You don't want them to get overcooked and mushy.

Wednesday 11 April 2012

BACON

Mmmmm, Bacon!!

I am never frying bacon again!! Don't get me wrong, we are not removing bacon from our menu, it is just the frying method that I will never do again. Don't you hate cramming 4 or 5 pieces, at a time, into your largest frying pan... trying to get them all to lay flat as they curl up and leave those white fatty ends on each piece?!?!?  Me too, so I went on an Internet hunt for a "flat bacon miracle" and I found a super easy one!! Maybe everyone already knows about this method, but I sure didn't and I can tell you right now, I'll never fry bacon in a frying pan again!!

Using a large baking sheet that has a lip on it, spray it with a little cooking spray (probably not really necessary, but it makes for easier clean up) and line up the raw bacon slices, side by side, like this (my baking sheet cooked a 12 ounce package of bacon all at once.
Now, depending on how thick your bacon is and how hot your oven runs, it takes roughly 20-25 minutes at 375 degrees (I don't even pre-heat the oven) to bake the whole package at once!! No turning slices, no splattering in your oven, no bacon fat skin burns and no curly bacon....its magic!!

Start watching the bacon at about 20 minutes for regular thickness sliced bacon (I've never timed the thick sliced stuff). It comes out absolutely perfectly flat and Picky-picky husband who is one of the strictest bacon critics that I've ever met, gave this bacon BOTH thumbs up and raved about what a great texture and taste it had.....well, blow me over!!
Not only is this a wonderful way to cook mass amounts of bacon, but it leaves your entire cooking range free for whatever!!

NOTE: If you like super crispy bacon, just leave it in for an extra minute.

Sunday 8 April 2012

MAPLE PECAN PIE

Picky-picky husband quizzed me on what flavor pie I was making this morning and when I told him it was maple pecan, my "pecan pie purist" husband wrinkled up his nose and went silent...(no fear...I'm used to that response ha! ha!). However, I've noticed him cutting extra slices from the pie more than once today, so I'm guessing he approves (everyone else loved it too!!).

This recipe is a nice, sweet change from traditional pecan pie since it's made with real maple syrup and it goes together quick and easy!! 

2 teaspoons butter
1½ cups pecans
3 eggs
1 cup real maple syrup (not pancake syrup)
1/2 cup granulated sugar
1/3 cup melted butter
1 teaspoon vanilla extract
1/2 teaspoon maple extract
1/2 teaspoon salt

Melt 2 teaspoons of butter in a frying pan and toast the pecans for a couple of minutes. Be very careful because they burn FAST!! Let the toasted nuts cool for about 10 minutes before adding them to the pie filling.

Mix everything else in a large bowl, using a whisk to combine well.  Stir in the cooled pecans and pour this filling into an unbaked 9" pie shell.

Bake in a preheated 350 oven for 45 to 50 minutes or until the filling is set and puffs a little. My oven takes the full 50 minutes.  Cool to room temperature before slicing.

NOTE: The first time I made this pie, I didn't watch the pecans close enough and they scorched (an expensive lesson!!). So most of the time, I toast them in the oven while it is preheating (just to be safe).

Thursday 5 April 2012

VEGGIE CORN BREAD

This super MOIST and tasty (veggie filled) corn bread starts out with two of those little Jiffy corn bread mixes (what could be easier?) and feeds a crowd. It is equally delicious warm or at room temperature, so it is perfect for a pot luck or holiday brunch.
 
(2) boxes Jiffy corn muffin mix
4 eggs (beaten)
1½ sticks butter (melted)
(2) cups broccoli florets (chopped)
1 cup of frozen corn (thawed)
1 medium onion (chopped) saute until tender
1 cup cottage cheese
1/4  teaspoon dry red pepper flakes (or to taste)

Saute broccoli, corn and onion until tender, set aside. In large bowl, beat 4 eggs together and stir in melted butter, cottage cheese and pepper flakes. Add Jiffy mixes and stir until smooth. Gently stir in broccoli, corn and onion. Spread in a greased 9 x 13 baking dish and bake (375°) for 35 to 40 minutes or until lightly browned.

LOTS OF VEGGIES INSIDE

NOTE: Finely diced sweet red pepper is pretty in this cornbread too, but I was out of it.

Friday 30 March 2012

"HARD BOILED" EGGS FROM THE OVEN !!

There is nothing tricky about boiling eggs for Easter, but there are ALWAYS those eggs that crack as they boil, or the phone rings and you forget the eggs on the stove (and they overcook and  get those green "rings" around the yolks, etc.)  Not a big deal, but it can be a hassle when you are preparing for a crowd.

This oven method, of cooking eggs in the shell, is not only fool proof, but the eggs come out absolutely perfect and you can make a ba-jillion at once!!

Preheat your oven to 350 and place large size eggs in a mini-muffin pan (large end down). If you don't have a mini-muffin pan, you can use a regular cupcake pan  (they they will just roll around a little more).

How long you bake the eggs depends on the size of eggs you use and how hot your oven runs. I used large grade A eggs and cooked them for 25 minutes.  If you are concerned about it, just run a "test egg" to gauge how long to cook them.

When the eggs are done, use tongs to put the eggs into a bowl of ICE water (for 10 minutes) to stop further cooking.

NOTE: After the eggs are cooked, you MIGHT find SOME eggs that have brown speckles on them, but don't freak out; these little specks will dissolve when you put the eggs into the ice water. The next photo is before and after the ice water bath.

Not only is this a great way to cook Easter eggs in bulk, but the eggs are delicious!! The yolks are bright yellow and the whites are very tender (not rubbery like boiled eggs can produce).

Where has this cooking method been all my life!?!?

Wednesday 28 March 2012

BACON RISOTTO

There are huge "blind spots" in my cooking repertoire, like various herbs that I've never been introduced to, or spices that picky-picky husband refuses to eat and then there is always the financial restrictions that keep me from trying certain foods.

I'm not sure which of these categories risotto falls into (I've never even tasted it before today)  but I'm guessing that the $10 price tag for a 36 ounce jar of Arborio rice was part of the "hold up". I know I will be on a search for a more reasonable source, in the near future, for this specialty rice since we liked it so much.

This recipe came from allrecipes.com and it is absolutely delicious. I am really looking forward to reheating it for tomorrows lunch!!
1/2 pound bacon (fried, drained and crumbled)
5 cups chicken stock
2 tablespoons butter
1/2 onion, diced
4 cloves garlic, minced (see note)
1½ cups Arborio rice (do not use regular rice)
2 tablespoons butter
1/4 cup grated Parmesan cheese (not the powdered kind)
salt and pepper to taste

Bring the chicken stock to a boil in a sauce pan, over high heat; reduce the heat to low and keep the chicken stock hot.

Heat 2 tablespoons butter in a large, heavy bottomed saucepan over medium high heat.  Add the onion and garlic; cook and stir until the onion begins to turn golden brown at the edges, about 2 minutes. Add the rice and stir until it is coated in butter and has started to toast, about 2 or 3 minutes.

Reduce the heat to medium and stir in one third of the hot chicken stock; continue stirring until the rice has absorbed the liquid and turned creamy.

Repeat this process two more times, stirring constantly, which should take about 15-20 minutes total time. The rice should be tender but slightly firm when fully cooked.

Remove the risotto from the heat and stir in the remaining 2 tablespoons butter, the cheese and the crisp bacon. Season to taste with salt and pepper.

NOTE: As a first time risotto maker, I was nervous about making rice without using a lid on the pan, but it works great...just don't rush it.

NOTE: I wanted the bacon flavor to cook into the rice, so I put about half of the crisp bacon into the rice as it cooked, then mixed in the other half of the crisp bacon before serving. I will definitely do that again because it gave the rice a wonderful flavor.

NOTE: The recipe calls for four cloves of garlic, but that seems like a LOT. I didn't use any garlic because picky-picky is allergic to it.
These photos do not do this tasty side dish justice.