Saturday 22 September 2012

HANDY KITCHEN TIPS

I love handy kitchen tips, don't you?  I don't know how many times I've had one of those Homer Simpson "D'oh!!" moments when I see something that I never thought of...yet seems so obvious...like this tip:

Did you know that the plastic lid from a Parmesan container will also fit a regular mouth mason jar?  How handy is that !?!??


This next tip is super handy for gift wrapping season, never have to "find" the end of the tape....D'ho!!


Did you know that cranberry sauce freezes well? We are empty nesters and I hate opening a can of cranberry sauce, (or worse yet...make it) and then not be able to use it all.  I found that if you put it in a mason jar (with plenty of head room) it freezes well. It never freezes solid, so you can scoop out what you need (completely frozen it is still the consistency of ice cream) and then put the rest of the jar back in the freezer.  15-20 minutes at room temp or an hour in the fridge and it is just as good as fresh cranberry sauce!! We use a lot more these days (for baked chicken) because its always in the freezer!!

Remember Tang?  I buy it in gallon cans from Costco and once a month or so, I put 2 cups of it in my dishwasher and run a super hot cycle through. The dishwasher gets sparkling clean and smells fantastic!!

I buy ground beef in bulk packages, then divide and freeze it.  I found that if you wrap the ground beef (tightly) with plastic wrap BEFORE you put it into a Ziploc bag, there will be ZERO freezer burn or ice crystals. Also, since there is just the 2 of us, I divide the burger into a wide range of sizes...some as little as 1/4 pound; I then put all of the mini-packages into one big Ziploc bag and freeze...it works great and a lot less waste.

Do you need room temperature cream cheese in a hurry?  Take an 8 ounce block out of the wrapper and microwave it, on high, for 13 seconds. Do you need room temperature butter in a hurry?  Grate the butter onto a piece of waxed paper and let it sit for a few minutes.


This little refrigerator magnet, in the shape of a Pyrex measuring cup has been on my fridge for at least 20 years and I refer to it all of the time.  I've had it so long that I can't even remember where it came from, I just know that it has been ultra handy and has answered many cooking questions for me over the years. If you ever see one, or find a similar one...grab it, you will not be sorry.


Monday 17 September 2012

DAIRY FREE COLESLAW

There are a zillion coleslaw recipes on-line; there are creamy ones; there are spicy ones; there are slaws made with broccoli; I even saw one with Gorgonzola cheese the other day!! Personally, I have been looking for a basic, no frills, "please everyone" coleslaw recipe to make for large family gatherings.

In my search, I found this quick and easy "recipe gem" over at MGCC, and truly IS a keeper. Not only is it delicious, but there is no dairy in it and it lasts in the fridge for up to a week; as a matter of fact, it just keeps getting tastier and it goes well with everything!!

Thank you for sharing the recipe, Charlotte!!!


3 cups shredded cabbage
1/4 cup diced onion
1/4 cup diced green pepper
1 carrot shredded
3 tablespoons sugar
3 tablespoons vinegar
3 tablespoons oil
1/2 to 1 teaspoon salt
1/4 teaspoon black pepper (my variation)
1/2 teaspoon celery seed (my variation)

How small you chop the veggies is a matter of personal preference. We prefer pieces about twice the size of a grain of rice and my food processor (using the steel blade) makes short work of this step.

In a small saucepan, mix the sugar, vinegar, oil, salt, pepper and celery seed and bring to a boil, stirring just until sugar has dissolved then remove from the heat.

Pour the hot dressing over the vegetables and mix well.  Let this cool a little before covering it and putting it in the fridge to chill until ready to serve. 
NOTE: Toss salad again, just before serving to distribute the dressing.

NOTE: This recipe make four generous side servings (adult size).  When I make it for a crowd, I quadruple the recipe.

Wednesday 12 September 2012

BLUEBERRY-EST MUFFINS EVER !!

Blueberry-est...is that a word? Why yes, I think it is!! These muffins are super easy to make with just a bowl and spoon. They are ready for the oven before it even gets up to the right temperature and they are made with frozen blueberries (no need to thaw)...it doesn't get any easier than that AND... they are VERY moist and delicious.
 

1½ cups all purpose flour
3/4 cup granulated sugar
1/2 teaspoon salt
2 teaspoons baking powder
1/2 teaspoon cinnamon
1/3 cup vegetable oil
1 egg
1/3 cup milk
2 cups frozen blueberries

Preheat oven to 375 and line a cupcake pan with paper liners.

Mix the flour, sugar, salt, cinnamon and baking powder in a large bowl.  Place 1/3 cup of vegetable oil in a 1 cup measuring cup; add one egg to the same measuring cup; add enough milk to fill the same measuring cup (recipe says 1/3 cup...but it make take an extra tablespoon if you have a smaller egg... just make sure the egg, oil and milk equal 1 cup total). Mix with fork to break the egg.

Mix the egg,oil, milk mixture into the dry flour mixture, just until its all wet, don't over-mix, batter will be pretty thick, but don't add any more liquid. Stir in 2 cups frozen blueberries.

Fill paper liners 2/3 full (I used an ice cream scoop) and bake for 30-35 minutes or until done. Right after they come out of the oven, sprinkle each muffin with a pinch of sugar.

This recipe makes a dozen
blueberry muffins

Tuesday 11 September 2012

PEANUT BUTTER BROWNIES with CHOCOLATE-PEANUT BUTTER FROSTING

We are huge fans of peanut butter and chocolate together, are you? This peanut butter brownie has peanut butter and miniature chocolate chips in the batter and a peanut butter - chocolate frosting on top...oh my, it was good!!!


1½ cups all purpose flour
1 teaspoon baking powder
¼ teaspoon salt
6 tablespoons butter, room temperature
½ cup smooth peanut butter
2/3 cup granulated sugar
2/3 cup brown sugar
3 eggs
1 teaspoon vanilla extract
1 cup miniature semi-sweet chocolate chips

Preheat oven to 350 and spray a 8" x 11" baking dish with vegetable spray.

After you measure the flour, remove a tablespoon of it and toss it with the miniature chocolate chips...set aside (this will keep the chocolate chips from sinking in the batter as they bake).

Cream the peanut butter and room temperature butter until smooth.  Add the sugars, vanilla and eggs and beat until smooth with electric mixer.

Add the flour, baking powder and salt and beat on low until combined (don't over-beat). Stir in the flour coated miniature chocolate chips.

Spread in the prepared baking dish and bake 35-40 minutes. NOTE: At 35 minutes, my brownies looked a little dark, so I just shut the oven off and let them sit in there for another few minutes. Use toothpick to test for done-ness.

Remove from oven and place pan on a cooling rack for 20 minutes or so before frosting. 


If you let these frosted brownies cool completely, they will cut cleanly like this.  

I frosted these with my chocolate - peanut butter frosting...posted HERE

Saturday 1 September 2012

PEANUT BUTTER CHOCOLATE CHIP COOKIES

Picky picky husband loves anything peanut butter and I love anything chocolate; so I combined two of our favorite recipes and this cookie "was born".  It is a GREAT lunch box or picnic cookie, as they travel well and stay soft if you keep them in a lidded cookie jar.
1/2 cup butter flavored Crisco  (see note below)
1/2 cup creamy peanut butter (I use Jiff)
2 eggs
1 teaspoon vanilla extract
1/2 teaspoon salt
1 teaspoon baking soda
1/2 cup brown sugar
1/2 cup granulated sugar
2 ¼ cups all purpose flour
1/2 cup miniature chocolate chips
1 cup chopped pecans

Cream the butter flavored Crisco, peanut butter, eggs and vanilla until smooth and creamy. Add the sugars and mix well.

Add the flour, salt and baking soda and mix well. Stir in the miniature chocolate chips and pecans.

Roll into balls about the size of a walnut and bake on parchment paper lined baking sheet for 10-12 minutes (at 375 degrees) until they are very light golden around the edges.

They won't look quite "done" in the center, but trust me...they are.

NOTE: Some people freak out about using Crisco in cookies, however, 99.9% of the reports show that there is virtually zero difference between Crisco and butter when it comes to saturated fat, not to mention there is zero cholesterol in Crisco (something you can not say about butter).  Just make sure (for flavor sake) you use butter flavored Crisco.

I have no idea how these cookies turn out if you use all butter... I just know that in classic chocolate chip cookies, you get a super thin misshapen cookie if you use butter... but if you use butter flavored Crisco in that same recipe, you get a nice thick, perfectly round cookie.

NOTE: I like to use miniature chocolate chips in my cookies because they distribute in the batter well, however, regular size chocolate chips would work too.

Sunday 26 August 2012

CHOCOLATE PEANUT BUTTER FROSTING

This is a POSITIVELY DELICIOUS frosting recipe. What a nice variation from classic chocolate frosting!! It has a smooth, thick texture and tastes great by the spoonful!!


This is my new "go to" recipe for frosting snack cakes, brownies and cupcakes, it is quick, easy to make and tastes great!!

1/2 cup smooth peanut butter (I used Jiff)
1/2 cup unsweetened cocoa powder
1/4 teaspoon salt
1 teaspoon vanilla extract
1/2 - 3/4  cup half and half (see note)
2  2/3 cup confectioners sugar

Mix the peanut butter, cocoa powder, vanilla and a few tablespoons of the half and half until it is smooth and creamy.  Add the sugar, salt and the rest of the half and half (*see note below).   Beat with electric mixer until smooth and shiny.

That's it... what could be easier?!?  We LOVED this frosting!!

NOTE: The recipe said to start with half cup of the half and half and if you want it thinner, add the remaining 1/4 cup of half and half (one tablespoon at time)...beating until smooth.

Monday 13 August 2012

ZUCCHINI PICKLE RELISH

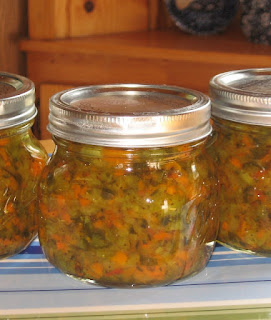
This time of year, there is an overabundance of zucchini, so I've been making relish out of it. A friend kindly gave me a wonderful recipe last year and I was thrilled with the outcome of my first pickling adventure. Unfortunately, I only made half of the recipe and we ran out quickly because we used it in EVERYTHING from tuna fish, to potato salad, to hot dogs, to you name it... you would NEVER guess it was made out of zucchini.

This season, I'm making TWO batches. I also (nervously) tweaked last years recipe a little with amazing results; we love this recipe, it has a perfect bread and butter pickle flavor.

12 cups unpeeled zucchini (chopped small)
3 cups sweet onion (chopped small)
1 cup celery (chopped small)
2 large red bell peppers (chopped small)
2 cups peeled carrots (chopped small)
1 cup pickling salt (see important note)
3 cups white vinegar
3 cups granulated sugar
2 teaspoons turmeric
2 teaspoons DRY mustard powder
1 tablespoon celery seed
1/2 teaspoon black pepper
1 tablespoon corn starch


Wash and dry the vegetables before cutting them (the only one you should peel is the carrot).  Coarsely chop the vegetables, then put them in the food processor (2 or 3 cups at a time) and pulse them a few times to get them small enough for a good relish (but not too small). The chop size should look like the next photo.


CLICK ON PHOTO TO ENLARGE
Measure the vegetables AFTER you chop them in the food processor.

Mix the small chopped vegetables and 1 cup of pickling salt. Place this mixture (covered) in fridge overnight (The salt will draw excess moisture out of the veggies).

IMPORTANT NOTE: After the vegetables have chilled overnight, it is VERY IMPORTANT that you rinse the salt off of them.  I used a colander and rinsed the veggies three times (in small batches). Whatever method you choose to rinse the salt off, just make sure you rinse, rinse, rinse then squeeze as much water out of the chopped veggies (with your hands) as you can. Set aside.

In a large, non-aluminum, pot, mix the vinegar, sugar, celery seed, spices and corn starch. Bring to a boil (to dissolve the sugar). Add all of the rinsed vegetables to the pot and bring BACK to a boil. Once it is boiling well, turn heat to medium low and gently boil everything for 20 minutes, stirring every five minutes or so.

While the relish is simmering, sterilize 7 pint jars and 7 (two piece) screw on lids. I do this by putting the jars through a hot cycle in my dishwasher (but I don't put the lids in there). Keep the jars in the (unopened) hot dishwasher after the last cycle.

For the lids, I just wash them with hot soapy water, rinse them well and then pour boiling water over them in a large saucepan which I keep warm on a burner.

Also, while the relish is simmering, bring your  hot water bath to a boil, here's how: Place a rack on the bottom of a large stock pot (or something to keep the jars up off of the bottom of the pan) and fill the pot with water (water should be deep enough to cover the jars by 2". Bring to full boil.

Now that your relish has boiled for 20 minutes, remove it from the heat and place it in the hot jars, leaving 1/4" space at the top of the jars (make sure there are no air pockets in the relish). Wipe the rims of the jars with a clean, hot, wet kitchen towel and screw on the two-piece lids fairly tight. Lower the jars into the already boiling water and keep them in there  10 minutes for half pint jars and 15 minutes for pint jars.

Remove from boiling water and let cool to room temperature on your kitchen counter. As they cool on your counter, you will hear the lids "pop" when they make the correct seal.  If they don't "pop", just keep them in the fridge.

NOTE: Do not use regular table salt for this recipe because the anti-caking agents in table salt cause the relish to discolor.  If you don't have pickling salt, the next best thing to use is kosher salt (but I highly recommend pickling salt).

NOTE: This recipe makes 7 pints of relish.